Mongodb Atlas MongoDB Identity Provider
This module sets up the identity provider configuration in MongoDB Atlas.
Due to limitations with MongoDB Atlas, users will not be automatically removed from MongoDB Atlas when they are removed from Authentik.
They will lose the ability to login, but you should be aware of the following caveats:
- If “Bypass SAML Mode” is enabled, users will be able to bypass Authentik and login directly to Atlas using their static usernames and passwords. As a result, we strongly recommend keeping the SSO Debug Mode input as
falseafter initial setup. - Any active session tokens that the user has with the Atlas web UI will not be automatically revoked. Until these tokens expire, the user may still have the ability to interact with the web UI unless you manually remove them from the Atlas organization.
- Atlas application keys are not scoped to a user’s account. If the user had access to these keys, they may still be able to access Atlas even after their account is removed. As a result, ensure that you rotate application keys if removing a user in the
superusersorprivileged_engineersgroup (and any other group configured with access to application keys).
Panfactum Role to MongoDB Atlas Role Mapping
This document outlines the default role mappings between Panfactum Roles and MongoDB Atlas Roles. The mappings ensure that users in Panfactum have appropriate permissions in MongoDB Atlas, maintaining security and role-based access control.
For more details on MongoDB Atlas roles, refer to the official documentation:
MongoDB Atlas User Roles
| Panfactum Role | MongoDB Atlas Role(s) | Reason for Mapping |
|---|---|---|
| superusers | ORG_OWNER | Superusers require full administrative access to the MongoDB Atlas organization, including user management, billing, and resource creation. |
| privileged_engineers | ORG_OWNER | Privileged engineers act as admins, enabling them to fully manage Atlas independently without relying on Panfactum. |
| billing_admins | ORG_BILLING_ADMIN | Billing admins manage payment details and invoices but do not need full administrative control over the organization. |
| engineers | ORG_READ_ONLY | Engineers require read-only access to view Atlas organization settings but cannot modify any configurations. |
| restricted_engineers | ORG_MEMBER | Restricted engineers have basic membership access, allowing them to work within assigned projects but without organization-wide privileges. |
Guide
Pre-req: Setup MongoDB Atlas Identity Provider Domain Verification
- Go to your MongoDB Atlas account
- Go to
Organization Settings->Federated Authentication Settings->Domains - Click on
Add Domain
- Add the root domain that you are using for Authentik (i.e., panfactum.com)
- Select
DNS Recordas the verification method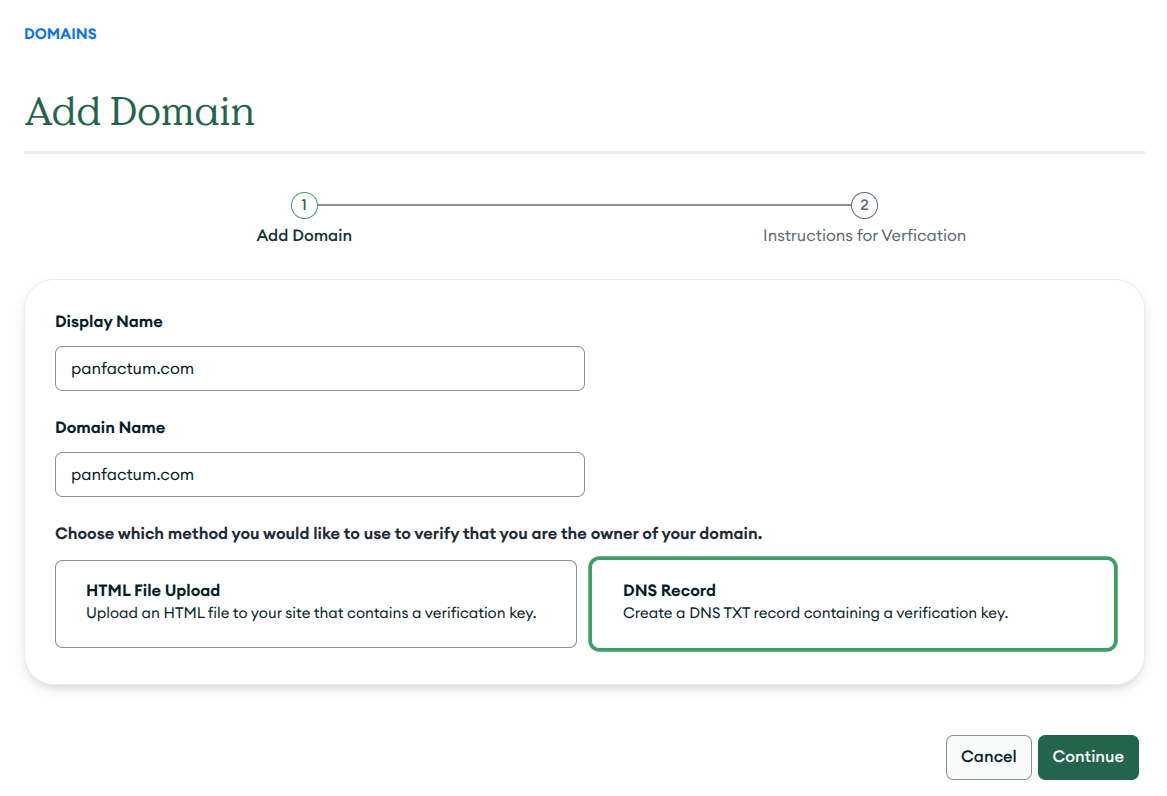
- Note the
TXT Recordthat is generated. You will need this value in future steps.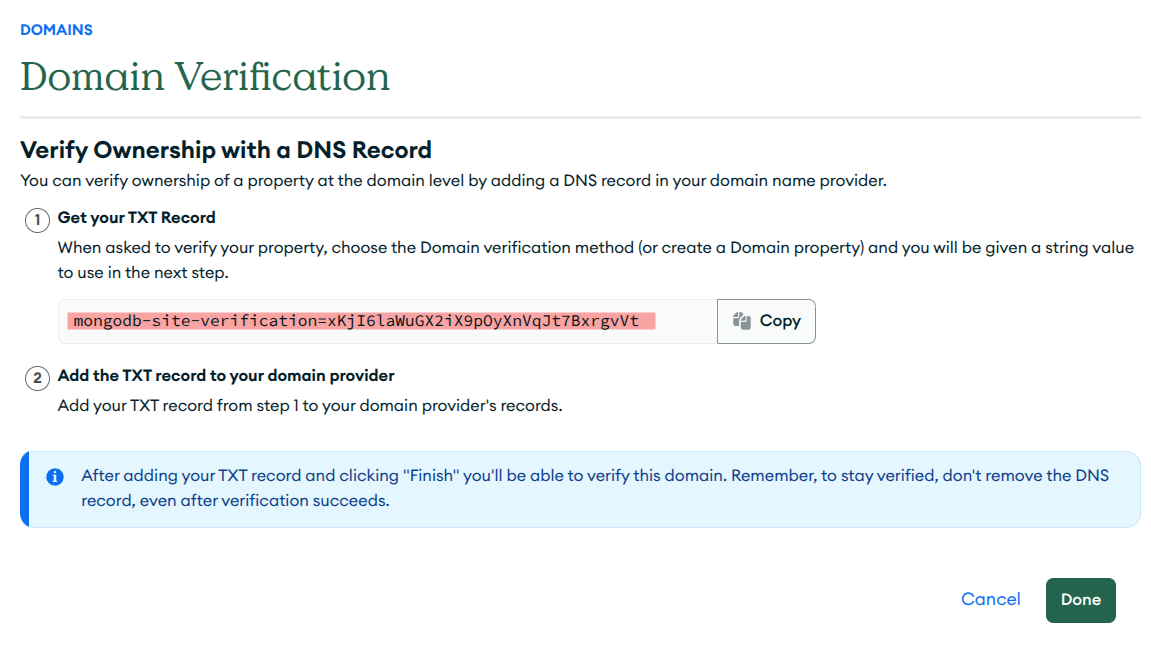
Deploy a new DNS TXT Record & Verify
Add a text record to your
production/global/aws_dns/terragrunt.hclfile that looks like this:include "panfactum" {path = find_in_parent_folders("panfactum.hcl")expose = true}terraform {source = include.panfactum.locals.pf_stack_source}inputs = {zones = {// Replace with the domain from// "Setup MongoDB Atlas Identity Provider Domain Verification""REPLACE_ME" = {txt_records = [{subdomain = ""records = ["mongodb-site-verification=REPLACE_ME", // MongoDB Atlas SSO]}]}}}Run
terragrunt applyGo back to MongoDB Atlas and click on
Verifynext to the domain you addedConfirm verification
Download the Signing Certificate from Authentik
Before proceeding, make sure to have downloaded the signing certificate from the Authentik application
- Login to your Authentik instance
- Switch over to the
Adminsection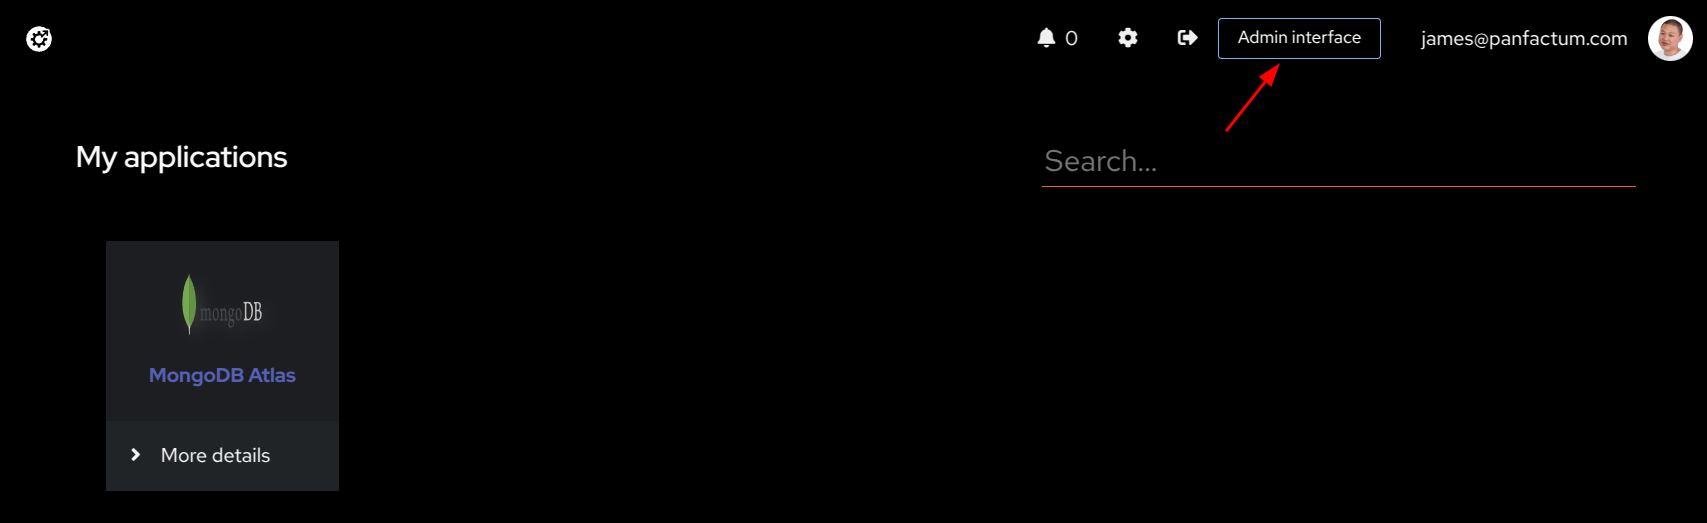
- Go to the section
Applications->Providers->MongoDB Atlas - Find
Related objectsand click on theDownloadbutton for theDownload signing certificate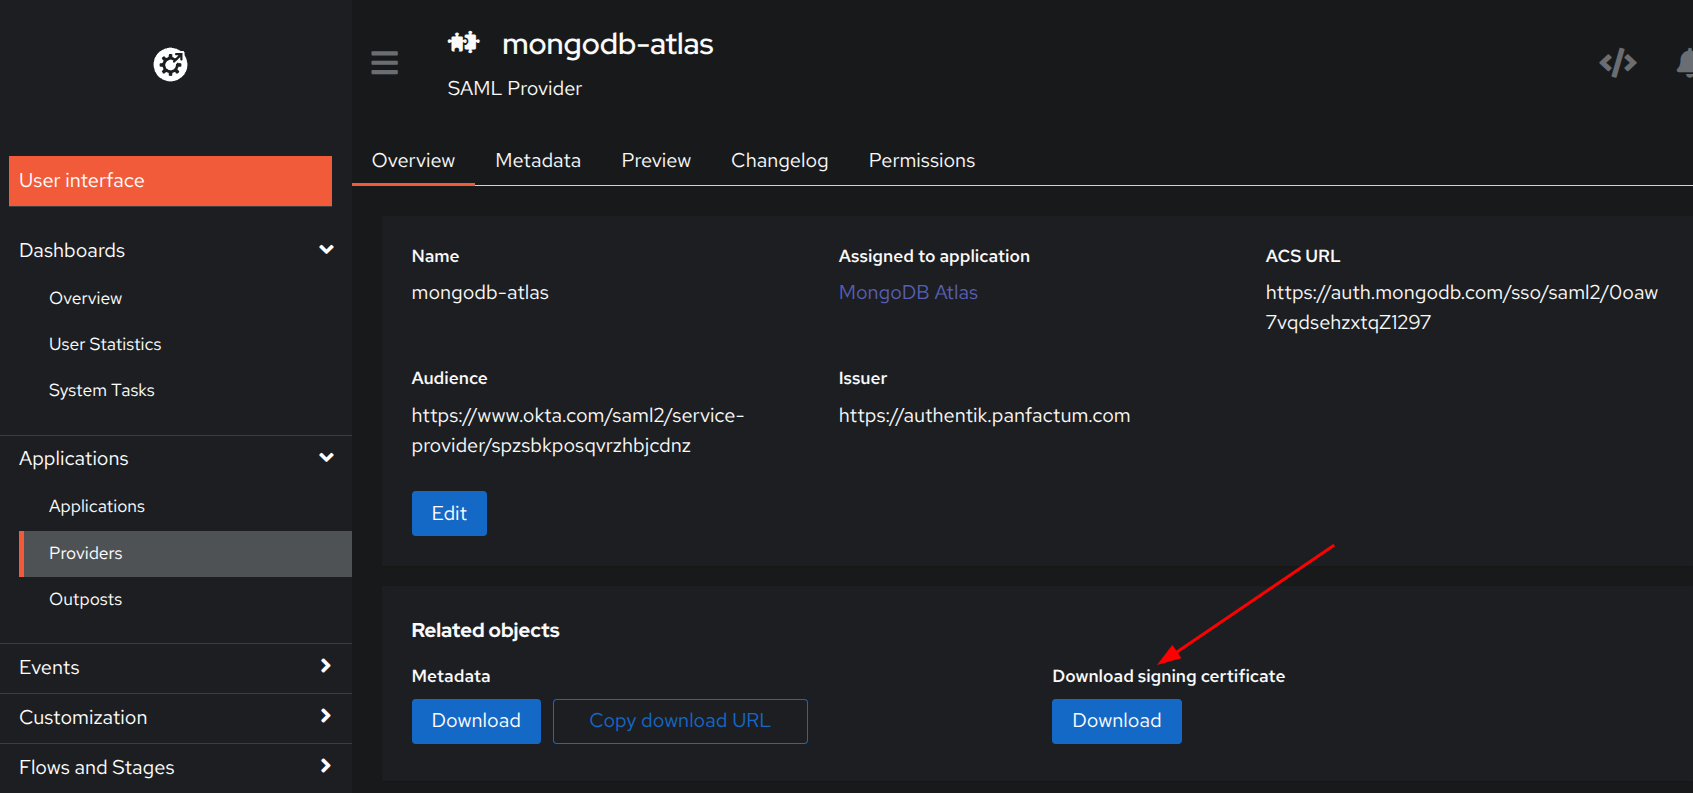
Deploy the MongoDB Identity Provider module
Unfortunately, the terraform provider for MongoDB Atlas does not support the creation of the Identity Provider but allows for modifications. We will first create the resource through the UI and then import it to configure further.
1. From MongoDB Atlas UI
- Go to
Organization Settings - Note the
Organization ID. You will need this value in future steps. - Go to
Federated Authentication Settings->Identity Providers - Click on
Configure Identity Provider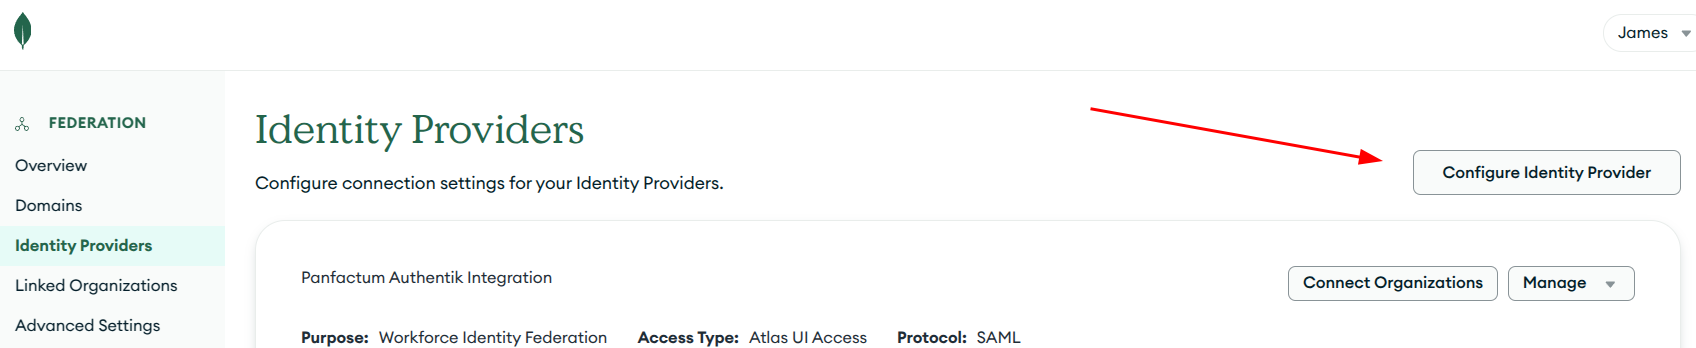
- Select
Workforce Identity Federation - Select
SAML for Atlas UI Access - Set a Name such as
Authentik Integration - Click on
Fill with placeholder valuesfor the Issuer URI and Single Sign-On URL
- Upload the
Signing Certificatethat we downloaded above - Set the
Request BindingtoHTTP-POST - Set the
Response Signature AlgorithmtoSHA-256 - Continue to the next step and note these values as you will need them in future steps.
ACS URLAudience URIIdP IDFederation Settings ID(Found in the urlhttps://cloud.mongodb.com/v2#/federation/<this-is-your-federation-settings-id>/overview)
2. Create Access Keys
- Go to
Organization Settings->Access Manager - Click on
Applicationstab - Click on
Add new - Set the description to
terraform - Set the Organization Permission to
Organization Owner - Save the public and private key to your
.envfile- Set
MONGODB_ATLAS_PUBLIC_KEY - Set
MONGODB_ATLAS_PRIVATE_KEY
- Set
3. From the terminal
Add a new a
mongodb_atlas_identity_providerfolder adjacent to yourauthentik_core_resourcesfolderAdd a new a
terragrunt.hclfile that looks like this:include "panfactum" {path = find_in_parent_folders("panfactum.hcl")expose = true}terraform {source = include.panfactum.locals.pf_stack_source}dependency "authentik_atlas_mongodb_sso" {config_path = "../authentik_mongodb_atlas_sso"}inputs = {issuer_url = dependency.authentik_atlas_mongodb_sso.outputs.issuer_urlsso_url = dependency.authentik_atlas_mongodb_sso.outputs.url_sso_post// Set to "Organization ID" from step 1.2// Example: 679ac9030691076f53402259organization_id = "REPLACE_ME"// Set to "Federation Settings ID" from step 1.12// Example: 679ac90e37161e292db2780efederation_settings_id = "REPLACE_ME"// Set to "IdP ID" from step 1.12// Example: 67a80b37499ddf3676fa8f2bidp_id = "REPLACE_ME"// Set to the domain you verified in the prerequisite step:// "Setup MongoDB Atlas Identity Provider Domain Verification"// Example: panfactum.comassociated_domains = [REPLACE_ME]sso_debug_enabled = true}Run
pf-tf-initRun
terragrunt apply
4. CICD (Optional)
If you have CICD setup and are deploying infrastructure using the wf_tf_deploy module, you will also need to pass in the keys:
module "tf_deploy" { source = "${var.pf_module_source}wf_tf_deploy${var.pf_module_ref}"
name = "tf-deploy" namespace = local.namespace
# This is the repository url for that contains your terragrunt configuration files repo = "github.com/panfactum/stack"
# All modules in this directory of the repository will be deployed tf_apply_dir = "environments/production/us-east-2"
# These secrets will be exposed as environment variables during the # `terragrunt apply`. This can be used to supply credentials to # the OpenTofu providers. secrets = { AUTHENTIK_TOKEN = var.authentik_token MONGODB_ATLAS_PUBLIC_KEY = var.mongodb_atlas_public_key MONGODB_ATLAS_PRIVATE_KEY = var.mongodb_atlas_private_key }}5. Finish Authentik Setup
If you are following the authentik_mongodb_atlas_sso module guide, please return and resume the Sync Authentik with the Atlas Settings section.
Disable SSO Bypass
You MUST verify that SSO works prior to disabling the bypass. Disabling this toggle will lock you out of your MongoDB Atlas account if you have not configured SSO correctly. If you do lock yourself out, rest assured you can still recover by contacting their support, but it can take 1-2 days.
After you have confirmed and validated that SSO is working through Authentik, disable the Bypass SAML Mode toggle by removing the sso_debug_enabled in the mongodb_atlas_identity_provider module.
include "panfactum" {   path   = find_in_parent_folders("panfactum.hcl")   expose = true}
terraform {   source = include.panfactum.locals.pf_stack_source}
dependency "authentik_atlas_mongodb_sso" {   config_path = "../authentik_mongodb_atlas_sso"}
inputs = {   issuer_url = dependency.authentik_atlas_mongodb_sso.outputs.issuer_url   sso_url    = dependency.authentik_atlas_mongodb_sso.outputs.url_sso_post
   // Set to "Organization ID" from step 1.2   // Example: 679ac9030691076f53402259   organization_id = "REPLACE_ME"
   // Set to "Federation Settings ID" from step 1.12   // Example: 679ac90e37161e292db2780e   federation_settings_id = "REPLACE_ME"
   // Set to "IdP ID" from step 1.12   // Example: 67a80b37499ddf3676fa8f2b   idp_id = "REPLACE_ME"
   // Set to the domain you verified in the prerequisite step:   // "Setup MongoDB Atlas Identity Provider Domain Verification"   // Example: panfactum.com   associated_domains = [REPLACE_ME]
sso_debug_enabled = true}Providers
The following providers are needed by this module:
authentik (2024.8.4)
mongodbatlas (1.26.1)
Required Inputs
The following input variables are required:
federation_settings_id
Description: The IDP ID from MongoDB Atlas
Type: string
idp_id
Description: The IDP ID from MongoDB Atlas
Type: string
issuer_url
Description: The issuer URL
Type: string
organization_id
Description: ID of the MongoDB Atlas organization
Type: string
sso_url
Description: The SSO URL
Type: string
Optional Inputs
The following input variables are optional (have default values):
active
Description: The status of the identity provider in MongoDB Atlas. Setting to false will disable the identity provider and SSO will not function.
Type: bool
Default: true
associated_domains
Description: The domains associated with the identity provider
Type: list(string)
Default: []
extra_role_mappings
Description: Extra authentik roles to map to MongoDB Atlas roles. {<panfactum role> => [<mongodb role>, ...]}
Type: map(list(string))
Default: {}
name
Description: The name of the identity provider
Type: string
Default: "Panfactum Authentik Integration"
sso_debug_enabled
Description: Enable SSO debug. This allows users to login with a password bypassing the SSO flow.
Type: bool
Default: false
Outputs
The following outputs are exported:
acs_url
Description: Assertion consumer service URL to which the IdP sends the SAML response
Maintainer Notes
No notes