Kubernetes Cluster
Deploy a Kubernetes cluster on AWS EKS using our aws_eks module.
A Quick Note
This is the first infrastructure component that will begin to incur nontrivial cost. EKS costs at minimum $75 / month, and we recommend planning for at minimum $150 / month / cluster.
To save costs during the bootstrapping process you can follow the Kubernetes Cluster Suspension Guide to suspend resources and resume as you are setting up your cluster.
Configure Pull Through Cache
Many of the utilities we will run on the cluster are distributed as images from public registries such as quay.io, ghcr.io, docker.io, or registry.k8s.io. The cluster’s ability to download these images is critical to its operational resiliency. Unfortunately, public registries have several downsides:
They can and frequently do experience service disruptions
Many impose rate limits to the amount of images any IP is allowed to download in a given time window
Image downloads tend to be large and are subject to the bandwidth limitations of the upstream registry as well the intermediate network infrastructure
To address these problems, we will configure a pull through cache using AWS ECR. Conceptually this works as follows:
%20AppleWebKit%2F537.36%20(KHTML%2C%20like%20Gecko)%20draw.io%2F22.1.18%20Chrome%2F120.0.6099.216%20Electron%2F28.1.4%20Safari%2F537.36%26quot%3B%20etag%3D%26quot%3B8CTxfCBiarObEwZDXRPe%26quot%3B%20version%3D%26quot%3B22.1.18%26quot%3B%20type%3D%26quot%3Bdevice%26quot%3B%26gt%3B%26%2310%3B%20%20%26lt%3Bdiagram%20name%3D%26quot%3BPage-1%26quot%3B%20id%3D%26quot%3BVpfTYLxNYxg76RwLspR5%26quot%3B%26gt%3B%26%2310%3B%20%20%20%20%26lt%3BmxGraphModel%20dx%3D%26quot%3B1044%26quot%3B%20dy%3D%26quot%3B1427%26quot%3B%20grid%3D%26quot%3B1%26quot%3B%20gridSize%3D%26quot%3B10%26quot%3B%20guides%3D%26quot%3B1%26quot%3B%20tooltips%3D%26quot%3B1%26quot%3B%20connect%3D%26quot%3B1%26quot%3B%20arrows%3D%26quot%3B1%26quot%3B%20fold%3D%26quot%3B1%26quot%3B%20page%3D%26quot%3B1%26quot%3B%20pageScale%3D%26quot%3B1%26quot%3B%20pageWidth%3D%26quot%3B1200%26quot%3B%20pageHeight%3D%26quot%3B1600%26quot%3B%20math%3D%26quot%3B0%26quot%3B%20shadow%3D%26quot%3B0%26quot%3B%26gt%3B%26%2310%3B%20%20%20%20%20%20%26lt%3Broot%26gt%3B%26%2310%3B%20%20%20%20%20%20%20%20%26lt%3BmxCell%20id%3D%26quot%3B0%26quot%3B%20%2F%26gt%3B%26%2310%3B%20%20%20%20%20%20%20%20%26lt%3BmxCell%20id%3D%26quot%3B1%26quot%3B%20parent%3D%26quot%3B0%26quot%3B%20%2F%26gt%3B%26%2310%3B%20%20%20%20%20%20%20%20%26lt%3BmxCell%20id%3D%26quot%3B1VFkoUJbtm8M1T-ZW6xZ-23%26quot%3B%20value%3D%26quot%3B%26quot%3B%20style%3D%26quot%3Brounded%3D0%3BwhiteSpace%3Dwrap%3Bhtml%3D1%3BfillColor%3Dnone%3Bdashed%3D1%3BdashPattern%3D1%204%3B%26quot%3B%20vertex%3D%26quot%3B1%26quot%3B%20parent%3D%26quot%3B1%26quot%3B%26gt%3B%26%2310%3B%20%20%20%20%20%20%20%20%20%20%26lt%3BmxGeometry%20x%3D%26quot%3B50%26quot%3B%20y%3D%26quot%3B530%26quot%3B%20width%3D%26quot%3B500%26quot%3B%20height%3D%26quot%3B350%26quot%3B%20as%3D%26quot%3Bgeometry%26quot%3B%20%2F%26gt%3B%26%2310%3B%20%20%20%20%20%20%20%20%26lt%3B%2FmxCell%26gt%3B%26%2310%3B%20%20%20%20%20%20%20%20%26lt%3BmxCell%20id%3D%26quot%3B1VFkoUJbtm8M1T-ZW6xZ-15%26quot%3B%20value%3D%26quot%3B%26quot%3B%20style%3D%26quot%3Brounded%3D0%3BwhiteSpace%3Dwrap%3Bhtml%3D1%3BstrokeColor%3Ddefault%3BfillColor%3Dnone%3B%26quot%3B%20vertex%3D%26quot%3B1%26quot%3B%20parent%3D%26quot%3B1%26quot%3B%26gt%3B%26%2310%3B%20%20%20%20%20%20%20%20%20%20%26lt%3BmxGeometry%20x%3D%26quot%3B70%26quot%3B%20y%3D%26quot%3B710%26quot%3B%20width%3D%26quot%3B470%26quot%3B%20height%3D%26quot%3B160%26quot%3B%20as%3D%26quot%3Bgeometry%26quot%3B%20%2F%26gt%3B%26%2310%3B%20%20%20%20%20%20%20%20%26lt%3B%2FmxCell%26gt%3B%26%2310%3B%20%20%20%20%20%20%20%20%26lt%3BmxCell%20id%3D%26quot%3B1VFkoUJbtm8M1T-ZW6xZ-5%26quot%3B%20value%3D%26quot%3BECR%26quot%3B%20style%3D%26quot%3Bshape%3Dcylinder3%3BwhiteSpace%3Dwrap%3Bhtml%3D1%3BboundedLbl%3D1%3BbackgroundOutline%3D1%3Bsize%3D15%3B%26quot%3B%20vertex%3D%26quot%3B1%26quot%3B%20parent%3D%26quot%3B1%26quot%3B%26gt%3B%26%2310%3B%20%20%20%20%20%20%20%20%20%20%26lt%3BmxGeometry%20x%3D%26quot%3B380%26quot%3B%20y%3D%26quot%3B550%26quot%3B%20width%3D%26quot%3B140%26quot%3B%20height%3D%26quot%3B130%26quot%3B%20as%3D%26quot%3Bgeometry%26quot%3B%20%2F%26gt%3B%26%2310%3B%20%20%20%20%20%20%20%20%26lt%3B%2FmxCell%26gt%3B%26%2310%3B%20%20%20%20%20%20%20%20%26lt%3BmxCell%20id%3D%26quot%3B1VFkoUJbtm8M1T-ZW6xZ-7%26quot%3B%20value%3D%26quot%3BAWS%20Account%26quot%3B%20style%3D%26quot%3Btext%3Bhtml%3D1%3BstrokeColor%3Dnone%3BfillColor%3Dnone%3Balign%3Dcenter%3BverticalAlign%3Dmiddle%3BwhiteSpace%3Dwrap%3Brounded%3D0%3B%26quot%3B%20vertex%3D%26quot%3B1%26quot%3B%20parent%3D%26quot%3B1%26quot%3B%26gt%3B%26%2310%3B%20%20%20%20%20%20%20%20%20%20%26lt%3BmxGeometry%20x%3D%26quot%3B60%26quot%3B%20y%3D%26quot%3B540%26quot%3B%20width%3D%26quot%3B100%26quot%3B%20height%3D%26quot%3B30%26quot%3B%20as%3D%26quot%3Bgeometry%26quot%3B%20%2F%26gt%3B%26%2310%3B%20%20%20%20%20%20%20%20%26lt%3B%2FmxCell%26gt%3B%26%2310%3B%20%20%20%20%20%20%20%20%26lt%3BmxCell%20id%3D%26quot%3B1VFkoUJbtm8M1T-ZW6xZ-8%26quot%3B%20value%3D%26quot%3B%26quot%3B%20style%3D%26quot%3Bgroup%26quot%3B%20vertex%3D%26quot%3B1%26quot%3B%20connectable%3D%26quot%3B0%26quot%3B%20parent%3D%26quot%3B1%26quot%3B%26gt%3B%26%2310%3B%20%20%20%20%20%20%20%20%20%20%26lt%3BmxGeometry%20x%3D%26quot%3B90%26quot%3B%20y%3D%26quot%3B745%26quot%3B%20width%3D%26quot%3B120%26quot%3B%20height%3D%26quot%3B110%26quot%3B%20as%3D%26quot%3Bgeometry%26quot%3B%20%2F%26gt%3B%26%2310%3B%20%20%20%20%20%20%20%20%26lt%3B%2FmxCell%26gt%3B%26%2310%3B%20%20%20%20%20%20%20%20%26lt%3BmxCell%20id%3D%26quot%3B1VFkoUJbtm8M1T-ZW6xZ-2%26quot%3B%20value%3D%26quot%3B%26quot%3B%20style%3D%26quot%3Brounded%3D0%3BwhiteSpace%3Dwrap%3Bhtml%3D1%3B%26quot%3B%20vertex%3D%26quot%3B1%26quot%3B%20parent%3D%26quot%3B1VFkoUJbtm8M1T-ZW6xZ-8%26quot%3B%26gt%3B%26%2310%3B%20%20%20%20%20%20%20%20%20%20%26lt%3BmxGeometry%20width%3D%26quot%3B120%26quot%3B%20height%3D%26quot%3B110%26quot%3B%20as%3D%26quot%3Bgeometry%26quot%3B%20%2F%26gt%3B%26%2310%3B%20%20%20%20%20%20%20%20%26lt%3B%2FmxCell%26gt%3B%26%2310%3B%20%20%20%20%20%20%20%20%26lt%3BmxCell%20id%3D%26quot%3B1VFkoUJbtm8M1T-ZW6xZ-3%26quot%3B%20value%3D%26quot%3BCluster%20Node%26quot%3B%20style%3D%26quot%3Btext%3Bhtml%3D1%3BstrokeColor%3Dnone%3BfillColor%3Dnone%3Balign%3Dcenter%3BverticalAlign%3Dmiddle%3BwhiteSpace%3Dwrap%3Brounded%3D0%3B%26quot%3B%20vertex%3D%26quot%3B1%26quot%3B%20parent%3D%26quot%3B1VFkoUJbtm8M1T-ZW6xZ-8%26quot%3B%26gt%3B%26%2310%3B%20%20%20%20%20%20%20%20%20%20%26lt%3BmxGeometry%20x%3D%26quot%3B20%26quot%3B%20y%3D%26quot%3B40%26quot%3B%20width%3D%26quot%3B80%26quot%3B%20height%3D%26quot%3B30%26quot%3B%20as%3D%26quot%3Bgeometry%26quot%3B%20%2F%26gt%3B%26%2310%3B%20%20%20%20%20%20%20%20%26lt%3B%2FmxCell%26gt%3B%26%2310%3B%20%20%20%20%20%20%20%20%26lt%3BmxCell%20id%3D%26quot%3B1VFkoUJbtm8M1T-ZW6xZ-9%26quot%3B%20value%3D%26quot%3B%26quot%3B%20style%3D%26quot%3Bgroup%26quot%3B%20vertex%3D%26quot%3B1%26quot%3B%20connectable%3D%26quot%3B0%26quot%3B%20parent%3D%26quot%3B1%26quot%3B%26gt%3B%26%2310%3B%20%20%20%20%20%20%20%20%20%20%26lt%3BmxGeometry%20x%3D%26quot%3B240%26quot%3B%20y%3D%26quot%3B745%26quot%3B%20width%3D%26quot%3B120%26quot%3B%20height%3D%26quot%3B110%26quot%3B%20as%3D%26quot%3Bgeometry%26quot%3B%20%2F%26gt%3B%26%2310%3B%20%20%20%20%20%20%20%20%26lt%3B%2FmxCell%26gt%3B%26%2310%3B%20%20%20%20%20%20%20%20%26lt%3BmxCell%20id%3D%26quot%3B1VFkoUJbtm8M1T-ZW6xZ-10%26quot%3B%20value%3D%26quot%3B%26quot%3B%20style%3D%26quot%3Brounded%3D0%3BwhiteSpace%3Dwrap%3Bhtml%3D1%3B%26quot%3B%20vertex%3D%26quot%3B1%26quot%3B%20parent%3D%26quot%3B1VFkoUJbtm8M1T-ZW6xZ-9%26quot%3B%26gt%3B%26%2310%3B%20%20%20%20%20%20%20%20%20%20%26lt%3BmxGeometry%20width%3D%26quot%3B120%26quot%3B%20height%3D%26quot%3B110%26quot%3B%20as%3D%26quot%3Bgeometry%26quot%3B%20%2F%26gt%3B%26%2310%3B%20%20%20%20%20%20%20%20%26lt%3B%2FmxCell%26gt%3B%26%2310%3B%20%20%20%20%20%20%20%20%26lt%3BmxCell%20id%3D%26quot%3B1VFkoUJbtm8M1T-ZW6xZ-11%26quot%3B%20value%3D%26quot%3BCluster%20Node%26quot%3B%20style%3D%26quot%3Btext%3Bhtml%3D1%3BstrokeColor%3Dnone%3BfillColor%3Dnone%3Balign%3Dcenter%3BverticalAlign%3Dmiddle%3BwhiteSpace%3Dwrap%3Brounded%3D0%3B%26quot%3B%20vertex%3D%26quot%3B1%26quot%3B%20parent%3D%26quot%3B1VFkoUJbtm8M1T-ZW6xZ-9%26quot%3B%26gt%3B%26%2310%3B%20%20%20%20%20%20%20%20%20%20%26lt%3BmxGeometry%20x%3D%26quot%3B20%26quot%3B%20y%3D%26quot%3B40%26quot%3B%20width%3D%26quot%3B80%26quot%3B%20height%3D%26quot%3B30%26quot%3B%20as%3D%26quot%3Bgeometry%26quot%3B%20%2F%26gt%3B%26%2310%3B%20%20%20%20%20%20%20%20%26lt%3B%2FmxCell%26gt%3B%26%2310%3B%20%20%20%20%20%20%20%20%26lt%3BmxCell%20id%3D%26quot%3B1VFkoUJbtm8M1T-ZW6xZ-12%26quot%3B%20value%3D%26quot%3B%26quot%3B%20style%3D%26quot%3Bgroup%26quot%3B%20vertex%3D%26quot%3B1%26quot%3B%20connectable%3D%26quot%3B0%26quot%3B%20parent%3D%26quot%3B1%26quot%3B%26gt%3B%26%2310%3B%20%20%20%20%20%20%20%20%20%20%26lt%3BmxGeometry%20x%3D%26quot%3B390%26quot%3B%20y%3D%26quot%3B745%26quot%3B%20width%3D%26quot%3B120%26quot%3B%20height%3D%26quot%3B110%26quot%3B%20as%3D%26quot%3Bgeometry%26quot%3B%20%2F%26gt%3B%26%2310%3B%20%20%20%20%20%20%20%20%26lt%3B%2FmxCell%26gt%3B%26%2310%3B%20%20%20%20%20%20%20%20%26lt%3BmxCell%20id%3D%26quot%3B1VFkoUJbtm8M1T-ZW6xZ-13%26quot%3B%20value%3D%26quot%3B%26quot%3B%20style%3D%26quot%3Brounded%3D0%3BwhiteSpace%3Dwrap%3Bhtml%3D1%3B%26quot%3B%20vertex%3D%26quot%3B1%26quot%3B%20parent%3D%26quot%3B1VFkoUJbtm8M1T-ZW6xZ-12%26quot%3B%26gt%3B%26%2310%3B%20%20%20%20%20%20%20%20%20%20%26lt%3BmxGeometry%20width%3D%26quot%3B120%26quot%3B%20height%3D%26quot%3B110%26quot%3B%20as%3D%26quot%3Bgeometry%26quot%3B%20%2F%26gt%3B%26%2310%3B%20%20%20%20%20%20%20%20%26lt%3B%2FmxCell%26gt%3B%26%2310%3B%20%20%20%20%20%20%20%20%26lt%3BmxCell%20id%3D%26quot%3B1VFkoUJbtm8M1T-ZW6xZ-14%26quot%3B%20value%3D%26quot%3BCluster%20Node%26quot%3B%20style%3D%26quot%3Btext%3Bhtml%3D1%3BstrokeColor%3Dnone%3BfillColor%3Dnone%3Balign%3Dcenter%3BverticalAlign%3Dmiddle%3BwhiteSpace%3Dwrap%3Brounded%3D0%3B%26quot%3B%20vertex%3D%26quot%3B1%26quot%3B%20parent%3D%26quot%3B1VFkoUJbtm8M1T-ZW6xZ-12%26quot%3B%26gt%3B%26%2310%3B%20%20%20%20%20%20%20%20%20%20%26lt%3BmxGeometry%20x%3D%26quot%3B20%26quot%3B%20y%3D%26quot%3B40%26quot%3B%20width%3D%26quot%3B80%26quot%3B%20height%3D%26quot%3B30%26quot%3B%20as%3D%26quot%3Bgeometry%26quot%3B%20%2F%26gt%3B%26%2310%3B%20%20%20%20%20%20%20%20%26lt%3B%2FmxCell%26gt%3B%26%2310%3B%20%20%20%20%20%20%20%20%26lt%3BmxCell%20id%3D%26quot%3B1VFkoUJbtm8M1T-ZW6xZ-16%26quot%3B%20value%3D%26quot%3BKubernetes%20Cluster%20(EKS)%26quot%3B%20style%3D%26quot%3Btext%3Bhtml%3D1%3BstrokeColor%3Dnone%3BfillColor%3Dnone%3Balign%3Dcenter%3BverticalAlign%3Dmiddle%3BwhiteSpace%3Dwrap%3Brounded%3D0%3B%26quot%3B%20vertex%3D%26quot%3B1%26quot%3B%20parent%3D%26quot%3B1%26quot%3B%26gt%3B%26%2310%3B%20%20%20%20%20%20%20%20%20%20%26lt%3BmxGeometry%20x%3D%26quot%3B70%26quot%3B%20y%3D%26quot%3B710%26quot%3B%20width%3D%26quot%3B160%26quot%3B%20height%3D%26quot%3B30%26quot%3B%20as%3D%26quot%3Bgeometry%26quot%3B%20%2F%26gt%3B%26%2310%3B%20%20%20%20%20%20%20%20%26lt%3B%2FmxCell%26gt%3B%26%2310%3B%20%20%20%20%20%20%20%20%26lt%3BmxCell%20id%3D%26quot%3B1VFkoUJbtm8M1T-ZW6xZ-24%26quot%3B%20value%3D%26quot%3BDocker%20Hub%26quot%3B%20style%3D%26quot%3Bshape%3Dcylinder3%3BwhiteSpace%3Dwrap%3Bhtml%3D1%3BboundedLbl%3D1%3BbackgroundOutline%3D1%3Bsize%3D15%3B%26quot%3B%20vertex%3D%26quot%3B1%26quot%3B%20parent%3D%26quot%3B1%26quot%3B%26gt%3B%26%2310%3B%20%20%20%20%20%20%20%20%20%20%26lt%3BmxGeometry%20x%3D%26quot%3B630%26quot%3B%20y%3D%26quot%3B530%26quot%3B%20width%3D%26quot%3B90%26quot%3B%20height%3D%26quot%3B110%26quot%3B%20as%3D%26quot%3Bgeometry%26quot%3B%20%2F%26gt%3B%26%2310%3B%20%20%20%20%20%20%20%20%26lt%3B%2FmxCell%26gt%3B%26%2310%3B%20%20%20%20%20%20%20%20%26lt%3BmxCell%20id%3D%26quot%3B1VFkoUJbtm8M1T-ZW6xZ-25%26quot%3B%20value%3D%26quot%3BGithub%20Container%20Registry%26quot%3B%20style%3D%26quot%3Bshape%3Dcylinder3%3BwhiteSpace%3Dwrap%3Bhtml%3D1%3BboundedLbl%3D1%3BbackgroundOutline%3D1%3Bsize%3D15%3B%26quot%3B%20vertex%3D%26quot%3B1%26quot%3B%20parent%3D%26quot%3B1%26quot%3B%26gt%3B%26%2310%3B%20%20%20%20%20%20%20%20%20%20%26lt%3BmxGeometry%20x%3D%26quot%3B630%26quot%3B%20y%3D%26quot%3B650%26quot%3B%20width%3D%26quot%3B90%26quot%3B%20height%3D%26quot%3B110%26quot%3B%20as%3D%26quot%3Bgeometry%26quot%3B%20%2F%26gt%3B%26%2310%3B%20%20%20%20%20%20%20%20%26lt%3B%2FmxCell%26gt%3B%26%2310%3B%20%20%20%20%20%20%20%20%26lt%3BmxCell%20id%3D%26quot%3B1VFkoUJbtm8M1T-ZW6xZ-26%26quot%3B%20value%3D%26quot%3BQuay.io%26quot%3B%20style%3D%26quot%3Bshape%3Dcylinder3%3BwhiteSpace%3Dwrap%3Bhtml%3D1%3BboundedLbl%3D1%3BbackgroundOutline%3D1%3Bsize%3D15%3B%26quot%3B%20vertex%3D%26quot%3B1%26quot%3B%20parent%3D%26quot%3B1%26quot%3B%26gt%3B%26%2310%3B%20%20%20%20%20%20%20%20%20%20%26lt%3BmxGeometry%20x%3D%26quot%3B630%26quot%3B%20y%3D%26quot%3B770%26quot%3B%20width%3D%26quot%3B90%26quot%3B%20height%3D%26quot%3B110%26quot%3B%20as%3D%26quot%3Bgeometry%26quot%3B%20%2F%26gt%3B%26%2310%3B%20%20%20%20%20%20%20%20%26lt%3B%2FmxCell%26gt%3B%26%2310%3B%20%20%20%20%20%20%20%20%26lt%3BmxCell%20id%3D%26quot%3B1VFkoUJbtm8M1T-ZW6xZ-28%26quot%3B%20value%3D%26quot%3B%26quot%3B%20style%3D%26quot%3BendArrow%3Dclassic%3Bhtml%3D1%3Brounded%3D0%3BentryX%3D1%3BentryY%3D0%3BentryDx%3D0%3BentryDy%3D0%3BexitX%3D0.5%3BexitY%3D1%3BexitDx%3D0%3BexitDy%3D0%3BexitPerimeter%3D0%3B%26quot%3B%20edge%3D%26quot%3B1%26quot%3B%20parent%3D%26quot%3B1%26quot%3B%20source%3D%26quot%3B1VFkoUJbtm8M1T-ZW6xZ-5%26quot%3B%20target%3D%26quot%3B1VFkoUJbtm8M1T-ZW6xZ-2%26quot%3B%26gt%3B%26%2310%3B%20%20%20%20%20%20%20%20%20%20%26lt%3BmxGeometry%20width%3D%26quot%3B50%26quot%3B%20height%3D%26quot%3B50%26quot%3B%20relative%3D%26quot%3B1%26quot%3B%20as%3D%26quot%3Bgeometry%26quot%3B%26gt%3B%26%2310%3B%20%20%20%20%20%20%20%20%20%20%20%20%26lt%3BmxPoint%20x%3D%26quot%3B440%26quot%3B%20y%3D%26quot%3B510%26quot%3B%20as%3D%26quot%3BsourcePoint%26quot%3B%20%2F%26gt%3B%26%2310%3B%20%20%20%20%20%20%20%20%20%20%20%20%26lt%3BmxPoint%20x%3D%26quot%3B490%26quot%3B%20y%3D%26quot%3B460%26quot%3B%20as%3D%26quot%3BtargetPoint%26quot%3B%20%2F%26gt%3B%26%2310%3B%20%20%20%20%20%20%20%20%20%20%26lt%3B%2FmxGeometry%26gt%3B%26%2310%3B%20%20%20%20%20%20%20%20%26lt%3B%2FmxCell%26gt%3B%26%2310%3B%20%20%20%20%20%20%20%20%26lt%3BmxCell%20id%3D%26quot%3B1VFkoUJbtm8M1T-ZW6xZ-29%26quot%3B%20value%3D%26quot%3B%26quot%3B%20style%3D%26quot%3BendArrow%3Dclassic%3Bhtml%3D1%3Brounded%3D0%3BentryX%3D0.5%3BentryY%3D0%3BentryDx%3D0%3BentryDy%3D0%3BexitX%3D0.5%3BexitY%3D1%3BexitDx%3D0%3BexitDy%3D0%3BexitPerimeter%3D0%3B%26quot%3B%20edge%3D%26quot%3B1%26quot%3B%20parent%3D%26quot%3B1%26quot%3B%20source%3D%26quot%3B1VFkoUJbtm8M1T-ZW6xZ-5%26quot%3B%20target%3D%26quot%3B1VFkoUJbtm8M1T-ZW6xZ-10%26quot%3B%26gt%3B%26%2310%3B%20%20%20%20%20%20%20%20%20%20%26lt%3BmxGeometry%20width%3D%26quot%3B50%26quot%3B%20height%3D%26quot%3B50%26quot%3B%20relative%3D%26quot%3B1%26quot%3B%20as%3D%26quot%3Bgeometry%26quot%3B%26gt%3B%26%2310%3B%20%20%20%20%20%20%20%20%20%20%20%20%26lt%3BmxPoint%20x%3D%26quot%3B450%26quot%3B%20y%3D%26quot%3B620%26quot%3B%20as%3D%26quot%3BsourcePoint%26quot%3B%20%2F%26gt%3B%26%2310%3B%20%20%20%20%20%20%20%20%20%20%20%20%26lt%3BmxPoint%20x%3D%26quot%3B220%26quot%3B%20y%3D%26quot%3B755%26quot%3B%20as%3D%26quot%3BtargetPoint%26quot%3B%20%2F%26gt%3B%26%2310%3B%20%20%20%20%20%20%20%20%20%20%26lt%3B%2FmxGeometry%26gt%3B%26%2310%3B%20%20%20%20%20%20%20%20%26lt%3B%2FmxCell%26gt%3B%26%2310%3B%20%20%20%20%20%20%20%20%26lt%3BmxCell%20id%3D%26quot%3B1VFkoUJbtm8M1T-ZW6xZ-30%26quot%3B%20value%3D%26quot%3B%26quot%3B%20style%3D%26quot%3BendArrow%3Dclassic%3Bhtml%3D1%3Brounded%3D0%3BentryX%3D0.5%3BentryY%3D0%3BentryDx%3D0%3BentryDy%3D0%3BexitX%3D0.5%3BexitY%3D1%3BexitDx%3D0%3BexitDy%3D0%3BexitPerimeter%3D0%3B%26quot%3B%20edge%3D%26quot%3B1%26quot%3B%20parent%3D%26quot%3B1%26quot%3B%20source%3D%26quot%3B1VFkoUJbtm8M1T-ZW6xZ-5%26quot%3B%20target%3D%26quot%3B1VFkoUJbtm8M1T-ZW6xZ-13%26quot%3B%26gt%3B%26%2310%3B%20%20%20%20%20%20%20%20%20%20%26lt%3BmxGeometry%20width%3D%26quot%3B50%26quot%3B%20height%3D%26quot%3B50%26quot%3B%20relative%3D%26quot%3B1%26quot%3B%20as%3D%26quot%3Bgeometry%26quot%3B%26gt%3B%26%2310%3B%20%20%20%20%20%20%20%20%20%20%20%20%26lt%3BmxPoint%20x%3D%26quot%3B450%26quot%3B%20y%3D%26quot%3B620%26quot%3B%20as%3D%26quot%3BsourcePoint%26quot%3B%20%2F%26gt%3B%26%2310%3B%20%20%20%20%20%20%20%20%20%20%20%20%26lt%3BmxPoint%20x%3D%26quot%3B310%26quot%3B%20y%3D%26quot%3B755%26quot%3B%20as%3D%26quot%3BtargetPoint%26quot%3B%20%2F%26gt%3B%26%2310%3B%20%20%20%20%20%20%20%20%20%20%26lt%3B%2FmxGeometry%26gt%3B%26%2310%3B%20%20%20%20%20%20%20%20%26lt%3B%2FmxCell%26gt%3B%26%2310%3B%20%20%20%20%20%20%20%20%26lt%3BmxCell%20id%3D%26quot%3B1VFkoUJbtm8M1T-ZW6xZ-31%26quot%3B%20value%3D%26quot%3B%26quot%3B%20style%3D%26quot%3BendArrow%3Dclassic%3Bhtml%3D1%3Brounded%3D0%3BexitX%3D-0.035%3BexitY%3D0.559%3BexitDx%3D0%3BexitDy%3D0%3BexitPerimeter%3D0%3BentryX%3D1%3BentryY%3D0.5%3BentryDx%3D0%3BentryDy%3D0%3BentryPerimeter%3D0%3B%26quot%3B%20edge%3D%26quot%3B1%26quot%3B%20parent%3D%26quot%3B1%26quot%3B%20source%3D%26quot%3B1VFkoUJbtm8M1T-ZW6xZ-24%26quot%3B%20target%3D%26quot%3B1VFkoUJbtm8M1T-ZW6xZ-5%26quot%3B%26gt%3B%26%2310%3B%20%20%20%20%20%20%20%20%20%20%26lt%3BmxGeometry%20width%3D%26quot%3B50%26quot%3B%20height%3D%26quot%3B50%26quot%3B%20relative%3D%26quot%3B1%26quot%3B%20as%3D%26quot%3Bgeometry%26quot%3B%26gt%3B%26%2310%3B%20%20%20%20%20%20%20%20%20%20%20%20%26lt%3BmxPoint%20x%3D%26quot%3B440%26quot%3B%20y%3D%26quot%3B510%26quot%3B%20as%3D%26quot%3BsourcePoint%26quot%3B%20%2F%26gt%3B%26%2310%3B%20%20%20%20%20%20%20%20%20%20%20%20%26lt%3BmxPoint%20x%3D%26quot%3B490%26quot%3B%20y%3D%26quot%3B460%26quot%3B%20as%3D%26quot%3BtargetPoint%26quot%3B%20%2F%26gt%3B%26%2310%3B%20%20%20%20%20%20%20%20%20%20%26lt%3B%2FmxGeometry%26gt%3B%26%2310%3B%20%20%20%20%20%20%20%20%26lt%3B%2FmxCell%26gt%3B%26%2310%3B%20%20%20%20%20%20%20%20%26lt%3BmxCell%20id%3D%26quot%3B1VFkoUJbtm8M1T-ZW6xZ-32%26quot%3B%20value%3D%26quot%3B%26quot%3B%20style%3D%26quot%3BendArrow%3Dclassic%3Bhtml%3D1%3Brounded%3D0%3BexitX%3D0%3BexitY%3D0.5%3BexitDx%3D0%3BexitDy%3D0%3BexitPerimeter%3D0%3B%26quot%3B%20edge%3D%26quot%3B1%26quot%3B%20parent%3D%26quot%3B1%26quot%3B%20source%3D%26quot%3B1VFkoUJbtm8M1T-ZW6xZ-25%26quot%3B%26gt%3B%26%2310%3B%20%20%20%20%20%20%20%20%20%20%26lt%3BmxGeometry%20width%3D%26quot%3B50%26quot%3B%20height%3D%26quot%3B50%26quot%3B%20relative%3D%26quot%3B1%26quot%3B%20as%3D%26quot%3Bgeometry%26quot%3B%26gt%3B%26%2310%3B%20%20%20%20%20%20%20%20%20%20%20%20%26lt%3BmxPoint%20x%3D%26quot%3B637%26quot%3B%20y%3D%26quot%3B601%26quot%3B%20as%3D%26quot%3BsourcePoint%26quot%3B%20%2F%26gt%3B%26%2310%3B%20%20%20%20%20%20%20%20%20%20%20%20%26lt%3BmxPoint%20x%3D%26quot%3B520%26quot%3B%20y%3D%26quot%3B627%26quot%3B%20as%3D%26quot%3BtargetPoint%26quot%3B%20%2F%26gt%3B%26%2310%3B%20%20%20%20%20%20%20%20%20%20%26lt%3B%2FmxGeometry%26gt%3B%26%2310%3B%20%20%20%20%20%20%20%20%26lt%3B%2FmxCell%26gt%3B%26%2310%3B%20%20%20%20%20%20%20%20%26lt%3BmxCell%20id%3D%26quot%3B1VFkoUJbtm8M1T-ZW6xZ-33%26quot%3B%20value%3D%26quot%3B%26quot%3B%20style%3D%26quot%3BendArrow%3Dclassic%3Bhtml%3D1%3Brounded%3D0%3BexitX%3D0%3BexitY%3D0.5%3BexitDx%3D0%3BexitDy%3D0%3BexitPerimeter%3D0%3BentryX%3D1%3BentryY%3D0%3BentryDx%3D0%3BentryDy%3D90%3BentryPerimeter%3D0%3B%26quot%3B%20edge%3D%26quot%3B1%26quot%3B%20parent%3D%26quot%3B1%26quot%3B%20source%3D%26quot%3B1VFkoUJbtm8M1T-ZW6xZ-26%26quot%3B%20target%3D%26quot%3B1VFkoUJbtm8M1T-ZW6xZ-5%26quot%3B%26gt%3B%26%2310%3B%20%20%20%20%20%20%20%20%20%20%26lt%3BmxGeometry%20width%3D%26quot%3B50%26quot%3B%20height%3D%26quot%3B50%26quot%3B%20relative%3D%26quot%3B1%26quot%3B%20as%3D%26quot%3Bgeometry%26quot%3B%26gt%3B%26%2310%3B%20%20%20%20%20%20%20%20%20%20%20%20%26lt%3BmxPoint%20x%3D%26quot%3B640%26quot%3B%20y%3D%26quot%3B715%26quot%3B%20as%3D%26quot%3BsourcePoint%26quot%3B%20%2F%26gt%3B%26%2310%3B%20%20%20%20%20%20%20%20%20%20%20%20%26lt%3BmxPoint%20x%3D%26quot%3B530%26quot%3B%20y%3D%26quot%3B625%26quot%3B%20as%3D%26quot%3BtargetPoint%26quot%3B%20%2F%26gt%3B%26%2310%3B%20%20%20%20%20%20%20%20%20%20%26lt%3B%2FmxGeometry%26gt%3B%26%2310%3B%20%20%20%20%20%20%20%20%26lt%3B%2FmxCell%26gt%3B%26%2310%3B%20%20%20%20%20%20%26lt%3B%2Froot%26gt%3B%26%2310%3B%20%20%20%20%26lt%3B%2FmxGraphModel%26gt%3B%26%2310%3B%20%20%26lt%3B%2Fdiagram%26gt%3B%26%2310%3B%26lt%3B%2Fmxfile%26gt%3B%26%2310%3B%22%3E%3Cdefs%2F%3E%3Cg%3E%3Crect%20x%3D%220%22%20y%3D%220%22%20width%3D%22500%22%20height%3D%22350%22%20fill%3D%22none%22%20stroke%3D%22rgb(0%2C%200%2C%200)%22%20stroke-dasharray%3D%221%204%22%20pointer-events%3D%22all%22%2F%3E%3Crect%20x%3D%2220%22%20y%3D%22180%22%20width%3D%22470%22%20height%3D%22160%22%20fill%3D%22none%22%20stroke%3D%22rgb(0%2C%200%2C%200)%22%20pointer-events%3D%22all%22%2F%3E%3Cpath%20d%3D%22M%20330%2035%20C%20330%2026.72%20361.34%2020%20400%2020%20C%20418.57%2020%20436.37%2021.58%20449.5%2024.39%20C%20462.63%2027.21%20470%2031.02%20470%2035%20L%20470%20135%20C%20470%20143.28%20438.66%20150%20400%20150%20C%20361.34%20150%20330%20143.28%20330%20135%20Z%22%20fill%3D%22rgb(255%2C%20255%2C%20255)%22%20stroke%3D%22rgb(0%2C%200%2C%200)%22%20stroke-miterlimit%3D%2210%22%20pointer-events%3D%22all%22%2F%3E%3Cpath%20d%3D%22M%20470%2035%20C%20470%2043.28%20438.66%2050%20400%2050%20C%20361.34%2050%20330%2043.28%20330%2035%22%20fill%3D%22none%22%20stroke%3D%22rgb(0%2C%200%2C%200)%22%20stroke-miterlimit%3D%2210%22%20pointer-events%3D%22all%22%2F%3E%3Cg%20transform%3D%22translate(-0.5%20-0.5)%22%3E%3Cswitch%3E%3CforeignObject%20pointer-events%3D%22none%22%20width%3D%22100%25%22%20height%3D%22100%25%22%20requiredFeatures%3D%22http%3A%2F%2Fwww.w3.org%2FTR%2FSVG11%2Ffeature%23Extensibility%22%20style%3D%22overflow%3A%20visible%3B%20text-align%3A%20left%3B%22%3E%3Cdiv%20xmlns%3D%22http%3A%2F%2Fwww.w3.org%2F1999%2Fxhtml%22%20style%3D%22display%3A%20flex%3B%20align-items%3A%20unsafe%20center%3B%20justify-content%3A%20unsafe%20center%3B%20width%3A%20138px%3B%20height%3A%201px%3B%20padding-top%3A%2098px%3B%20margin-left%3A%20331px%3B%22%3E%3Cdiv%20data-drawio-colors%3D%22color%3A%20rgb(0%2C%200%2C%200)%3B%20%22%20style%3D%22box-sizing%3A%20border-box%3B%20font-size%3A%200px%3B%20text-align%3A%20center%3B%22%3E%3Cdiv%20style%3D%22display%3A%20inline-block%3B%20font-size%3A%2012px%3B%20font-family%3A%20Helvetica%3B%20color%3A%20rgb(0%2C%200%2C%200)%3B%20line-height%3A%201.2%3B%20pointer-events%3A%20all%3B%20white-space%3A%20normal%3B%20overflow-wrap%3A%20normal%3B%22%3EECR%3C%2Fdiv%3E%3C%2Fdiv%3E%3C%2Fdiv%3E%3C%2FforeignObject%3E%3Ctext%20x%3D%22400%22%20y%3D%22102%22%20fill%3D%22rgb(0%2C%200%2C%200)%22%20font-family%3D%22Helvetica%22%20font-size%3D%2212px%22%20text-anchor%3D%22middle%22%3EECR%3C%2Ftext%3E%3C%2Fswitch%3E%3C%2Fg%3E%3Crect%20x%3D%2210%22%20y%3D%2210%22%20width%3D%22100%22%20height%3D%2230%22%20fill%3D%22none%22%20stroke%3D%22none%22%20pointer-events%3D%22all%22%2F%3E%3Cg%20transform%3D%22translate(-0.5%20-0.5)%22%3E%3Cswitch%3E%3CforeignObject%20pointer-events%3D%22none%22%20width%3D%22100%25%22%20height%3D%22100%25%22%20requiredFeatures%3D%22http%3A%2F%2Fwww.w3.org%2FTR%2FSVG11%2Ffeature%23Extensibility%22%20style%3D%22overflow%3A%20visible%3B%20text-align%3A%20left%3B%22%3E%3Cdiv%20xmlns%3D%22http%3A%2F%2Fwww.w3.org%2F1999%2Fxhtml%22%20style%3D%22display%3A%20flex%3B%20align-items%3A%20unsafe%20center%3B%20justify-content%3A%20unsafe%20center%3B%20width%3A%2098px%3B%20height%3A%201px%3B%20padding-top%3A%2025px%3B%20margin-left%3A%2011px%3B%22%3E%3Cdiv%20data-drawio-colors%3D%22color%3A%20rgb(0%2C%200%2C%200)%3B%20%22%20style%3D%22box-sizing%3A%20border-box%3B%20font-size%3A%200px%3B%20text-align%3A%20center%3B%22%3E%3Cdiv%20style%3D%22display%3A%20inline-block%3B%20font-size%3A%2012px%3B%20font-family%3A%20Helvetica%3B%20color%3A%20rgb(0%2C%200%2C%200)%3B%20line-height%3A%201.2%3B%20pointer-events%3A%20all%3B%20white-space%3A%20normal%3B%20overflow-wrap%3A%20normal%3B%22%3EAWS%20Account%3C%2Fdiv%3E%3C%2Fdiv%3E%3C%2Fdiv%3E%3C%2FforeignObject%3E%3Ctext%20x%3D%2260%22%20y%3D%2229%22%20fill%3D%22rgb(0%2C%200%2C%200)%22%20font-family%3D%22Helvetica%22%20font-size%3D%2212px%22%20text-anchor%3D%22middle%22%3EAWS%20Account%3C%2Ftext%3E%3C%2Fswitch%3E%3C%2Fg%3E%3Crect%20x%3D%2240%22%20y%3D%22215%22%20width%3D%22120%22%20height%3D%22110%22%20fill%3D%22rgb(255%2C%20255%2C%20255)%22%20stroke%3D%22rgb(0%2C%200%2C%200)%22%20pointer-events%3D%22all%22%2F%3E%3Crect%20x%3D%2260%22%20y%3D%22255%22%20width%3D%2280%22%20height%3D%2230%22%20fill%3D%22none%22%20stroke%3D%22none%22%20pointer-events%3D%22all%22%2F%3E%3Cg%20transform%3D%22translate(-0.5%20-0.5)%22%3E%3Cswitch%3E%3CforeignObject%20pointer-events%3D%22none%22%20width%3D%22100%25%22%20height%3D%22100%25%22%20requiredFeatures%3D%22http%3A%2F%2Fwww.w3.org%2FTR%2FSVG11%2Ffeature%23Extensibility%22%20style%3D%22overflow%3A%20visible%3B%20text-align%3A%20left%3B%22%3E%3Cdiv%20xmlns%3D%22http%3A%2F%2Fwww.w3.org%2F1999%2Fxhtml%22%20style%3D%22display%3A%20flex%3B%20align-items%3A%20unsafe%20center%3B%20justify-content%3A%20unsafe%20center%3B%20width%3A%2078px%3B%20height%3A%201px%3B%20padding-top%3A%20270px%3B%20margin-left%3A%2061px%3B%22%3E%3Cdiv%20data-drawio-colors%3D%22color%3A%20rgb(0%2C%200%2C%200)%3B%20%22%20style%3D%22box-sizing%3A%20border-box%3B%20font-size%3A%200px%3B%20text-align%3A%20center%3B%22%3E%3Cdiv%20style%3D%22display%3A%20inline-block%3B%20font-size%3A%2012px%3B%20font-family%3A%20Helvetica%3B%20color%3A%20rgb(0%2C%200%2C%200)%3B%20line-height%3A%201.2%3B%20pointer-events%3A%20all%3B%20white-space%3A%20normal%3B%20overflow-wrap%3A%20normal%3B%22%3ECluster%20Node%3C%2Fdiv%3E%3C%2Fdiv%3E%3C%2Fdiv%3E%3C%2FforeignObject%3E%3Ctext%20x%3D%22100%22%20y%3D%22274%22%20fill%3D%22rgb(0%2C%200%2C%200)%22%20font-family%3D%22Helvetica%22%20font-size%3D%2212px%22%20text-anchor%3D%22middle%22%3ECluster%20Node%3C%2Ftext%3E%3C%2Fswitch%3E%3C%2Fg%3E%3Crect%20x%3D%22190%22%20y%3D%22215%22%20width%3D%22120%22%20height%3D%22110%22%20fill%3D%22rgb(255%2C%20255%2C%20255)%22%20stroke%3D%22rgb(0%2C%200%2C%200)%22%20pointer-events%3D%22all%22%2F%3E%3Crect%20x%3D%22210%22%20y%3D%22255%22%20width%3D%2280%22%20height%3D%2230%22%20fill%3D%22none%22%20stroke%3D%22none%22%20pointer-events%3D%22all%22%2F%3E%3Cg%20transform%3D%22translate(-0.5%20-0.5)%22%3E%3Cswitch%3E%3CforeignObject%20pointer-events%3D%22none%22%20width%3D%22100%25%22%20height%3D%22100%25%22%20requiredFeatures%3D%22http%3A%2F%2Fwww.w3.org%2FTR%2FSVG11%2Ffeature%23Extensibility%22%20style%3D%22overflow%3A%20visible%3B%20text-align%3A%20left%3B%22%3E%3Cdiv%20xmlns%3D%22http%3A%2F%2Fwww.w3.org%2F1999%2Fxhtml%22%20style%3D%22display%3A%20flex%3B%20align-items%3A%20unsafe%20center%3B%20justify-content%3A%20unsafe%20center%3B%20width%3A%2078px%3B%20height%3A%201px%3B%20padding-top%3A%20270px%3B%20margin-left%3A%20211px%3B%22%3E%3Cdiv%20data-drawio-colors%3D%22color%3A%20rgb(0%2C%200%2C%200)%3B%20%22%20style%3D%22box-sizing%3A%20border-box%3B%20font-size%3A%200px%3B%20text-align%3A%20center%3B%22%3E%3Cdiv%20style%3D%22display%3A%20inline-block%3B%20font-size%3A%2012px%3B%20font-family%3A%20Helvetica%3B%20color%3A%20rgb(0%2C%200%2C%200)%3B%20line-height%3A%201.2%3B%20pointer-events%3A%20all%3B%20white-space%3A%20normal%3B%20overflow-wrap%3A%20normal%3B%22%3ECluster%20Node%3C%2Fdiv%3E%3C%2Fdiv%3E%3C%2Fdiv%3E%3C%2FforeignObject%3E%3Ctext%20x%3D%22250%22%20y%3D%22274%22%20fill%3D%22rgb(0%2C%200%2C%200)%22%20font-family%3D%22Helvetica%22%20font-size%3D%2212px%22%20text-anchor%3D%22middle%22%3ECluster%20Node%3C%2Ftext%3E%3C%2Fswitch%3E%3C%2Fg%3E%3Crect%20x%3D%22340%22%20y%3D%22215%22%20width%3D%22120%22%20height%3D%22110%22%20fill%3D%22rgb(255%2C%20255%2C%20255)%22%20stroke%3D%22rgb(0%2C%200%2C%200)%22%20pointer-events%3D%22all%22%2F%3E%3Crect%20x%3D%22360%22%20y%3D%22255%22%20width%3D%2280%22%20height%3D%2230%22%20fill%3D%22none%22%20stroke%3D%22none%22%20pointer-events%3D%22all%22%2F%3E%3Cg%20transform%3D%22translate(-0.5%20-0.5)%22%3E%3Cswitch%3E%3CforeignObject%20pointer-events%3D%22none%22%20width%3D%22100%25%22%20height%3D%22100%25%22%20requiredFeatures%3D%22http%3A%2F%2Fwww.w3.org%2FTR%2FSVG11%2Ffeature%23Extensibility%22%20style%3D%22overflow%3A%20visible%3B%20text-align%3A%20left%3B%22%3E%3Cdiv%20xmlns%3D%22http%3A%2F%2Fwww.w3.org%2F1999%2Fxhtml%22%20style%3D%22display%3A%20flex%3B%20align-items%3A%20unsafe%20center%3B%20justify-content%3A%20unsafe%20center%3B%20width%3A%2078px%3B%20height%3A%201px%3B%20padding-top%3A%20270px%3B%20margin-left%3A%20361px%3B%22%3E%3Cdiv%20data-drawio-colors%3D%22color%3A%20rgb(0%2C%200%2C%200)%3B%20%22%20style%3D%22box-sizing%3A%20border-box%3B%20font-size%3A%200px%3B%20text-align%3A%20center%3B%22%3E%3Cdiv%20style%3D%22display%3A%20inline-block%3B%20font-size%3A%2012px%3B%20font-family%3A%20Helvetica%3B%20color%3A%20rgb(0%2C%200%2C%200)%3B%20line-height%3A%201.2%3B%20pointer-events%3A%20all%3B%20white-space%3A%20normal%3B%20overflow-wrap%3A%20normal%3B%22%3ECluster%20Node%3C%2Fdiv%3E%3C%2Fdiv%3E%3C%2Fdiv%3E%3C%2FforeignObject%3E%3Ctext%20x%3D%22400%22%20y%3D%22274%22%20fill%3D%22rgb(0%2C%200%2C%200)%22%20font-family%3D%22Helvetica%22%20font-size%3D%2212px%22%20text-anchor%3D%22middle%22%3ECluster%20Node%3C%2Ftext%3E%3C%2Fswitch%3E%3C%2Fg%3E%3Crect%20x%3D%2220%22%20y%3D%22180%22%20width%3D%22160%22%20height%3D%2230%22%20fill%3D%22none%22%20stroke%3D%22none%22%20pointer-events%3D%22all%22%2F%3E%3Cg%20transform%3D%22translate(-0.5%20-0.5)%22%3E%3Cswitch%3E%3CforeignObject%20pointer-events%3D%22none%22%20width%3D%22100%25%22%20height%3D%22100%25%22%20requiredFeatures%3D%22http%3A%2F%2Fwww.w3.org%2FTR%2FSVG11%2Ffeature%23Extensibility%22%20style%3D%22overflow%3A%20visible%3B%20text-align%3A%20left%3B%22%3E%3Cdiv%20xmlns%3D%22http%3A%2F%2Fwww.w3.org%2F1999%2Fxhtml%22%20style%3D%22display%3A%20flex%3B%20align-items%3A%20unsafe%20center%3B%20justify-content%3A%20unsafe%20center%3B%20width%3A%20158px%3B%20height%3A%201px%3B%20padding-top%3A%20195px%3B%20margin-left%3A%2021px%3B%22%3E%3Cdiv%20data-drawio-colors%3D%22color%3A%20rgb(0%2C%200%2C%200)%3B%20%22%20style%3D%22box-sizing%3A%20border-box%3B%20font-size%3A%200px%3B%20text-align%3A%20center%3B%22%3E%3Cdiv%20style%3D%22display%3A%20inline-block%3B%20font-size%3A%2012px%3B%20font-family%3A%20Helvetica%3B%20color%3A%20rgb(0%2C%200%2C%200)%3B%20line-height%3A%201.2%3B%20pointer-events%3A%20all%3B%20white-space%3A%20normal%3B%20overflow-wrap%3A%20normal%3B%22%3EKubernetes%20Cluster%20(EKS)%3C%2Fdiv%3E%3C%2Fdiv%3E%3C%2Fdiv%3E%3C%2FforeignObject%3E%3Ctext%20x%3D%22100%22%20y%3D%22199%22%20fill%3D%22rgb(0%2C%200%2C%200)%22%20font-family%3D%22Helvetica%22%20font-size%3D%2212px%22%20text-anchor%3D%22middle%22%3EKubernetes%20Cluster%20(EKS)%3C%2Ftext%3E%3C%2Fswitch%3E%3C%2Fg%3E%3Cpath%20d%3D%22M%20580%2015%20C%20580%206.72%20600.15%200%20625%200%20C%20636.93%200%20648.38%201.58%20656.82%204.39%20C%20665.26%207.21%20670%2011.02%20670%2015%20L%20670%2095%20C%20670%20103.28%20649.85%20110%20625%20110%20C%20600.15%20110%20580%20103.28%20580%2095%20Z%22%20fill%3D%22rgb(255%2C%20255%2C%20255)%22%20stroke%3D%22rgb(0%2C%200%2C%200)%22%20stroke-miterlimit%3D%2210%22%20pointer-events%3D%22all%22%2F%3E%3Cpath%20d%3D%22M%20670%2015%20C%20670%2023.28%20649.85%2030%20625%2030%20C%20600.15%2030%20580%2023.28%20580%2015%22%20fill%3D%22none%22%20stroke%3D%22rgb(0%2C%200%2C%200)%22%20stroke-miterlimit%3D%2210%22%20pointer-events%3D%22all%22%2F%3E%3Cg%20transform%3D%22translate(-0.5%20-0.5)%22%3E%3Cswitch%3E%3CforeignObject%20pointer-events%3D%22none%22%20width%3D%22100%25%22%20height%3D%22100%25%22%20requiredFeatures%3D%22http%3A%2F%2Fwww.w3.org%2FTR%2FSVG11%2Ffeature%23Extensibility%22%20style%3D%22overflow%3A%20visible%3B%20text-align%3A%20left%3B%22%3E%3Cdiv%20xmlns%3D%22http%3A%2F%2Fwww.w3.org%2F1999%2Fxhtml%22%20style%3D%22display%3A%20flex%3B%20align-items%3A%20unsafe%20center%3B%20justify-content%3A%20unsafe%20center%3B%20width%3A%2088px%3B%20height%3A%201px%3B%20padding-top%3A%2068px%3B%20margin-left%3A%20581px%3B%22%3E%3Cdiv%20data-drawio-colors%3D%22color%3A%20rgb(0%2C%200%2C%200)%3B%20%22%20style%3D%22box-sizing%3A%20border-box%3B%20font-size%3A%200px%3B%20text-align%3A%20center%3B%22%3E%3Cdiv%20style%3D%22display%3A%20inline-block%3B%20font-size%3A%2012px%3B%20font-family%3A%20Helvetica%3B%20color%3A%20rgb(0%2C%200%2C%200)%3B%20line-height%3A%201.2%3B%20pointer-events%3A%20all%3B%20white-space%3A%20normal%3B%20overflow-wrap%3A%20normal%3B%22%3EDocker%20Hub%3C%2Fdiv%3E%3C%2Fdiv%3E%3C%2Fdiv%3E%3C%2FforeignObject%3E%3Ctext%20x%3D%22625%22%20y%3D%2272%22%20fill%3D%22rgb(0%2C%200%2C%200)%22%20font-family%3D%22Helvetica%22%20font-size%3D%2212px%22%20text-anchor%3D%22middle%22%3EDocker%20Hub%3C%2Ftext%3E%3C%2Fswitch%3E%3C%2Fg%3E%3Cpath%20d%3D%22M%20580%20135%20C%20580%20126.72%20600.15%20120%20625%20120%20C%20636.93%20120%20648.38%20121.58%20656.82%20124.39%20C%20665.26%20127.21%20670%20131.02%20670%20135%20L%20670%20215%20C%20670%20223.28%20649.85%20230%20625%20230%20C%20600.15%20230%20580%20223.28%20580%20215%20Z%22%20fill%3D%22rgb(255%2C%20255%2C%20255)%22%20stroke%3D%22rgb(0%2C%200%2C%200)%22%20stroke-miterlimit%3D%2210%22%20pointer-events%3D%22all%22%2F%3E%3Cpath%20d%3D%22M%20670%20135%20C%20670%20143.28%20649.85%20150%20625%20150%20C%20600.15%20150%20580%20143.28%20580%20135%22%20fill%3D%22none%22%20stroke%3D%22rgb(0%2C%200%2C%200)%22%20stroke-miterlimit%3D%2210%22%20pointer-events%3D%22all%22%2F%3E%3Cg%20transform%3D%22translate(-0.5%20-0.5)%22%3E%3Cswitch%3E%3CforeignObject%20pointer-events%3D%22none%22%20width%3D%22100%25%22%20height%3D%22100%25%22%20requiredFeatures%3D%22http%3A%2F%2Fwww.w3.org%2FTR%2FSVG11%2Ffeature%23Extensibility%22%20style%3D%22overflow%3A%20visible%3B%20text-align%3A%20left%3B%22%3E%3Cdiv%20xmlns%3D%22http%3A%2F%2Fwww.w3.org%2F1999%2Fxhtml%22%20style%3D%22display%3A%20flex%3B%20align-items%3A%20unsafe%20center%3B%20justify-content%3A%20unsafe%20center%3B%20width%3A%2088px%3B%20height%3A%201px%3B%20padding-top%3A%20188px%3B%20margin-left%3A%20581px%3B%22%3E%3Cdiv%20data-drawio-colors%3D%22color%3A%20rgb(0%2C%200%2C%200)%3B%20%22%20style%3D%22box-sizing%3A%20border-box%3B%20font-size%3A%200px%3B%20text-align%3A%20center%3B%22%3E%3Cdiv%20style%3D%22display%3A%20inline-block%3B%20font-size%3A%2012px%3B%20font-family%3A%20Helvetica%3B%20color%3A%20rgb(0%2C%200%2C%200)%3B%20line-height%3A%201.2%3B%20pointer-events%3A%20all%3B%20white-space%3A%20normal%3B%20overflow-wrap%3A%20normal%3B%22%3EGithub%20Container%20Registry%3C%2Fdiv%3E%3C%2Fdiv%3E%3C%2Fdiv%3E%3C%2FforeignObject%3E%3Ctext%20x%3D%22625%22%20y%3D%22192%22%20fill%3D%22rgb(0%2C%200%2C%200)%22%20font-family%3D%22Helvetica%22%20font-size%3D%2212px%22%20text-anchor%3D%22middle%22%3EGithub%20Containe...%3C%2Ftext%3E%3C%2Fswitch%3E%3C%2Fg%3E%3Cpath%20d%3D%22M%20580%20255%20C%20580%20246.72%20600.15%20240%20625%20240%20C%20636.93%20240%20648.38%20241.58%20656.82%20244.39%20C%20665.26%20247.21%20670%20251.02%20670%20255%20L%20670%20335%20C%20670%20343.28%20649.85%20350%20625%20350%20C%20600.15%20350%20580%20343.28%20580%20335%20Z%22%20fill%3D%22rgb(255%2C%20255%2C%20255)%22%20stroke%3D%22rgb(0%2C%200%2C%200)%22%20stroke-miterlimit%3D%2210%22%20pointer-events%3D%22all%22%2F%3E%3Cpath%20d%3D%22M%20670%20255%20C%20670%20263.28%20649.85%20270%20625%20270%20C%20600.15%20270%20580%20263.28%20580%20255%22%20fill%3D%22none%22%20stroke%3D%22rgb(0%2C%200%2C%200)%22%20stroke-miterlimit%3D%2210%22%20pointer-events%3D%22all%22%2F%3E%3Cg%20transform%3D%22translate(-0.5%20-0.5)%22%3E%3Cswitch%3E%3CforeignObject%20pointer-events%3D%22none%22%20width%3D%22100%25%22%20height%3D%22100%25%22%20requiredFeatures%3D%22http%3A%2F%2Fwww.w3.org%2FTR%2FSVG11%2Ffeature%23Extensibility%22%20style%3D%22overflow%3A%20visible%3B%20text-align%3A%20left%3B%22%3E%3Cdiv%20xmlns%3D%22http%3A%2F%2Fwww.w3.org%2F1999%2Fxhtml%22%20style%3D%22display%3A%20flex%3B%20align-items%3A%20unsafe%20center%3B%20justify-content%3A%20unsafe%20center%3B%20width%3A%2088px%3B%20height%3A%201px%3B%20padding-top%3A%20308px%3B%20margin-left%3A%20581px%3B%22%3E%3Cdiv%20data-drawio-colors%3D%22color%3A%20rgb(0%2C%200%2C%200)%3B%20%22%20style%3D%22box-sizing%3A%20border-box%3B%20font-size%3A%200px%3B%20text-align%3A%20center%3B%22%3E%3Cdiv%20style%3D%22display%3A%20inline-block%3B%20font-size%3A%2012px%3B%20font-family%3A%20Helvetica%3B%20color%3A%20rgb(0%2C%200%2C%200)%3B%20line-height%3A%201.2%3B%20pointer-events%3A%20all%3B%20white-space%3A%20normal%3B%20overflow-wrap%3A%20normal%3B%22%3EQuay.io%3C%2Fdiv%3E%3C%2Fdiv%3E%3C%2Fdiv%3E%3C%2FforeignObject%3E%3Ctext%20x%3D%22625%22%20y%3D%22312%22%20fill%3D%22rgb(0%2C%200%2C%200)%22%20font-family%3D%22Helvetica%22%20font-size%3D%2212px%22%20text-anchor%3D%22middle%22%3EQuay.io%3C%2Ftext%3E%3C%2Fswitch%3E%3C%2Fg%3E%3Cpath%20d%3D%22M%20400%20150%20L%20166.15%20213.34%22%20fill%3D%22none%22%20stroke%3D%22rgb(0%2C%200%2C%200)%22%20stroke-miterlimit%3D%2210%22%20pointer-events%3D%22stroke%22%2F%3E%3Cpath%20d%3D%22M%20161.08%20214.71%20L%20166.92%20209.5%20L%20166.15%20213.34%20L%20168.75%20216.26%20Z%22%20fill%3D%22rgb(0%2C%200%2C%200)%22%20stroke%3D%22rgb(0%2C%200%2C%200)%22%20stroke-miterlimit%3D%2210%22%20pointer-events%3D%22all%22%2F%3E%3Cpath%20d%3D%22M%20400%20150%20L%20255.84%20212.47%22%20fill%3D%22none%22%20stroke%3D%22rgb(0%2C%200%2C%200)%22%20stroke-miterlimit%3D%2210%22%20pointer-events%3D%22stroke%22%2F%3E%3Cpath%20d%3D%22M%20251.03%20214.56%20L%20256.06%20208.56%20L%20255.84%20212.47%20L%20258.84%20214.98%20Z%22%20fill%3D%22rgb(0%2C%200%2C%200)%22%20stroke%3D%22rgb(0%2C%200%2C%200)%22%20stroke-miterlimit%3D%2210%22%20pointer-events%3D%22all%22%2F%3E%3Cpath%20d%3D%22M%20400%20150%20L%20400%20208.63%22%20fill%3D%22none%22%20stroke%3D%22rgb(0%2C%200%2C%200)%22%20stroke-miterlimit%3D%2210%22%20pointer-events%3D%22stroke%22%2F%3E%3Cpath%20d%3D%22M%20400%20213.88%20L%20396.5%20206.88%20L%20400%20208.63%20L%20403.5%20206.88%20Z%22%20fill%3D%22rgb(0%2C%200%2C%200)%22%20stroke%3D%22rgb(0%2C%200%2C%200)%22%20stroke-miterlimit%3D%2210%22%20pointer-events%3D%22all%22%2F%3E%3Cpath%20d%3D%22M%20576.85%2061.49%20L%20476.22%2083.63%22%20fill%3D%22none%22%20stroke%3D%22rgb(0%2C%200%2C%200)%22%20stroke-miterlimit%3D%2210%22%20pointer-events%3D%22stroke%22%2F%3E%3Cpath%20d%3D%22M%20471.09%2084.76%20L%20477.18%2079.84%20L%20476.22%2083.63%20L%20478.68%2086.67%20Z%22%20fill%3D%22rgb(0%2C%200%2C%200)%22%20stroke%3D%22rgb(0%2C%200%2C%200)%22%20stroke-miterlimit%3D%2210%22%20pointer-events%3D%22all%22%2F%3E%3Cpath%20d%3D%22M%20580%20175%20L%20475.19%20100.68%22%20fill%3D%22none%22%20stroke%3D%22rgb(0%2C%200%2C%200)%22%20stroke-miterlimit%3D%2210%22%20pointer-events%3D%22stroke%22%2F%3E%3Cpath%20d%3D%22M%20470.91%2097.65%20L%20478.65%2098.84%20L%20475.19%20100.68%20L%20474.6%20104.55%20Z%22%20fill%3D%22rgb(0%2C%200%2C%200)%22%20stroke%3D%22rgb(0%2C%200%2C%200)%22%20stroke-miterlimit%3D%2210%22%20pointer-events%3D%22all%22%2F%3E%3Cpath%20d%3D%22M%20580%20295%20L%20473.25%20115.47%22%20fill%3D%22none%22%20stroke%3D%22rgb(0%2C%200%2C%200)%22%20stroke-miterlimit%3D%2210%22%20pointer-events%3D%22stroke%22%2F%3E%3Cpath%20d%3D%22M%20470.57%20110.96%20L%20477.16%20115.19%20L%20473.25%20115.47%20L%20471.14%20118.77%20Z%22%20fill%3D%22rgb(0%2C%200%2C%200)%22%20stroke%3D%22rgb(0%2C%200%2C%200)%22%20stroke-miterlimit%3D%2210%22%20pointer-events%3D%22all%22%2F%3E%3C%2Fg%3E%3Cswitch%3E%3Cg%20requiredFeatures%3D%22http%3A%2F%2Fwww.w3.org%2FTR%2FSVG11%2Ffeature%23Extensibility%22%2F%3E%3Ca%20transform%3D%22translate(0%2C-5)%22%20xlink%3Ahref%3D%22https%3A%2F%2Fwww.drawio.com%2Fdoc%2Ffaq%2Fsvg-export-text-problems%22%20target%3D%22_blank%22%3E%3Ctext%20text-anchor%3D%22middle%22%20font-size%3D%2210px%22%20x%3D%2250%25%22%20y%3D%22100%25%22%3EText%20is%20not%20SVG%20-%20cannot%20display%3C%2Ftext%3E%3C%2Fa%3E%3C%2Fswitch%3E%3C%2Fsvg%3E)
Instead of cluster nodes pulling images directly from a public registry, they will pull them from ECR which is then configured to download the image from the public registry only if it does not already contain the image in its cache. In this way, most images will only ever need to be downloaded from a public source once during the initial deployment.
We provide a module for configuring this behavior: aws_ecr_pull_through_cache.
However, before we deploy it, you must first retrieve authentication credentials for some upstream repositories.
GitHub Credentials
You will need a GitHub user and an associated GitHub personal access token (PAT).
Use the following PAT settings:
Use a classic token.
Set the token to never expire.
Grant only the
read:packagesscope.
Docker Hub Credentials
You will need a Docker Hub user an associated access token.
This token should have the Public Repo Read-only access permissions.
Deploy the Pull Through Cache Module
The following instructions apply for every environment-region combination where you will deploy Kubernetes cluster:
Choose the region where you want to deploy clusters.
Add an
aws_ecr_pull_through_cachedirectory to that region.Add a
terragrunt.hcland sops-encryptedsecrets.yamlto that directory that looks like this:9 collapsed linesinclude "panfactum" {path = find_in_parent_folders("panfactum.hcl")expose = true}terraform {source = include.panfactum.locals.pf_stack_source}locals {secrets = yamldecode(sops_decrypt_file("${get_terragrunt_dir()}/secrets.yaml"))}inputs = {docker_hub_username = "REPLACE_ME"docker_hub_access_token = local.secrets.docker_hub_access_tokengithub_username = "REPLACE_ME"github_access_token = local.secrets.github_access_token}docker_hub_access_token: ENC[AES256_GCM,data:sfHAIQE6UMhj8Nt4t6h58wCsaXxrvVswDQS090i1K4f7VmmR,iv:8pJWO4ezmNg2gOf2oUbiqJbaJIChTT6Lc5OUiZ1BjC8=,tag:6+NxD3Ucl1i2hwfInkRQHg==,type:str]github_access_token: ENC[AES256_GCM,data:MWfsW39UGATwIfDe/w77ed3DOXndvDaZPherUsXqzqUE5LYOfMAsDw==,iv:N9CfuhTIJ+dZNP0Ngq+EKCUSdpIXZSChaw7I5H38ZxI=,tag:/OfLsqED51L3Ji6iyGRhUg==,type:str]sops:kms:- arn: arn:aws:kms:us-east-2:891377197483:key/mrk-d8075b5c1dc8468db33448f40ae92b5ccreated_at: "2024-04-05T14:51:33Z"enc: AQICAHiO33BhcW4FdrQk4VmdZqD44nTqvEUzee/kwr4reXJeMQEiLGnxR5S0pzjrxVdwE2M4AAAAfjB8BgkqhkiG9w0BBwagbzBtAgEAMGgGCSqGSIb3DQEHATAeBglghkgBZQMEAS4wEQQMkkLy3mUgU3uwpptXAgEQgDvRj3ydpGP8B0cjHLGDWepyqFIA+2XJaNkgqfWUY8CVIFCP7YSeUIOIv34UUt2uts2e94wQTYAxS4ITWw==aws_profile: production-superuser- arn: arn:aws:kms:us-west-2:891377197483:key/mrk-d8075b5c1dc8468db33448f40ae92b5ccreated_at: "2024-04-05T14:51:33Z"enc: AQICAHiO33BhcW4FdrQk4VmdZqD44nTqvEUzee/kwr4reXJeMQGrVJHw9Bkv7OZzsX7WCo+vAAAAfjB8BgkqhkiG9w0BBwagbzBtAgEAMGgGCSqGSIb3DQEHATAeBglghkgBZQMEAS4wEQQMN3rRF+6gxTL8REbXAgEQgDuObzBPe+Ahl7lJ9zvbX2toJgsvuzJQh6rKHCld1tslbODg/C0/0vRjEShF1waw3U3R3wLRLpxumv3Blw==aws_profile: production-superusergcp_kms: []azure_kv: []hc_vault: []age: []lastmodified: "2024-04-05T14:51:34Z"mac: ENC[AES256_GCM,data:suw9298kNaX+Kg35Zny2xhEFKcTzioLrv/kfqyoZ+TjxCogJQdadzemjv3rlInQC3u8AGMEaN0qClYa6d1M/7Qc5t666zpETsSmRHfsD7tY33z0HDvDmAp43ADWPdI9Wv+G8RMJ3fs9/MI6FU4AGZlfhE+HC5TKs7oIV6BlQWPM=,iv:3VGtu70GZneuhnqiO6s53B+HQeUybrrGM46XDzQcr6Y=,tag:1fVWus0UDxKS5FmqqspZIQ==,type:str]pgp: []unencrypted_suffix: _unencryptedversion: 3.8.1Run
pf-tf-initto enable the required providers.Run
terragrunt apply.
This should only be deployed once per environment-region combination. If you have multiple clusters in the same region, you do not need to deploy the pull through cache multiple times.
Deploying the Cluster
Set up Terragrunt
Choose the region where you want to deploy the cluster.
Add an
aws_eksdirectory to that region.Add a
terragrunt.hclto that directory that looks like this:9 collapsed linesinclude "panfactum" {path = find_in_parent_folders("panfactum.hcl")expose = true}terraform {source = include.panfactum.locals.pf_stack_source}dependency "aws_vpc" {config_path = "../aws_vpc"}inputs = {vpc_id = dependency.aws_vpc.outputs.vpc_idegress_ips = dependency.aws_vpc.outputs.nat_ips// Can be named anything but MUST be unique within your organization.// We recommend "<environment_name>-<region_name>"// Example: "production-us-east-2"cluster_name = "REPLACE_ME"cluster_description = "REPLACE_ME"// Should contain one subnet if sla_target was set to `1`, and three subnets otherwise.// These should be private subnets unless you have a specific need for public nodes --// note that public subnets are a security risk.// Example: ["PRIVATE_A", "PRIVATE_B", "PRIVATE_C"]node_subnets = [REPLACE_ME]// We will disable this once more cluster utilities are installedbootstrap_mode_enabled = true}Run
pf-tf-initto enable the required providers.
Deploy the Cluster
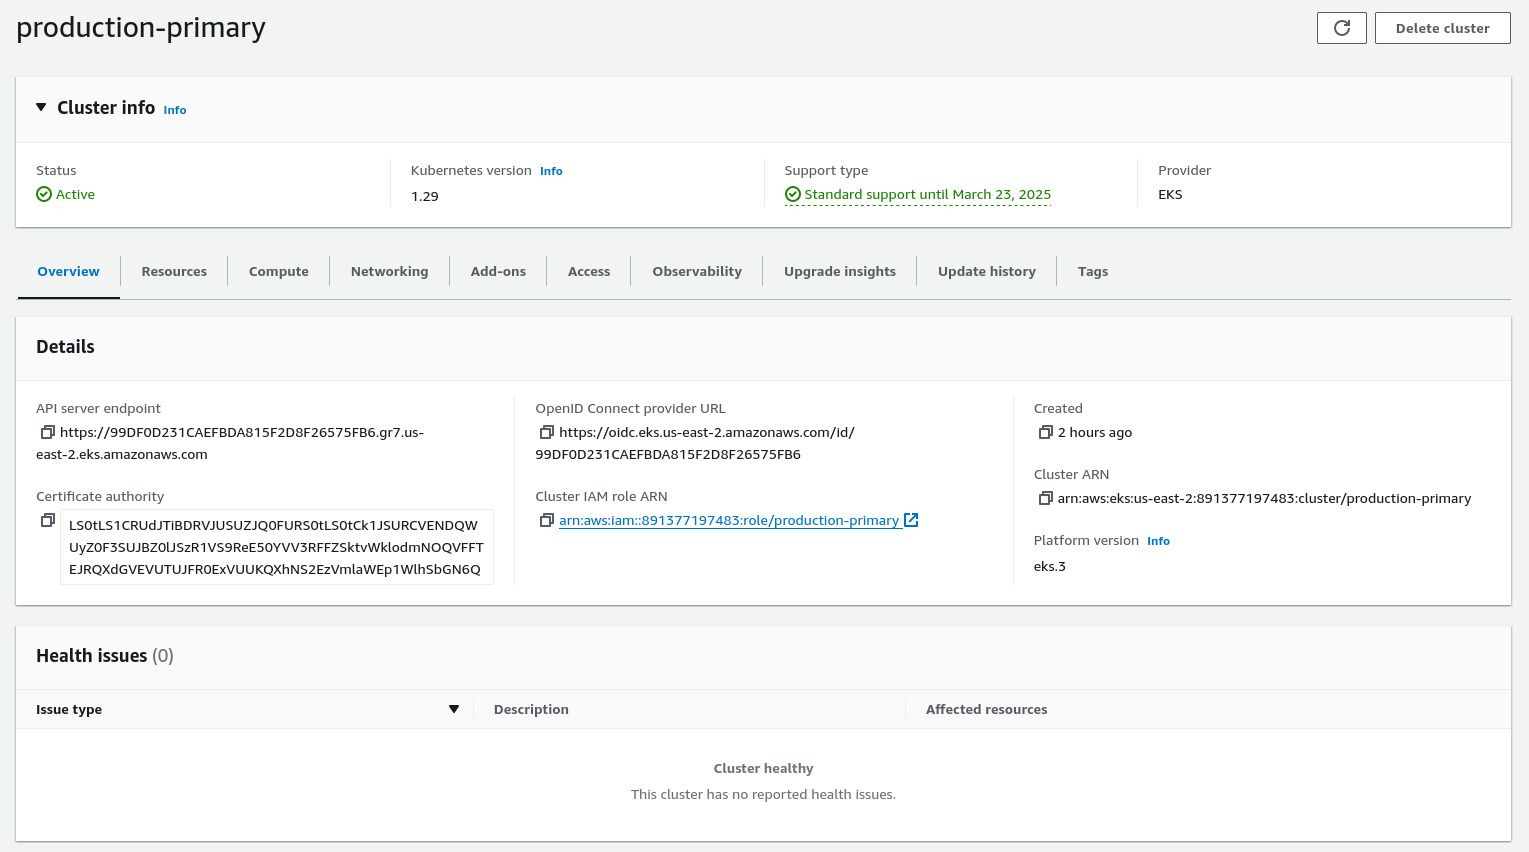
You are now ready to run terragrunt apply.
This may take up to 20 minutes to complete.
When it is ready, you should see your EKS cluster in the AWS web console reporting as Active and without any health issues.
Connect to the Cluster
Set Up Metadata and CA Certs
The Panfactum devShell comes with utilities that make connecting to your cluster a breeze.
First, we want to save important cluster metadata into your repository so other users can easily access the information even if they do not have permissions to interact directly with the infrastructure modules.
To download this metadata:
Add a
config.yamlfile to the repo’s.kubedirectory:clusters:- module: "production/us-east-2/aws_eks"Every entry under
clustersdefines a new cluster that you want to be able to connect to.modulepoints to its terragrunt directory underenvironments.Replace
modulewith the appropriate path for the cluster you just launched.Run
pf-update-kube --buildto dynamically generate acluster_infofile and download your cluster’s CA certs.
As you add additional clusters, you will need to update config.yaml and re-run pf-update-kube --build. More information about this file can be found here.
Set up Kubeconfig
All utilities in the Kubernetes ecosystem rely on kubeconfig files to configure their access to various Kubernetes clusters.
In the Panfactum stack, that file is stored in your repo in the kube_dir directory.
To generate your kubeconfig:
Add a
config.user.yamlfile that looks like this:clusters:- name: "production-primary"aws_profile: "production-superuser"Replace
namewith the name of the EKS cluster which can be found incluster_info.Replace
aws_profilewith the AWS profile you want to use to authenticate with the cluster. For now, use the AWS profile that you used to deploy theaws_eksmodule for the cluster.Run
pf-update-kubeto generate your kubeconfig file.
Remember that you will need to update your config.user.yaml and re-run pf-update-kube as you add additional clusters. More information about this file can be found here.
Every one of your users will need to set up their own config.user.yaml file, and we provide instructions for them here.
Verify Connection
Run
kubectxto list all the clusters that were set up in the previous section. Selecting one will set your Kubernetes context which defines which cluster your commandline tools likekubectlwill target. Select one now.Run
kubectl cluster-info.You should receive a result that looks like this:
Terminal window Kubernetes control plane is running at https://99DF0D231CAEFBDA815F2D8F26575FB6.gr7.us-east-2.eks.amazonaws.comCoreDNS is running at https://99DF0D231CAEFBDA815F2D8F26575FB6.gr7.us-east-2.eks.amazonaws.com/api/v1/namespaces/kube-system/services/kube-dns:dns/proxy
Use k9s
Most of our cluster introspection and debugging will be done from a TUI called k9s. This comes bundled with the Panfactum devShell.
Let’s verify what pods are running in the cluster:
Run
k9sType
:pods⏎to list all pods in the clusterk9s will filter results by namespace and by default it is set to the
defaultnamespace. Press0to switch the filter to all namespaces.You should see a minimal list of pods that looks like this:
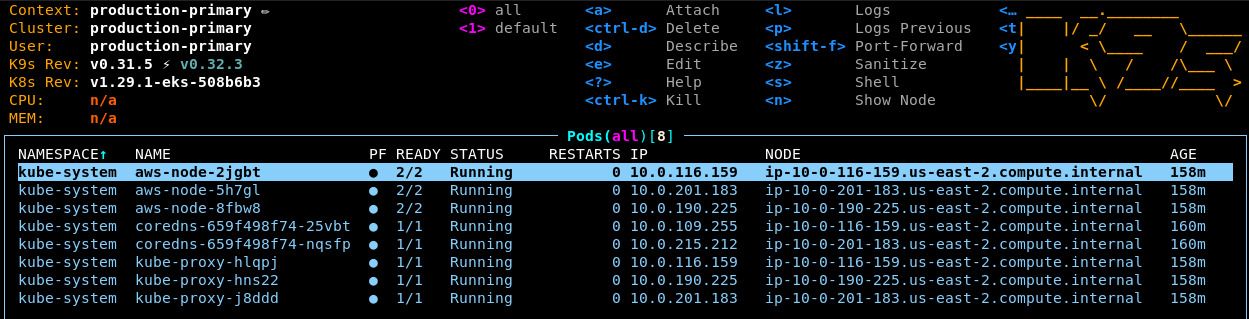
k9s is an incredibly powerful tool, and it is our recommended way for operators to interact directly with their clusters. If you have never used this tool before, we recommend getting up to speed with these tutorials.
Reset EKS Cluster
Unfortunately, AWS installs various utilities such as coredns and kube-proxy to every new EKS cluster. We provide hardened alternatives to these defaults, and their presence will conflict with Panfactum resources in later guide steps.
As a result, we need to reset the cluster to a clean state before we continue.
We provide a convenience command pf-eks-reset to perform the reset. Run this command now.
Prepare to Deploy Kubernetes Modules
In the Panfactum stack everything is deployed via OpenTofu (Terraform) modules, including Kubernetes manifests. By constraining ourselves to a single IaC paradigm, we are able to greatly simplify operations for users of the stack.
In order to start using our Kubernetes modules, we must first configure the Kubernetes provider by setting some additional terragrunt variables.
In the region.yaml file for the region where you deployed the cluster, add the following fields:
# The context in your `kubeconfig` file to use for connecting to the cluster in this region.# If this was set up using `pf-update-kube`, this is just the name of the cluster.# Example: production-us-east-2kube_config_context: REPLACE_ME
# This is the `https` address of the `Kubernetes control plane` when you run `kubectl cluster-info`# Example: https://6B4CCB112AD882D9XXXX73BA90CB8F80.yl4.us-east-2.eks.amazonaws.comkube_api_server: REPLACE_ME
The Kubernetes modules deployed in this region will now appropriately deploy to this cluster.
Next Steps
Congratulations! You have officially deployed Kubernetes using infrastructure-as-code. Now that the cluster is running, we will begin working on the internal networking stack.