Inbound Networking
Deploy the necessary components to allow inbound network traffic to workloads running in the cluster.
Background
Like internal networking, inbound networking has several moving parts. We won’t cover them in detail within this guide, but we do in our concept documentation.
Deploy ExternalDNS
ExternalDNS is the most popular Kubernetes controller for synchronizing DNS records from internal Service and Ingress resources to external DNS servers like AWS Route53.
We provide a module to deploy it: kube_external_dns
Let’s deploy it now:
Create a new directory adjacent to your
aws_eksmodule calledkube_external_dns.Add a
terragrunt.hclto that directory that looks like this:9 collapsed linesinclude "panfactum" {path = find_in_parent_folders("panfactum.hcl")expose = true}terraform {source = include.panfactum.locals.pf_stack_source}dependency "cert_issuers" {config_path = "../kube_cert_issuers"}inputs = {route53_zones = dependency.cert_issuers.outputs.route53_zones}Run
pf-tf-initto enable the required providers.Run
terragrunt apply.
We will test that this works once we set up our first inbound networking resource.
Deploy the AWS Load Balancer Controller
Otherwise known as the ALB controller, the AWS Load Balancer Controller provisions AWS load balancers for our Kubernetes Services of type LoadBalancer.
As the cluster nodes are running in private subnet, the first step to providing inbound networking is deploying a public gateway in your VPC for inbound traffic to connect with before it is forwarded onto your Kubernetes nodes. AWS load balancers are the perfect gateways:
Highly available, distributed across all your public AZs
Highly scalable, able to handle any amount of traffic
Built-in protection against DOS attacks
Support for PROXY protocol to preserve IP headers
We provide a module to deploy it: kube_aws_lb_controller
Let’s deploy it now:
Create a new directory adjacent to your
kube_external_dnsmodule calledkube_aws_lb_controller.Add a
terragrunt.hclto that directory that looks like this:9 collapsed linesinclude "panfactum" {path = find_in_parent_folders("panfactum.hcl")expose = true}terraform {source = include.panfactum.locals.pf_stack_source}dependency "aws_vpc" {config_path = "../aws_vpc"}inputs = {vpc_id = dependency.aws_vpc.outputs.vpc_id// Select the **public** subnets that you want AWS load balancers to be able to use. We suggest passing in **all**// the public subnets created in your `aws_vpc` deployment.// Example: ["PUBLIC_A", "PUBLIC_B", "PUBLIC_C"]subnets = [REPLACE_ME]}Run
pf-tf-initto enable the required providers.Run
terragrunt apply.
We will see it in action in the following section.
Deploy the Ingress System
The AWS load balancer will not route requests directly to our workloads. Instead, they will be mediated by a Kubernetes Ingress resource.
Operating at OSI layer 7 (e.g., HTTP), the ingress system adds several key capabilities:
Logging for all inbound traffic in a standard format
Public TLS termination
Request routing based on domain, pathname, and HTTP headers
Compression of large responses
Rate-limiting
Standard security headers
Web application firewall engine
Additionally, it allows you to only use one AWS load balancer instead of one for each service, saving significant costs.
The most popular ingress controller for Kubernetes is the Ingress-Nginx Controller which uses NGINX as the underlying proxy.
We provide a module to deploy it: kube_ingress_nginx.
Deploy the NGINX-Ingress Controller
Create a new directory adjacent to your
kube_external_dnsmodule calledkube_ingress_nginx.Add a
terragrunt.hclto that directory that looks like this:19 collapsed linesinclude "panfactum" {path = find_in_parent_folders("panfactum.hcl")expose = true}terraform {source = include.panfactum.locals.pf_stack_source}dependency "cert_issuers" {config_path = "../kube_cert_issuers"skip_outputs = true}dependency "lb_controller" {config_path = "../kube_aws_lb_controller"skip_outputs = true}locals {secrets = yamldecode(sops_decrypt_file("${get_terragrunt_dir()}/secrets.yaml"))}inputs = {// The `dhparam` is the Diffie-Hellman key used to power [perfect forward secrecy](https://en.wikipedia.org/wiki/Forward_secrecy)// in your tls connections. You can generate it by running `openssl dhparam 4096 2> /dev/null`. This// can take several minutes as it depends on the entropy generated by your computer.dhparam = local.secrets.dhparam// The `ingress_timeout_seconds` is the maximum number of seconds that NGINX will wait on upstream// servers to return a response before a server error is returned.// In general, long-lived requests create reliability and resiliency problems, so we recommend keeping// this to 60 seconds or less.ingress_timeout_seconds = 60// If you need to support legacy TLSv1.2 clients, set `tls_1_2_enabled` to `true`. We recommend using// only TLSv1.3 if possible as it is much more secure.tls_1_2_enabled = false}dhparam: ENC[AES256_GCM,data:UgDQGz6lZ0ecxQh2ofbIcpw0dhKwl8SfkjaGSh4Re9PWmROrSDwbRAcH9X1PwgOPK/5/3qC6YRnv856m1Y69W+NuK2QwxOqEaoPg5N8kRw9nDsDSjORVFG6Mov697h86wtyLlqGNwIpxFzr0OSgNsL4nPRj/lSnW9ViB3xdin57Y+sA3X7AuKX5ANq4taTRKzn0C5UCkNJ9wyzcjLZ/3Jcu+FztWk9gxSMfvYRJFONxGdTEMGvxl+6NGAW4PP+0+XyEXQpvIs26oWj66Hu5I7TjkO1KTWRFweUByKfLFRlyy/a/f0maJoDYIusrp/OA/o98VVf4BmpeOF8Pb8Hln3YrIGMMgusOD+MTX4XVV5xYelSXMCM6m1459Kceof5VsYqZMbweGJlM78pf5QxSn5KsSy+PaLPnjoeXGCBLV7zpZ7YeXk/db5BtRo6zV4P4/nHTGwPTTzXTTqcuqTwCwhwJlkj5H+DLHfofRbJE6HELj7H0BXYI5Ugxan4aHZ+9ZUKtF6q1MP5IXRP7ZeUFlLIuF9HpTpQb/3tI0UvxVhyDVeGIkf1KQ0KfPkEcjPnWlqhxfw5qXDFKjm7KmSyEt7hDYwQuwtSawM8CiVUNT1pNfdyuiG6uuRv/8gQfVyYRH2W6o01FUaOsOaOtRMDTpZ+c4j8QgaX3KDWzsp9QLBD6IVainxyNytkt4N/18Xt6KbEadYLVVFajJnmhKzZke3JY3D/EHpncIe/VJqUUdgOfjUEZPCP4zd7C+gWyCAAalBdvRXsI0B0PUjsrjt43PE0G5WZqrCulDJv11DlnXVKaj2gmpSl+f4qPmMyNJhBptxZ3Uz4n7X9ATS6qdOnsECzrrmwjn3vFSRtGAOm6YrFEvIllSEQF9wVYP5ItfRJXXbs41DwQYtGDdbwf1j6YJDNGJZeAMVw1NOb0B97wUEM1fnMFqE6glTBvzYzMufm4oOXoyGhhZy6HhgBHy7c+PNO8W+bDqRaGFUk+mro/tnkMKeSJaAelnIE0aR9d7P9pG,iv:YWLR1xWVUsXR2HpAW4VfELsqK/M++0Bm/aInl95Shrs=,tag:6Ay9c71F96pCgeCvntCN8g==,type:str]sops:kms:- arn: arn:aws:kms:us-east-2:891377197483:key/mrk-d8075b5c1dc8468db33448f40ae92b5ccreated_at: "2024-04-05T18:34:19Z"enc: AQICAHiO33BhcW4FdrQk4VmdZqD44nTqvEUzee/kwr4reXJeMQGxqVCKuWah+8jEkLsOchKKAAAAfjB8BgkqhkiG9w0BBwagbzBtAgEAMGgGCSqGSIb3DQEHATAeBglghkgBZQMEAS4wEQQMM3qHKs26LMy7egLHAgEQgDstPa/gui8Shl75g7OipBMovxod1opdqYPqFtU/hIHFZnUO4/DP837Oi4tDh+HHcXpsGw7YE9GllTep0w==aws_profile: production-superuser- arn: arn:aws:kms:us-west-2:891377197483:key/mrk-d8075b5c1dc8468db33448f40ae92b5ccreated_at: "2024-04-05T18:34:19Z"enc: AQICAHiO33BhcW4FdrQk4VmdZqD44nTqvEUzee/kwr4reXJeMQHbPyAK0so8v2DC73PM1ye4AAAAfjB8BgkqhkiG9w0BBwagbzBtAgEAMGgGCSqGSIb3DQEHATAeBglghkgBZQMEAS4wEQQMR6Ummawos5Zyabs7AgEQgDvu9ySvUjYkKIjsrTRF5dkfIpe4S3Rd79eOsC1Om5hWqlRxJqoH1SGwgHOht79zx5WVQgUkh9oRh4dR7Q==aws_profile: production-superusergcp_kms: []azure_kv: []hc_vault: []age: []lastmodified: "2024-04-05T18:34:19Z"mac: ENC[AES256_GCM,data:ukTaPDHpMFdRbbOo8VUGTWoTkHL1LP+CbpOC3wRzR14nn2NbAJMEvItyTXXVuCu8/5ApL8hHjnu0b+PJvri0M8HI5Znh6GQGhhEdkWD3ss5qNP0GzSohlFwn7CGWQqzyE/w7+0UhhZjYPvFyM882IVW40F0DnOPgXMGA/vWwcxw=,iv:S0Nq6m5wYA5ftxUp8rMBjl634eSyP5qD6K3IDQSC2xM=,tag:x0y3l4P5ZlLhmHe6UfP6SQ==,type:str]pgp: []unencrypted_suffix: _unencryptedversion: 3.8.1Run
pf-tf-initto enable the required providers.Run
terragrunt apply.In k9s, notice that a service (
:svc) of typeLoadBalancerwas created:
This shows the ALB controller in action. It automatically provisioned a new AWS Network Load Balancer and configured it to route traffic across the NGINX pods.
Log into the AWS web console. Notice that the load balancer resource does indeed exist:
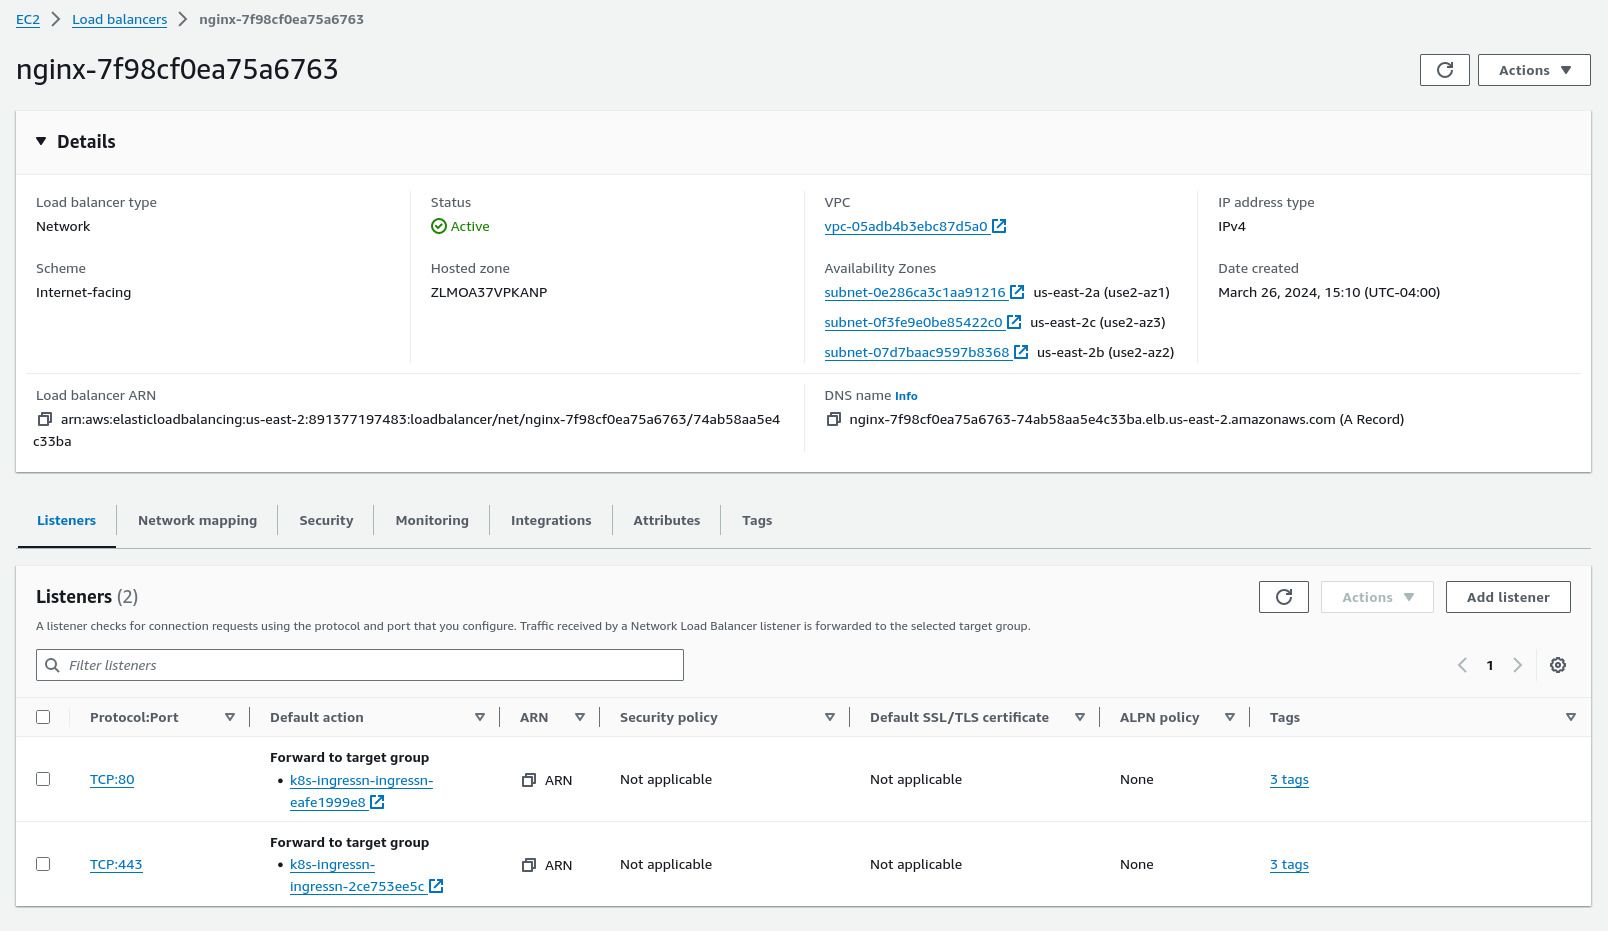
Select the target group bound to port 443. Notice that this automatically routes traffic to the IP addresses of the NGINX pods running in the cluster:


Deploy the Vault Ingress
While the NGINX-ingress controllers are successfully running, they will not process any traffic until you create an Ingress resource. An Ingress instructs NGINX how to respond to incoming traffic and what workloads to forward requests to.
Currently, the system has one workload that definitely needs inbound connectivity: the Vault cluster.
Let’s set that up now:
Return the
kube_vaultmodule you deployed in the Vault guide section.Set
ingress_enabledtotrue.14 collapsed linesinclude "panfactum" {path = find_in_parent_folders("panfactum.hcl")expose = true}terraform {source = include.panfactum.locals.pf_stack_source}dependency "ebs_csi" {config_path = "../kube_aws_ebs_csi"skip_outputs = true}inputs = {ingress_enabled = true2 collapsed linesvault_domain = "REPLACE_ME"}Run
terragrunt apply.In k9s, notice that you have your first Ingress resource:

ExternalDNS should recognize the new Ingress resource and set up your public DNS records appropriately. Verify that by running
delv @1.1.1.1 vault.prod.panfactum.comreplacingprod.panfactum.comwith your domain. You should receive a response like this:Terminal window ; fully validatedvault.prod.panfactum.com. 60 IN A 18.223.233.91vault.prod.panfactum.com. 60 IN A 52.14.249.23vault.prod.panfactum.com. 60 IN RRSIG A 13 4 60 20240326215221 20240326195121 42332 prod.panfactum.com. FDoA4LYqJw7KdTTzgcQb1JG74amZE3mf0HafZ06Z7GmWlLw3qWUSll9x KOl8XcMMr+XOLO7Zi4JjbdGn0CUjVg==Note that the IP addresses listed are the IPs assigned to the AWS load balancer in front of NGINX. The load balancer will forward TCP traffic onto NGINX which will in turn forward HTTP traffic onto the active Vault instance.
Let’s see that in action. Run
stern . -n ingress-nginxto start capturing logs from all the NGINX servers. Now visit your Vault cluster in your web browser (use the domain you queried in the previous section). You should now see the Vault login page:
Additionally, you should have seen many logs for each resource needed to load the UI:
Terminal window ingress-nginx-controller-c87487976-gd9cn controller {"tls.version": "TLSv1.3", "tls.cipher": "TLS_AES_256_GCM_SHA384", "http.url": "/v1/sys/seal-status", "http.version": "HTTP/2.0", "http.status_code": "200", "http.method": "GET", "http.referer": "", "http.origin": "", "http.host": "vault.prod.panfactum.com", "http.useragent":"Mozilla/5.0 (X11; Linux x86_64; rv:122.0) Gecko/20100101 Firefox/122.0", "time":"2024-03-26T20:58:54+00:00", "remote_addr": "X.X.X.X", "remote_user": "", "response_length": 667, "duration": 0.003, "request_id": "b2718b569ed881072fbe7682a2cc635d", "request_length": 29, "response_content_type": "application/json", "x_forwarded_for": "X.X.X.X"}ingress-nginx-controller-c87487976-gd9cn controller {"tls.version": "TLSv1.3", "tls.cipher": "TLS_AES_256_GCM_SHA384", "http.url": "/v1/sys/health?standbycode=200&sealedcode=200&uninitcode=200&drsecondarycode=200&performancestandbycode=200", "http.version": "HTTP/2.0", "http.status_code": "200", "http.method": "GET", "http.referer": "", "http.origin": "", "http.host": "vault.prod.panfactum.com", "http.useragent":"Mozilla/5.0 (X11; Linux x86_64; rv:122.0) Gecko/20100101 Firefox/122.0", "time":"2024-03-26T20:58:54+00:00", "remote_addr": "X.X.X.X", "remote_user": "", "response_length": 638, "duration": 0.004, "request_id": "dca72e8c51d359bcfcd4c702c53d85a8", "request_length": 90, "response_content_type": "application/json", "x_forwarded_for": "X.X.X.X"}ingress-nginx-controller-c87487976-gd9cn controller {"tls.version": "TLSv1.3", "tls.cipher": "TLS_AES_256_GCM_SHA384", "http.url": "/v1/sys/seal-status", "http.version": "HTTP/2.0", "http.status_code": "200", "http.method": "GET", "http.referer": "", "http.origin": "", "http.host": "vault.prod.panfactum.com", "http.useragent":"Mozilla/5.0 (X11; Linux x86_64; rv:122.0) Gecko/20100101 Firefox/122.0", "time":"2024-03-26T20:59:04+00:00", "remote_addr": "X.X.X.X", "remote_user": "", "response_length": 667, "duration": 0.020, "request_id": "7296f3e527c7dab1e2868b81e6252c32", "request_length": 29, "response_content_type": "application/json", "x_forwarded_for": "X.X.X.X"}ingress-nginx-controller-c87487976-gd9cn controller {"tls.version": "TLSv1.3", "tls.cipher": "TLS_AES_256_GCM_SHA384", "http.url": "/v1/sys/health?standbycode=200&sealedcode=200&uninitcode=200&drsecondarycode=200&performancestandbycode=200", "http.version": "HTTP/2.0", "http.status_code": "200", "http.method": "GET", "http.referer": "", "http.origin": "", "http.host": "vault.prod.panfactum.com", "http.useragent":"Mozilla/5.0 (X11; Linux x86_64; rv:122.0) Gecko/20100101 Firefox/122.0", "time":"2024-03-26T20:59:04+00:00", "remote_addr": "X.X.X.X", "remote_user": "", "response_length": 638, "duration": 0.020, "request_id": "29e496dbb0d04aecf00e1bf6e7bf7b5c", "request_length": 90, "response_content_type": "application/json", "x_forwarded_for": "X.X.X.X"}ingress-nginx-controller-c87487976-gd9cn controller {"tls.version": "TLSv1.3", "tls.cipher": "TLS_AES_256_GCM_SHA384", "http.url": "/v1/sys/health?standbycode=200&sealedcode=200&uninitcode=200&drsecondarycode=200&performancestandbycode=200", "http.version": "HTTP/2.0", "http.status_code": "200", "http.method": "GET", "http.referer": "", "http.origin": "", "http.host": "vault.prod.panfactum.com", "http.useragent":"Mozilla/5.0 (X11; Linux x86_64; rv:122.0) Gecko/20100101 Firefox/122.0", "time":"2024-03-26T20:59:05+00:00", "remote_addr": "X.X.X.X", "remote_user": "", "response_length": 638, "duration": 0.003, "request_id": "c7eefe2a1d3d155136618ff6bc3f1d9f", "request_length": 90, "response_content_type": "application/json", "x_forwarded_for": "X.X.X.X"}Notice that cert-manager has successfully provisioned a public TLS certificate and NGINX has picked it up to allow communication over HTTPS (using TLSv1.3).
Moreover, notice that NGINX properly secures the site in a standard way by setting security headers for the browser. You can verify this either directly via the command line (
curl -I <your_vault_address>) or using a site such as https://securityheaders.com.This is accomplished by our kube_ingress module.
kube_vaultuses it internally, and you can use it directly in your projects.Finally, you no longer need to use the finicky
kubectl port-forwardto connect with Vault. Let’s update the address in your configuration files:Remove
VAULT_ADDRfrom your.env, and updatevault_addrin your region’sregion.yamlfile.VAULT_ADDR="https://vault.example.com"vault_addr: REPLACE_METo verify this works as expected, re-apply the
vault_core_resourcesmodule.
Deploy the Bastion
While the Ingress system will allow you to publicly expose HTTP endpoints, you still need a way to communicate with other internal systems using other protocols. For example, you might want to connect over TCP with databases running in the cluster.
For that reason, we will deploy an SSH bastion host to proxy connections to your backend resources over raw TCP. This will allow you to use any protocol over the wire such as the PostgreSQL message format.
We provide a bastion deployment module: kube_bastion.
This host uses certificate authentication with Vault so that you do not need to manually manage static SSH keys unlike SSH setups you might have used in the past. We will see that in action in a moment.
Deploy the Bastion Module
Let’s deploy the bastion now:
Create a new directory adjacent to your
kube_ingress_nginxmodule calledkube_bastion.Add a
terragrunt.hclto that directory that looks like this:24 collapsed linesinclude "panfactum" {path = find_in_parent_folders("panfactum.hcl")expose = true}terraform {source = include.panfactum.locals.pf_stack_source}dependency "vault_config" {config_path = "../vault_core_resources"skip_outputs = true}dependency "lb_controller" {config_path = "../kube_aws_lb_controller"skip_outputs = true}dependency "kyverno" {config_path = "../kube_kyverno"skip_outputs = true}inputs = {// Set the domain names that you want to be able to access the bastion hosts at.bastion_domains = [REPLACE_ME]// Vault will issue ssh certificates that allow users in your organization to connect to private network resources.// Those certificates are valid for `ssh_cert_lifetime_seconds`. We recommend setting this to a fairly low value// (< 8 hours) as long-lived certificates would allow de-provisioned users to continue to access the private network.// Access to the private network is not the only security gate for accessing private systems in the Panfactum stack,// but short-lived credentials are an important part of defense-in-depth.ssh_cert_lifetime_seconds = 60 * 60 * 8}Run
pf-tf-initto enable the required providers.Run
terragrunt apply.
Note that this will deploy a second AWS NLB. We keep the bastion NLB separate to ensure you have a secondary ingress mechanism should the primary NLB fail.
Configure Bastion Connectivity
We provide two CLI utilities for working with the bastion:
pf-update-ssh: Sets up the bastion connectivity settings that you will commit to your repo for your team to sharepf-tunnel: Establishes a tunnel through one of the bastions using dynamically generated, individual credentials
Now that the bastion is running, let’s configure connectivity:
Run
pf-update-sshto scaffold yourssh_dirdirectory (default:.ssh).Switch to that directory.
Copy the
config.example.yamlfile toconfig.yaml.Update the values to the correct values for your setup. See the reference docs for more information.
Run
pf-update-ssh --buildto generate theknown_hostsandconnection_infofiles for your project. Additionally, astate.lockfile is used to help determine when you need to rebuild. These files should be committed to version control as they do not contain any sensitive information and can be shared with everyone in your organization.
Test Bastion Connectivity
Everything should now be in place to use the bastion to proxy connections. Let’s verify that it is working as intended.
We expose an internal service called
nginx-statusthat prints some realtime metrics about the NGINX instance. This service is available at the addressnginx-status.ingress-nginx:18080. We cannot access it via the public internet, so we must use the bastion to connect.We will open a tunnel to the service bound to your
localhost:3030that will route connections through the bastion. Runpf-tunnel -b <bastion_name> -r nginx-status.ingress-nginx:18080 -l 3030. Replace<bastion_name>with the name you used in yourconfig.yaml.-b / --bastion: Selects the name.-r / --remote-address: Selects the remote address. You must specify the port.-l / --local-port: Selects the local port to bind to.
In a separate terminal session, run
curl localhost:3030/nginx_status. NGINX should return a result like this:Terminal window Active connections: 1server accepts handled requests28680 28680 13962Reading: 0 Writing: 1 Waiting: 0Notice that the SSH keys were automatically generated in the configuration directory. The
_signed.pubis the certificate that was signed by Vault that allows you temporary access to the bastion host. It will expire after thessh_cert_lifetime_secondsyou configured for thekube_bastionmodule. These files are secret and automatically ignored from version control.This time it used the root vault token you set in your
.envfile, but in the future it will use your organization’s SSO which we will configure in a later section.For fun, run
kubectl rollout restart deployment -n bastionto restart the bastion instances. Notice that the tunnel recovers gracefully even during disruption to the underlying nodes.Close the tunnel with
^C.
While this was a particularly trivial test, this functionality will become important when needing to access private network resources such as databases without needing to manually maintain certificates or IP whitelists.
Next Steps
Now that the core functionality of the cluster is live, let’s install a handful of maintenance controllers that will ensure things continue to operate smoothly.