AWS Networking
Deploy the core AWS networking infrastructure such as the Virtual Private Cloud (VPC) that will contain all of your deployed resources.
If you are new to cloud networking, we recommend that your review the concept documentation before proceeding.
Up to now, we have focused on setting up all environments in each section. Moving forward, this guide will focus on setting up infrastructure for a single environment at a time. We recommend starting with your production environment and then returning here for additional environments as needed.
Additionally, unless otherwise specified, the following sections of this guide only apply to environments that will be hosting Kubernetes clusters. Those that do not host live infrastructure (e.g., management) do not need much further setup.
Choose Your SLA Target
When using Panfactum, you will need to choose an SLA target level when deploying each environment. The configured SLA target changes how Panfactum modules behave. Higher targets will improve uptime but also increase your infrastructure costs.
We provide three different SLA targets:
Level 1: 99.9% uptime (< 45 minutes of downtime / month) — Lowest cost
Level 2: 99.99% uptime (< 5 minutes of downtime / month) — Roughly 2x the cost of level 1
Level 3: 99.999% uptime (< 30 seconds of downtime / month) — Roughly 1.5x the cost of level 2
We recommend level 1 for test / development environments and level 2 or above for environments running live workloads. The default value is level 3.
To choose a level, set the Terragrunt variable sla_target in your environment’s environment.yaml.
15 collapsed lines
# Metaenvironment: "development" # Name of the environment
# AWSaws_account_id: "471112902605" # ID of the aws account to use for the aws provideraws_profile: "development-superuser" # Name of the AWS CLI profile to use for the aws provideraws_secondary_account_id: "471112902605" #ID of the aws account to use for the aws_secondary provideraws_secondary_profile: "development-superuser" # Name of the AWS CLI profile to use for the aws_secondary provider
# State Buckettf_state_account_id: "471112902605" # AWS Account for the S3 bucket holding the state filetf_state_region: "us-east-2" # Region for the S3 bucket holding the state filetf_state_bucket: "pf-tf-state-development" # S3 bucket holding the state filetf_state_lock_table: "pf-tf-locks-development" # Dynamodb table holding state locks"tf_state_profile: "development-superuser" # AWS profile to assume for working with the state files
# SLAsla_target: 1 # Either 1, 2, or 3This overrides the default SLA level for all modules deployed in that environment.
Create your VPC
We provide an aws_vpc module to deploy the VPC. This includes not only the VPC but also configuration of subnets, routing tables, flow logs, etc. See the module reference docs for a more comprehensive overview.
Deploy the AWS VPC Module
We will now deploy the aws_vpc module via terragrunt:
Create a new
aws_vpcdirectory in the primary region for your environment (notglobal).Add a
terragrunt.hclthat looks like this:9 collapsed linesinclude "panfactum" {path = find_in_parent_folders("panfactum.hcl")expose = true}terraform {source = include.panfactum.locals.pf_stack_source}inputs = {vpc_name = "REPLACE_ME" # This can be anything, but we recommend <ENVIRONMENT_NAME>_<REGION_NAME>vpc_description = "REPLACE_ME"}Run
pf-tf-initto enable the required providers.Run
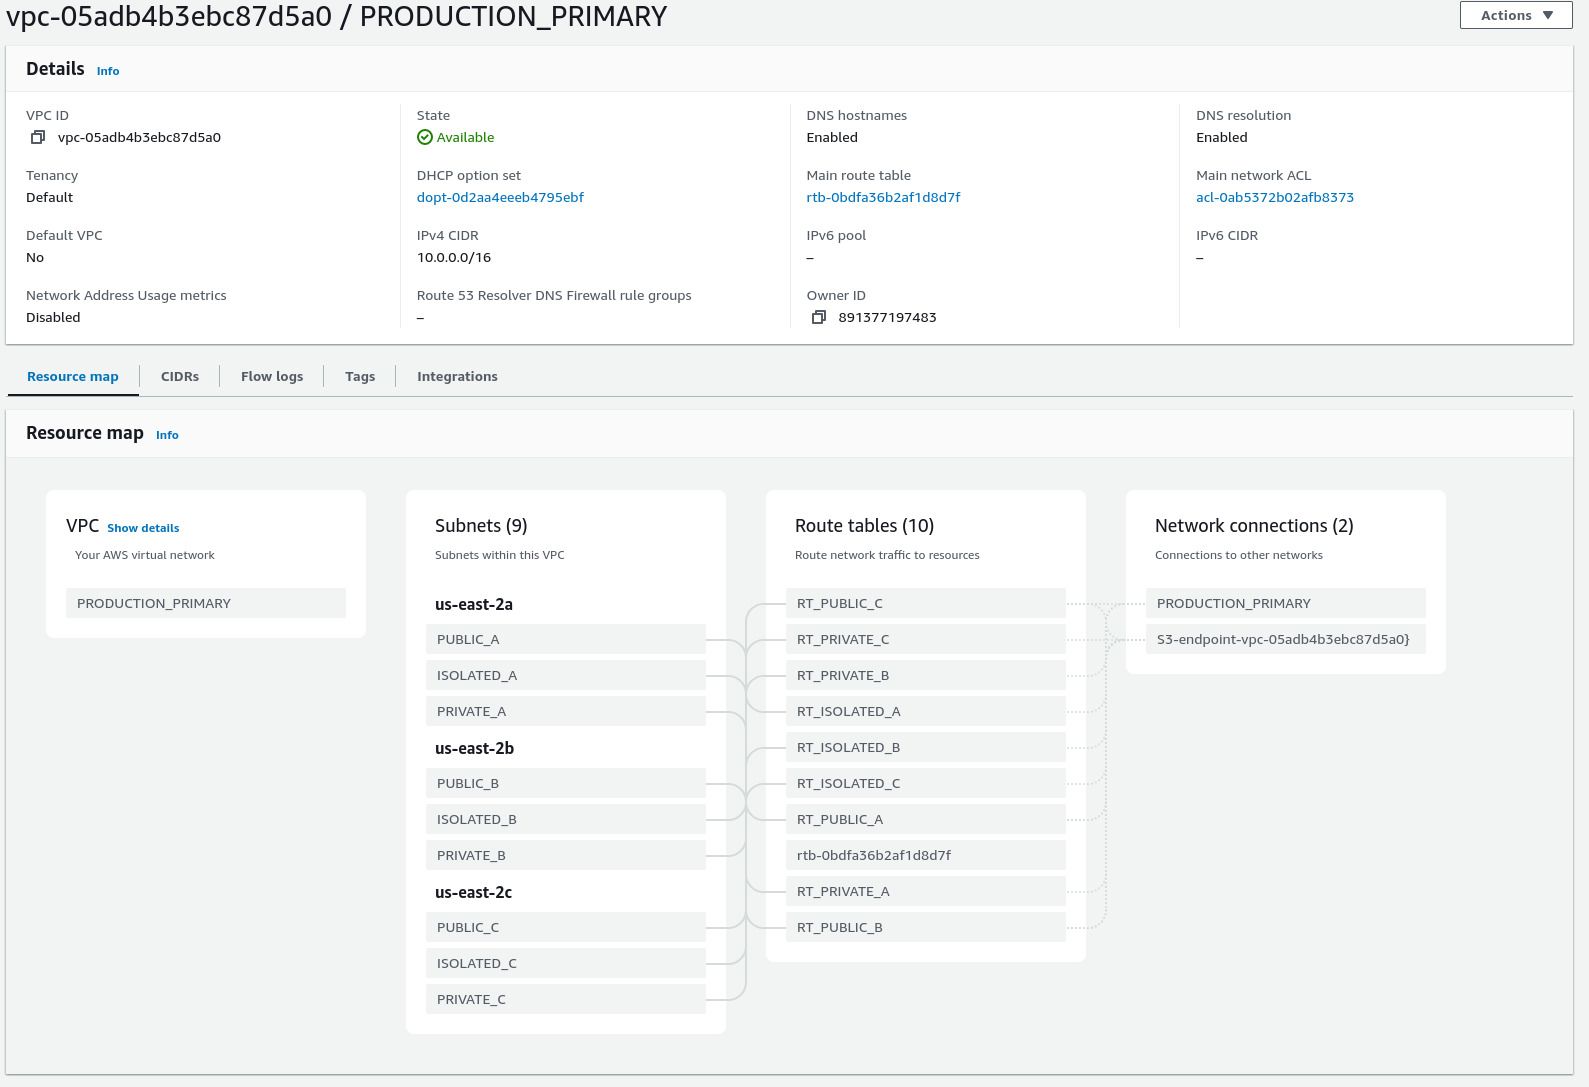
terragrunt apply.Ensure that your VPC looks similar to the following:
Ensure that your NAT nodes are running and healthy:

Note that each node should have a Public IPv4 address which should match its Elastic IP. All traffic from your cluster will appear to originate from one of these IP addresses, and they will remain the same for the lifetime of your VPC.
If you deviate from the default settings for the aws_vpc module, you will need to follow the instructions inside the module documentation for further instructions on how to configure AWS networking to support Panfactum infrastructure.
Test Connectivity
Let’s verify that networking connectivity in the new VPC is working as intended.
We provide a test script pf-vpc-network-test that ensures:
inbound traffic is rejected from your NAT nodes.
nodes running in your private subnets are able to connect to the internet through a NAT IP.
Run the test by calling pf-vpc-network-test <path-to-aws_vpc-module>. For example, if running the test from inside the aws_vpc folder, you would run the test as pf-vpc-network-test ..
If the test completes successfully, you are ready to proceed!
Next Steps
Now that networking is set up in AWS, we can deploy your Kubernetes cluster.