Autoscaling
Deploy the necessary metrics and autoscaling components to automatically rightsize the cluster.
Background
In Kubernetes, there are three distinct flavors of autoscaling:
Horizontal Pod Autoscaling (HPA): A built-in controller that adjusts the number of pods for a Deployment or StatefulSet. This can be extended to incorporate event-driven autoscaling with tools like KEDA.
Vertical Pod Autoscaling (VPA): A specific controller that can be installed to automatically adjust the resource requests and limits of pods based on historical usage.
Cluster Autoscaling: A category of controllers that will adjust the number of nodes running in the cluster. The two most popular projects are the Cluster Autoscaler and Karpenter.
The Panfactum stack makes use of all three types of autoscaling. To learn more about autoscaling and resource optimization, see our concept docs.
Deploy Metrics Server
For autoscaling to work, the Kubernetes API server must provide realtime metrics about individual container CPU and memory usage. Interestingly, this is not built-in to Kubernetes by default but rather powered by an API extension provided by the metrics-server project.
We provide a module to deploy the server: kube_metrics_server.
Let’s deploy it now:
Create a new directory adjacent to your
kube_linkerdmodule calledkube_metrics_server.Add a
terragrunt.hclto that directory that looks like this:include "panfactum" {path = find_in_parent_folders("panfactum.hcl")expose = true}terraform {source = include.panfactum.locals.pf_stack_source}dependency "cert_issuers" {config_path = "../kube_cert_issuers"skip_outputs = true}inputs = {}Run
pf-tf-initto enable the required providers.Run
terragrunt apply.
Let’s test to ensure it is working as intended:
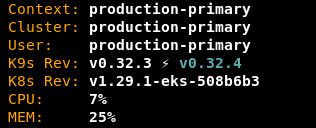
Open k9s (or restart if it is already open).
Notice that k9s is now reporting your total cluster resource utilization:
Navigate to the pods view. Notice that all pods are now reporting CPU and memory metrics:
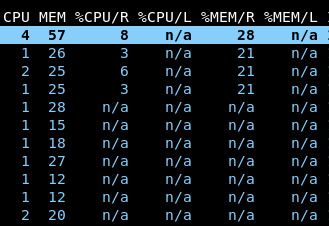
The
N/Afields for the/Rand/Lcolumns indicate that many pods have not had their resource requests (R) or limits (L) set. When we install the VPA, these will automatically be set.To diagnose utilization issues in the cluster, we bundle a CLI utility called
kube-capacityfor consolidating granular metrics across the entire cluster. Runkube-capacity -ucnow:Terminal window NODE NAMESPACE POD CONTAINER CPU REQUESTS CPU LIMITS CPU UTIL MEMORY REQUESTS MEMORY LIMITS MEMORY UTIL* * * * 1240m (21%) 3700m (63%) 514m (8%) 1740Mi (9%) 5334Mi (29%) 4596Mi (25%)....ip-10-0-213-182.us-east-2.compute.internal * * * 360m (18%) 1200m (62%) 161m (8%) 530Mi (8%) 1238Mi (20%) 1420Mi (23%)ip-10-0-213-182.us-east-2.compute.internal cilium cilium-4d4gf * 100m (5%) 0m (0%) 25m (1%) 10Mi (0%) 0Mi (0%) 126Mi (2%)ip-10-0-213-182.us-east-2.compute.internal cilium cilium-4d4gf cilium-agent 0m (0%) 0m (0%) 25m (1%) 0Mi (0%) 0Mi (0%) 126Mi (2%)ip-10-0-213-182.us-east-2.compute.internal aws-ebs-csi-driver ebs-csi-node-ph26m * 30m (1%) 100m (5%) 2m (0%) 120Mi (1%) 768Mi (12%) 26Mi (0%)ip-10-0-213-182.us-east-2.compute.internal aws-ebs-csi-driver ebs-csi-node-ph26m ebs-plugin 10m (0%) 0m (0%) 1m (0%) 40Mi (0%) 256Mi (4%) 11Mi (0%)ip-10-0-213-182.us-east-2.compute.internal aws-ebs-csi-driver ebs-csi-node-ph26m linkerd-proxy 0m (0%) 0m (0%) 1m (0%) 0Mi (0%) 0Mi (0%) 4Mi (0%)ip-10-0-213-182.us-east-2.compute.internal aws-ebs-csi-driver ebs-csi-node-ph26m liveness-probe 10m (0%) 0m (0%) 1m (0%) 40Mi (0%) 256Mi (4%) 8Mi (0%)ip-10-0-213-182.us-east-2.compute.internal aws-ebs-csi-driver ebs-csi-node-ph26m node-driver-registrar 10m (0%) 0m (0%) 1m (0%) 40Mi (0%) 256Mi (4%) 4Mi (0%)ip-10-0-213-182.us-east-2.compute.internal cert-manager jetstack-cert-manager-7b467c7747-xhbrx * 10m (0%) 100m (5%) 2m (0%) 10Mi (0%) 10Mi (0%) 16Mi (0%)ip-10-0-213-182.us-east-2.compute.internal cert-manager jetstack-cert-manager-7b467c7747-xhbrx cert-manager-controller 0m (0%) 0m (0%) 1m (0%) 0Mi (0%) 0Mi (0%) 13Mi (0%)ip-10-0-213-182.us-east-2.compute.internal cert-manager jetstack-cert-manager-7b467c7747-xhbrx linkerd-proxy 0m (0%) 0m (0%) 1m (0%) 0Mi (0%) 0Mi (0%) 4Mi (0%)ip-10-0-213-182.us-east-2.compute.internal linkerd linkerd-destination-96c96755b-8thzg * 10m (0%) 100m (5%) 3m (0%) 10Mi (0%) 10Mi (0%) 45Mi (0%)ip-10-0-213-182.us-east-2.compute.internal linkerd linkerd-destination-96c96755b-8thzg destination 0m (0%) 0m (0%) 2m (0%) 0Mi (0%) 0Mi (0%) 22Mi (0%)ip-10-0-213-182.us-east-2.compute.internal linkerd linkerd-destination-96c96755b-8thzg linkerd-proxy 0m (0%) 0m (0%) 1m (0%) 0Mi (0%) 0Mi (0%) 8Mi (0%)ip-10-0-213-182.us-east-2.compute.internal linkerd linkerd-destination-96c96755b-8thzg policy 0m (0%) 0m (0%) 1m (0%) 0Mi (0%) 0Mi (0%) 6Mi (0%)ip-10-0-213-182.us-east-2.compute.internal linkerd linkerd-destination-96c96755b-8thzg sp-validator 0m (0%) 0m (0%) 1m (0%) 0Mi (0%) 0Mi (0%) 10Mi (0%)ip-10-0-213-182.us-east-2.compute.internal linkerd linkerd-identity-cc6dffdf-tt9jm * 10m (0%) 100m (5%) 1m (0%) 10Mi (0%) 10Mi (0%) 15Mi (0%)ip-10-0-213-182.us-east-2.compute.internal linkerd linkerd-identity-cc6dffdf-tt9jm identity 0m (0%) 0m (0%) 1m (0%) 0Mi (0%) 0Mi (0%) 11Mi (0%)ip-10-0-213-182.us-east-2.compute.internal linkerd linkerd-identity-cc6dffdf-tt9jm linkerd-proxy 0m (0%) 0m (0%) 1m (0%) 0Mi (0%) 0Mi (0%) 4Mi (0%)ip-10-0-213-182.us-east-2.compute.internal linkerd linkerd-proxy-injector-8497c6bd8-dwv6j * 10m (0%) 100m (5%) 1m (0%) 10Mi (0%) 10Mi (0%) 19Mi (0%)ip-10-0-213-182.us-east-2.compute.internal linkerd linkerd-proxy-injector-8497c6bd8-dwv6j linkerd-proxy 0m (0%) 0m (0%) 1m (0%) 0Mi (0%) 0Mi (0%) 4Mi (0%)ip-10-0-213-182.us-east-2.compute.internal linkerd linkerd-proxy-injector-8497c6bd8-dwv6j proxy-injector 0m (0%) 0m (0%) 1m (0%) 0Mi (0%) 0Mi (0%) 16Mi (0%)ip-10-0-213-182.us-east-2.compute.internal metrics-server metrics-server-6df8ffd998-65mkb * 100m (5%) 100m (5%) 4m (0%) 200Mi (3%) 10Mi (0%) 24Mi (0%)ip-10-0-213-182.us-east-2.compute.internal metrics-server metrics-server-6df8ffd998-65mkb linkerd-proxy 0m (0%) 0m (0%) 1m (0%) 0Mi (0%) 0Mi (0%) 4Mi (0%)ip-10-0-213-182.us-east-2.compute.internal metrics-server metrics-server-6df8ffd998-65mkb metrics-server 100m (5%) 0m (0%) 3m (0%) 200Mi (3%) 0Mi (0%) 20Mi (0%)ip-10-0-213-182.us-east-2.compute.internal secrets-csi secrets-csi-secrets-store-csi-driver-zch5w * 70m (3%) 400m (20%) 1m (0%) 140Mi (2%) 400Mi (6%) 26Mi (0%)ip-10-0-213-182.us-east-2.compute.internal secrets-csi secrets-csi-secrets-store-csi-driver-zch5w linkerd-proxy 0m (0%) 0m (0%) 1m (0%) 0Mi (0%) 0Mi (0%) 4Mi (0%)ip-10-0-213-182.us-east-2.compute.internal secrets-csi secrets-csi-secrets-store-csi-driver-zch5w liveness-probe 10m (0%) 100m (5%) 1m (0%) 20Mi (0%) 100Mi (1%) 8Mi (0%)ip-10-0-213-182.us-east-2.compute.internal secrets-csi secrets-csi-secrets-store-csi-driver-zch5w node-driver-registrar 10m (0%) 100m (5%) 1m (0%) 20Mi (0%) 100Mi (1%) 4Mi (0%)ip-10-0-213-182.us-east-2.compute.internal secrets-csi secrets-csi-secrets-store-csi-driver-zch5w secrets-store 50m (2%) 200m (10%) 1m (0%) 100Mi (1%) 200Mi (3%) 12Mi (0%)ip-10-0-213-182.us-east-2.compute.internal vault vault-1 * 10m (0%) 100m (5%) 41m (2%) 10Mi (0%) 10Mi (0%) 52Mi (0%)ip-10-0-213-182.us-east-2.compute.internal vault vault-1 linkerd-proxy 0m (0%) 0m (0%) 4m (0%) 0Mi (0%) 0Mi (0%) 4Mi (0%)ip-10-0-213-182.us-east-2.compute.internal vault vault-1 vault 0m (0%) 0m (0%) 38m (1%) 0Mi (0%) 0Mi (0%) 49Mi (0%)ip-10-0-213-182.us-east-2.compute.internal vault vault-csi-provider-4cndp * 10m (0%) 100m (5%) 3m (0%) 10Mi (0%) 10Mi (0%) 34Mi (0%)ip-10-0-213-182.us-east-2.compute.internal vault vault-csi-provider-4cndp linkerd-proxy 0m (0%) 0m (0%) 1m (0%) 0Mi (0%) 0Mi (0%) 4Mi (0%)ip-10-0-213-182.us-east-2.compute.internal vault vault-csi-provider-4cndp vault-agent 0m (0%) 0m (0%) 2m (0%) 0Mi (0%) 0Mi (0%) 25Mi (0%)ip-10-0-213-182.us-east-2.compute.internal vault vault-csi-provider-4cndp vault-csi-provider 0m (0%) 0m (0%) 1m (0%) 0Mi (0%) 0Mi (0%) 6Mi (0%)
Deploy the Vertical Pod Autoscaler
Now that we are capturing resource utilization data, we can use the vertical pod autoscaler to automatically rightsize your pod’s CPU and memory resource requests and limits based on historical usage.
We provide a module to deploy the VPA: kube_vpa.
Let’s deploy it now:
Create a new directory adjacent to your
kube_metrics_servermodule calledkube_vpa.Add a
terragrunt.hclto that directory that looks like this:include "panfactum" {path = find_in_parent_folders("panfactum.hcl")expose = true}terraform {source = include.panfactum.locals.pf_stack_source}dependency "cert_issuers" {config_path = "../kube_cert_issuers"skip_outputs = true}inputs = {}Run
pf-tf-initto enable the required providers.Run
terragrunt apply.In your
region.yaml, setextra_inputs.vpa_enabledtotrue:# Meta - Example values only - Replace with your ownregion: "us-east-2"# AWS - Example values only - Replace with your ownaws_region: "us-east-2"aws_secondary_region: "us-west-2"# Kubernetes - Example values only - Replace with your ownkube_config_context: "production-primary"kube_api_server: "https://83063DDB274B2A04B6A7DC29DCB1740E.gr7.us-east-2.eks.amazonaws.com"# Vault - Example values only - Replace with your ownvault_addr: "https://vault.prod.panfactum.com"# Extra inputsextra_inputs:vpa_enabled: true # Set to `true` once kube_vpa is deployedThis will turn on the VPA for all modules in this cluster in the next apply.
Navigate up to the directory containing all your modules (i.e., the region directory). Run
terragrunt run-all applyto re-apply all the modules in the region at once. Note that this might cause your Vault proxy to disconnect as pods are restarted and thus result in an incomplete apply. Simply reconnect the proxy and try the command again.After all these modules are updated, you should now see many VPA resources in k9s (
:vpa). After a minute or two, they should begin to provide resource estimates: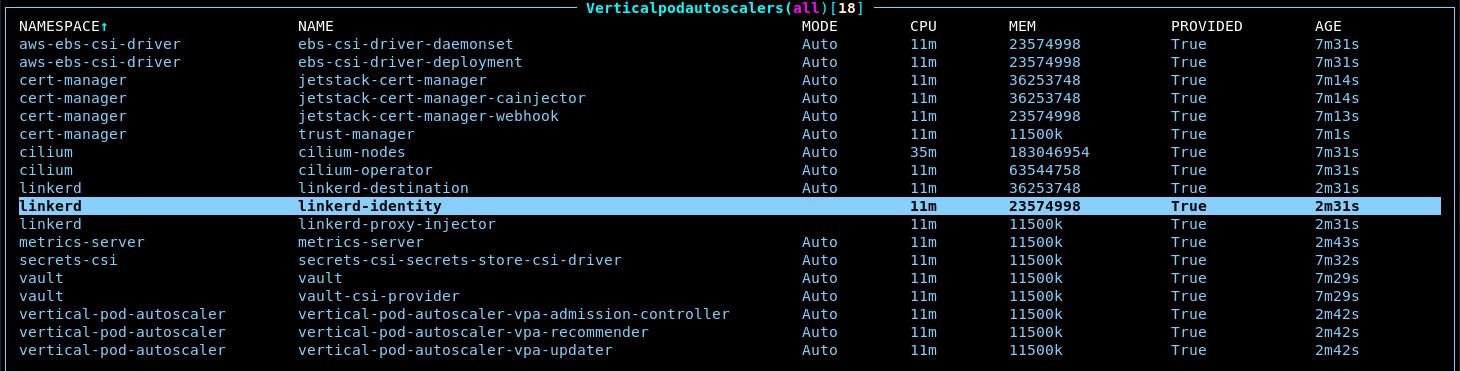
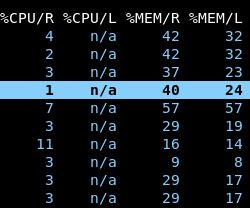
Return to the pod view. Notice that all request columns are populated as well as the memory limit column:
We set requests for both CPU and memory so that the Kubernetes scheduler can accurately decide which nodes have enough resources available for pods during the pod-to-node assignment phase.
We set memory limits so that memory leaks in any application will not consume unbounded memory on the node and thus cause all other pods on the node to crash with OOM errors.
We do not set cpu limits because if a node’s CPU is constrained, CPU will automatically be shared across all pods proportional to each pod’s CPU request. 1
When you first install the VPA, you will see many pods evicted over the first few hours. As the VPA collects utilization data, it will update its recommendations for resource settings. If a pod’s current resource settings significantly deviate from an updated recommendation, the VPA will evict the pod to update its resource settings.
Unfortunately, there is currently no way for a pod to have its resources updated in-place.
That said, we provide PodDisruptionBudgets for all of the Panfactum components, so you should not see any service disruptions despite the evictions.
Deploy Karpenter
Historically, cluster autoscaling has almost always been done by the cluster-autoscaler addon. However, this controller had several limitations and required lots of configuration to provide the optimal setup for your organization.
Fortunately, a new tool has emerged, Karpenter, which provides both more flexibility, better performance, and better cost optimization. Specifically:
You do not need to choose instance types in advance as it will query your cloud providers API for the entire list of available instance types and prices and then spin up the instance types that are the best fit for your workloads at the lowest cost
If you allow it, it will prioritize utilizing spot instances for around a 70% discount over list price. Moreover, it will periodically check if existing workloads can be migrated to cheaper instances as prices change over time.
It incorporates the functionality provided by the aws-node-termination-handler removing the need to run it altogether.
It scales extremely well with the ability to spin up and down 100s of nodes at a time.
We provide an infrastructure module to deploy it: kube_karpenter.
Let’s deploy it now:
Create a new directory adjacent to your
kube_vpamodule calledkube_karpenter.Add a
terragrunt.hclto that directory that looks like this:include "panfactum" {path = find_in_parent_folders("panfactum.hcl")expose = true}terraform {source = include.panfactum.locals.pf_stack_source}dependency "cluster" {config_path = "../aws_eks"}inputs = {cluster_name = dependency.cluster.outputs.cluster_namenode_role_arn = dependency.cluster.outputs.node_role_arnwait = false # IMPORTANT: You must set this to `false` during the initial install process.}Adjust the
waitinput tofalse. This will allow the installation to proceed even though there will be temporary errors as Karpenter sets up the required resources.Run
pf-tf-initto enable the required providers.Run
terragrunt apply.Remove the
waitinput. That was only needed to allow the installation process to proceed even though there will be temporary errors as Karpenter sets up the required resources.include "panfactum" {path = find_in_parent_folders("panfactum.hcl")expose = true}terraform {source = include.panfactum.locals.pf_stack_source}dependency "cluster" {config_path = "../aws_eks"}inputs = {cluster_name = dependency.cluster.outputs.cluster_namenode_role_arn = dependency.cluster.outputs.node_role_arnwait = false}
Deploy NodePools
Karpenter requires some instructions about how to perform autoscaling such as what AMI to use for the underlying nodes. It looks for those instructions in NodePool custom resources.
The Panfactum stack comes with several classes of NodePools which are defined in the kube_karpenter_node_pools module.
Let’s deploy the NodePools now:
Create a new directory adjacent to your
kube_karpentermodule calledkube_karpenter_node_pools.Add a
terragrunt.hclto that directory that looks like this:include "panfactum" {path = find_in_parent_folders("panfactum.hcl")expose = true}terraform {source = include.panfactum.locals.pf_stack_source}dependency "karpenter" {config_path = "../kube_karpenter"skip_outputs = true}dependency "cluster" {config_path = "../aws_eks"}dependency "vpc" {config_path = "../aws_vpc"}inputs = {cluster_name = dependency.cluster.outputs.cluster_namecluster_endpoint = dependency.cluster.outputs.cluster_urlcluster_dns_service_ip = dependency.cluster.outputs.dns_service_ipcluster_ca_data = dependency.cluster.outputs.cluster_ca_datanode_instance_profile = dependency.cluster.outputs.node_instance_profilenode_vpc_id = dependency.vpc.outputs.vpc_idnode_security_group_id = dependency.cluster.outputs.node_security_group_idnode_subnets = ["PRIVATE_A","PRIVATE_B","PRIVATE_C"]}For
node_subnets, we strongly recommend using the same subnets you used in theaws_eksmodule fornode_subnetsunless you have a specific reason not to.Run
pf-tf-initto enable the required providers.Run
terragrunt apply.
Test Cluster Autoscaling
Let’s verify that autoscaling now works as expected.
All deployments in the Panfactum stack are configured to disallow multiple replicas of the same pod to run on the same node. 2 As a result, we can increase the number of replicas in one of our pods and ensure that Karpenter recognizes that additional nodes need to be schedule.
In K9s, navigate to
:deployments.Highlight the
cert-manager-webhookdeployment and presssto trigger the scale dialogue.Increase this to
10.Immediately, Karpenter should recognize that new nodes are required to run these pods and begin to provision them. After 30-60 seconds, the nodes will be registered with Kubernetes and you should see them under
:nodes.Describe some of the new nodes by pressing
dwhen highlighting one. Notice that many of these new nodes are spot instances.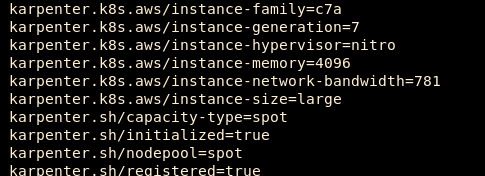
Scale
cert-manager-webhookback down to2. Karpenter will automatically take care of the node cleanup and de-provisioning. This will happen slower than the scale-up as scaling down happens in batches to avoid cluster thrash or service disruption. However, this should complete within 15 minutes.
Adjust EKS Node Pools
Now that Karpenter is successfully running, we can disable bootstrap mode on the EKS cluster by setting bootstrap_mode_enabled to false in the aws_eks module. This will reduce costs by allowing Karpenter to autoscale most of the cluster’s capacity.
Make that change and re-apply the module.
Deploy Bin-Packing Kubernetes Scheduler
The Kubernetes Scheduler (kube-scheduler) is the control plane component that is in charge of assigning new Pods to Nodes. AWS provides a built-in one (default-scheduler) via EKS, but it comes with a few limitations. 3 Most importantly, this scheduler cannot be configured and does not allow for resource bin-packing.
Instead, the default scheduler will try to spread pods evenly across nodes rather than consolidate them on as few nodes as possible. This hinders Karpenter’s ability to efficiently de-provision nodes, and can result in significant wasted resources. 4
We provide an alternative scheduler in kube_scheduler (panfactum) that implements the bin-packing scheduling algorithm. Typically, this results in a 25-33% cost reduction.
Let’s deploy it now:
Create a new directory adjacent to your
kube_karpentermodule calledkube_scheduler.Add a
terragrunt.hclto that directory that looks like this:include "panfactum" {path = find_in_parent_folders("panfactum.hcl")expose = true}terraform {source = include.panfactum.locals.pf_stack_source}dependency "karpenter" {config_path = "../kube_karpenter"skip_outputs = true}dependency "kyverno" {config_path = "../kube_kyverno"skip_outputs = true}inputs = {}Run
pf-tf-initto enable the required providers.Run
terragrunt apply.In your
region.yaml, setextra_inputs.panfactum_scheduler_enabledtotrue:# Meta - Example values only - Replace with your ownregion: "us-east-2"# AWS - Example values only - Replace with your ownaws_region: "us-east-2"aws_secondary_region: "us-west-2"# Kubernetes - Example values only - Replace with your ownkube_config_context: "production-primary"kube_api_server: "https://83063DDB274B2A04B6A7DC29DCB1740E.gr7.us-east-2.eks.amazonaws.com"# Vault - Example values only - Replace with your ownvault_addr: "https://vault.prod.panfactum.com"# Extra inputsextra_inputs:vpa_enabled: true # Do not enable until kube_vpa is deployedpanfactum_scheduler_enabled: true # Only set to `true` when kube_scheduler has been deployedThis will instruct all modules in this cluster to use this new scheduler instead of the default EKS one.
Re-deploy all Kubernetes modules.
Deploy KEDA
The Kubernetes Event-driven Autoscaler (KEDA) extends the built-in horizontal autoscaling capabilities of Kubernetes provided by the Horizontal Pod Autoscaler (HPA).
The built-in Kubernetes HPA has several limitations that KEDA allows you to mitigate:
- Cannot scale to 0
- Cannot be combined with vertical autoscaling
- Can only scale on internal metrics like CPU and memory (KEDA supports hundreds of additional metrics)
We provide a module kube_keda for deploying and managing KEDA.
Let’s deploy it now:
Create a new directory adjacent to your
kube_schedulermodule calledkube_keda.Add a
terragrunt.hclto that directory that looks like this:include "panfactum" {path = find_in_parent_folders("panfactum.hcl")expose = true}terraform {source = include.panfactum.locals.pf_stack_source}dependency "cert_issuers" {config_path = "../kube_cert_issuers"skip_outputs = true}dependency "scheduler" {config_path = "../kube_scheduler"skip_outputs = true}inputs = {}Run
pf-tf-initto enable the required providers.Run
terragrunt apply.
Next Steps
Now that autoscaling is active, we can proceed to set up inbound networking for our cluster.
Footnotes
In general, it is best to avoid setting CPU limits in order to allow CPU to occasionally spike as needed. If the CPU utilization remains high, cluster autoscaling will kick in to provision net new nodes. ↩
To prevent service disruption if a node goes offline. ↩
The EKS scheduler does not run inside your cluster, but rather in the private AWS system where the Kubernetes API server is hosted. ↩
This article provides a great real world example of how this impacted a company running Kubernetes clusters in AWS. ↩