Installing Self-hosted Runners for GitHub Actions
Objective
Install self-hosted runners to leverage your Panfactum clusters for executing GHA workflows.
Background and Limitations
Please ensure you have read this section and the associated links thoroughly before continuing.
GitHub Actions are not the recommended method for setting up CI / CD in Panfactum clusters. We provide a full set of guides for our recommended architecture here.
Additionally, GitHub Actions have many shortcomings compared to a more full-featured, Kubernetes-native workflow engine such as Argo Workflows. See our detailed analysis and list of limitations here.
Install the Runner Controller
To begin using self-hosted runners, you must first install the Actions Runner Controller (ARC) which is a Kubernetes operator that orchestrates and scales the runners based on Kubernetes custom resources.
We provide a module to deploy this controller: kube_gha.
Let’s deploy it now:
Create a new directory adjacent to your
aws_eksmodule calledkube_gha.Add a
terragrunt.hclto that directory that looks like this:include "panfactum" { path = find_in_parent_folders("panfactum.hcl") expose = true } terraform { source = include.panfactum.locals.pf_stack_source } dependency "karpenter" { config_path = "../kube_karpenter" skip_outputs = true } inputs = {}Run
pf-tf-initin the directory to enable the required providers.Run
terragrunt apply.
You should now see a new Deployment running in the gha namespace called gha-controller.
Install the Runners
The controller allows you to create various “runners” which are the pods that will actually execute your GHA code.
To create runners, you will use our kube_gha_runners module.
Let’s deploy one type of runner now:
Create a new directory adjacent to your
kube_ghamodule calledkube_gha_runners.Add a
terragrunt.hcland sops-encryptedsecrets.yamlto that directory that looks like this:include "panfactum" { path = find_in_parent_folders("panfactum.hcl") expose = true } terraform { source = include.panfactum.locals.pf_stack_source } dependency "kube_gha" { config_path = "../kube_gha" skip_outputs = true } locals { secrets = yamldecode(sops_decrypt_file("${get_terragrunt_dir()}/secrets.yaml")) config_url = "REPLACE_ME" } inputs = { github_token = local.secrets.github_token runners = { default = { github_config_url = local.config_url } default-secondary = { github_config_url = local.config_url } } }github_token: ENC[AES256_GCM,data:waZkOdu3dIsZVpb985JP7Ux+k9bFE3hdXaoK+sXG3bL5KlCIP/5UMw==,iv:pI5TPQhm6YFmEewgpzrmYJ3xpZaWClf5FlLhPikh3zE=,tag:mrk+oX43G4n7kLLcQ0EsPw==,type:str] sops: kms: - arn: arn:aws:kms:us-east-2:891377197483:key/mrk-d8075b5c1dc8468db33448f40ae92b5c created_at: "2024-09-13T18:56:01Z" enc: AQICAHiO33BhcW4FdrQk4VmdZqD44nTqvEUzee/kwr4reXJeMQFgamX9N5TtSAHw3xniTH1lAAAAfjB8BgkqhkiG9w0BBwagbzBtAgEAMGgGCSqGSIb3DQEHATAeBglghkgBZQMEAS4wEQQMahqMHDqgDm0fRVLCAgEQgDtcLmiUDK833ACrmXm8MBYZ49f+TzCZQYQYGEr2TT+7a7MBgpCFNirTzDvOA7g9hZxIXODMPt2KYy/05g== aws_profile: production-superuser - arn: arn:aws:kms:us-west-2:891377197483:key/mrk-d8075b5c1dc8468db33448f40ae92b5c created_at: "2024-09-13T18:56:01Z" enc: AQICAHiO33BhcW4FdrQk4VmdZqD44nTqvEUzee/kwr4reXJeMQEbrrmqDp6wWoikLY+HEBvXAAAAfjB8BgkqhkiG9w0BBwagbzBtAgEAMGgGCSqGSIb3DQEHATAeBglghkgBZQMEAS4wEQQM3LAVpXuQ1swJLWGfAgEQgDu7bMlhf98r8MXgcSbfmANfqZmWhCNPFca3IlLHifNyWliaKZpGErZhe72Oi+JSBn1G2AwTxqefhGnk6A== aws_profile: production-superuser gcp_kms: [] azure_kv: [] hc_vault: [] age: [] lastmodified: "2024-09-13T18:56:02Z" mac: ENC[AES256_GCM,data:kkMSWPwLJPGeuA5kUIFg0gNIt9HhvrFn+tZqY1i24xh1P53wZOcNdvs/c78EsRygxWmxzjNiuWDiCbYdkBwW9aYMSZEgUnCw0WDtBoTU9AOk5Z7LxuLSIyfHTaORpnn5S2dfVVUIZkW+1bGSSsJgqzRaHdGfbciPN1j9rlS6CmY=,iv:+mv4Yy0xtz2boJpGhMp5HhWYzVjz4BGOa4FGyw7Z9Bk=,tag:LSFN99YD+qE2eYsutuPJsA==,type:str] pgp: [] unencrypted_suffix: _unencrypted version: 3.8.1Follow GitHub’s documentation to provision a Classic Personal Access Token (PAT) with the correct permissions. Provide this token as an input via
github_token. Make sure that the token is encrypted with sops.The
runnersinput is a key-value map that defines the different runner groups that your workflow jobs can target. The keys are the names of the groups and the values are their configuration. See the module documentation for information on the various configuration values.The names of your runners must be globally unique to your organization. So if you install runners in multiple clusters, they cannot have identical names.
The only required configuration value is the
github_config_urlwhich defines where in GitHub your runners will be registered for use. You can register runners to either (a) a single repository, (b) an entire organization, or (c) an entire enterprise. Thegithub_config_urlis simply the URL to one of those entities (e.g.,https://github.com/Panfactum/stack). We recommend registering runners to your organization.
Run
pf-tf-initin the directory to enable the required providers.Run
terragrunt apply.
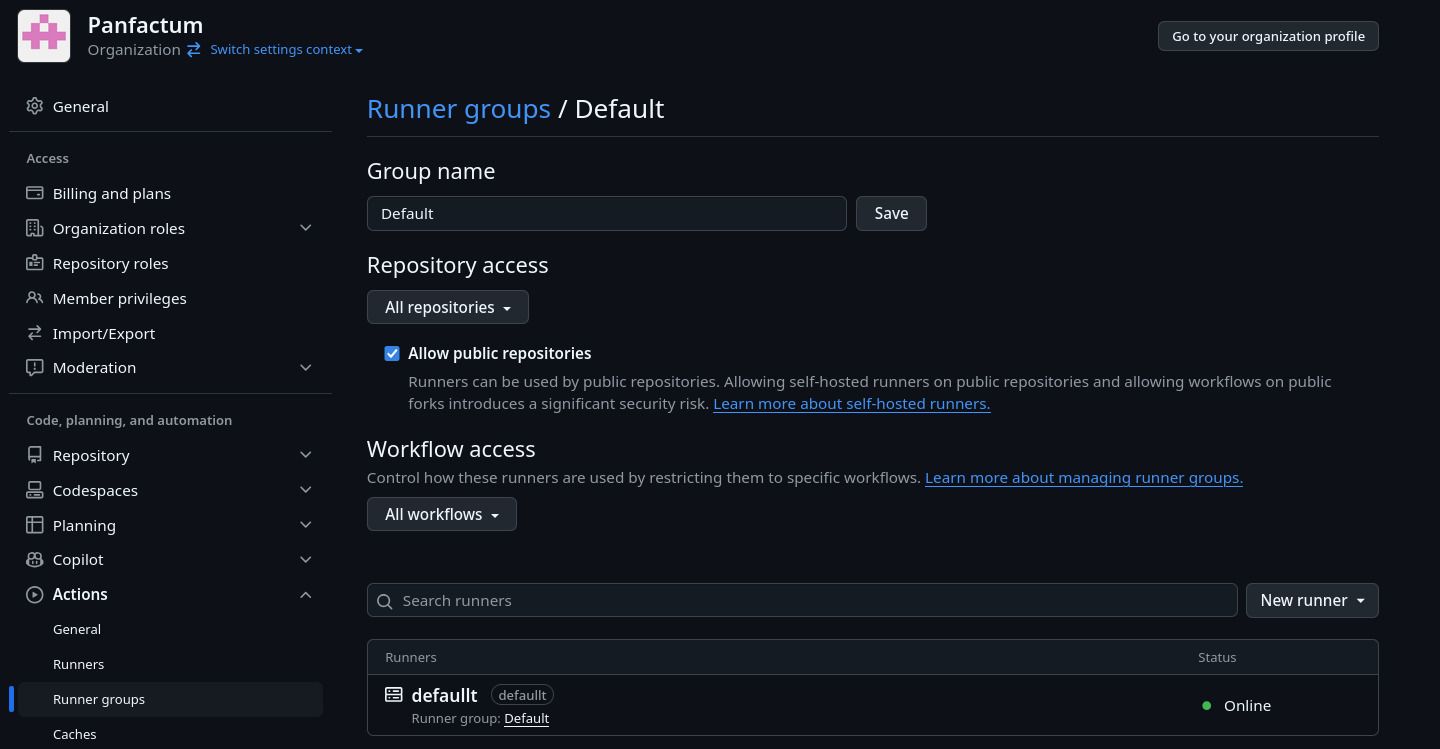
Assuming you have registered runners to your organization, you should now be able to see your runners in your GitHub organization’s settings:

Test the Runner
Let’s create a test workflow in on of your repositories to verify that self-hosted runners are working as expected.
In your repository, create a file at
.github/workflows/example.yaml.Add the following configuration:
name: Example
on:
  workflow_dispatch: # This enables you to launch the workflow manually in the GitHub UI
jobs:
  test:
    runs-on: default # This should be the name of your runner in the `runners` input when you created it in the previous section
    steps:
      - name: "Hello world"
        shell: bash
        run: 'echo "Hello World"'
Commit and push this new
.github/workflows/example.yaml.Open the GitHub repository in a web browser. Navigate to the Actions tab. You should see the “Example” workflow in the left-hand sidebar:

Select the workflow. You should now see an option to run the workflow:

Run the workflow. Within a minute, the workflow job should begin, and you should see the runner pod in your cluster. It should complete successfully after one to two minutes.

If the workflow is stuck in a pending state, double check that your runner is available on the repository by visiting Actions > Runners > Self-hosted runners. Additionally, make sure that the
runs-onvalue in your.github/workflows/example.yamlmatches the name of at least one runner in this view.
Congratulations! You have successfully installed self-hosted GHA runners and can now run GHA workflows inside your Panfactum clusters.