Installing BuildKit
Objective
Install BuildKit and build a container image.
Background
BuildKit is a server that efficiently executes container image build instructions (often via a format such as Dockerfiles) and outputs build artifacts into image registries.
The organization that maintains BuildKit, Moby, grew out of Docker in 2017. Today, BuildKit is ubiquitous. It is embedded in the Docker Engine and as a result has become the most popular way to build container images. Moreover, it is used as a core component in many popular projects such as Dagger, Depot and Gitpod.
In the Panfactum stack, we deploy BuildKit into a Kubernetes cluster as a standalone set of servers that can be used by CI / CD pipelines and local developers alike. Centralizing the build processes provides many benefits:
The build cache is shared across all users allowing for 10-100x faster build times.
Multi-platform container images become trivial to create, allowing developers to easily generate images that run on both amd64 and arm64 architectures.
Every developer does not need a beefy machine to build images as teams can rely on the elastic capacity of the cloud.
Prepare for Installation
Before you install BuildKit, you must first decide where it should run.
In general, you should aim to achieve the following architecture:
%20AppleWebKit%2F537.36%20(KHTML%2C%20like%20Gecko)%20draw.io%2F24.1.0%20Chrome%2F122.0.6261.156%20Electron%2F29.2.0%20Safari%2F537.36%26quot%3B%20etag%3D%26quot%3B1iTukmoz6K5VWyR935mh%26quot%3B%20version%3D%26quot%3B24.1.0%26quot%3B%20type%3D%26quot%3Bdevice%26quot%3B%26gt%3B%26%2310%3B%20%20%26lt%3Bdiagram%20name%3D%26quot%3BPage-1%26quot%3B%20id%3D%26quot%3BLDvCKok7nVfY_3z3i0AT%26quot%3B%26gt%3B%26%2310%3B%20%20%20%20%26lt%3BmxGraphModel%20dx%3D%26quot%3B2216%26quot%3B%20dy%3D%26quot%3B1260%26quot%3B%20grid%3D%26quot%3B1%26quot%3B%20gridSize%3D%26quot%3B10%26quot%3B%20guides%3D%26quot%3B1%26quot%3B%20tooltips%3D%26quot%3B1%26quot%3B%20connect%3D%26quot%3B1%26quot%3B%20arrows%3D%26quot%3B1%26quot%3B%20fold%3D%26quot%3B1%26quot%3B%20page%3D%26quot%3B1%26quot%3B%20pageScale%3D%26quot%3B1%26quot%3B%20pageWidth%3D%26quot%3B1200%26quot%3B%20pageHeight%3D%26quot%3B1600%26quot%3B%20math%3D%26quot%3B0%26quot%3B%20shadow%3D%26quot%3B0%26quot%3B%26gt%3B%26%2310%3B%20%20%20%20%20%20%26lt%3Broot%26gt%3B%26%2310%3B%20%20%20%20%20%20%20%20%26lt%3BmxCell%20id%3D%26quot%3B0%26quot%3B%20%2F%26gt%3B%26%2310%3B%20%20%20%20%20%20%20%20%26lt%3BmxCell%20id%3D%26quot%3B1%26quot%3B%20parent%3D%26quot%3B0%26quot%3B%20%2F%26gt%3B%26%2310%3B%20%20%20%20%20%20%20%20%26lt%3BmxCell%20id%3D%26quot%3BXV5yg_f98szh5ZPkbT75-2%26quot%3B%20value%3D%26quot%3B%26quot%3B%20style%3D%26quot%3BendArrow%3Dnone%3Bdashed%3D1%3Bhtml%3D1%3Brounded%3D0%3B%26quot%3B%20edge%3D%26quot%3B1%26quot%3B%20parent%3D%26quot%3B1%26quot%3B%26gt%3B%26%2310%3B%20%20%20%20%20%20%20%20%20%20%26lt%3BmxGeometry%20width%3D%26quot%3B50%26quot%3B%20height%3D%26quot%3B50%26quot%3B%20relative%3D%26quot%3B1%26quot%3B%20as%3D%26quot%3Bgeometry%26quot%3B%26gt%3B%26%2310%3B%20%20%20%20%20%20%20%20%20%20%20%20%26lt%3BmxPoint%20x%3D%26quot%3B610%26quot%3B%20y%3D%26quot%3B860%26quot%3B%20as%3D%26quot%3BsourcePoint%26quot%3B%20%2F%26gt%3B%26%2310%3B%20%20%20%20%20%20%20%20%20%20%20%20%26lt%3BmxPoint%20x%3D%26quot%3B610%26quot%3B%20y%3D%26quot%3B650%26quot%3B%20as%3D%26quot%3BtargetPoint%26quot%3B%20%2F%26gt%3B%26%2310%3B%20%20%20%20%20%20%20%20%20%20%26lt%3B%2FmxGeometry%26gt%3B%26%2310%3B%20%20%20%20%20%20%20%20%26lt%3B%2FmxCell%26gt%3B%26%2310%3B%20%20%20%20%20%20%20%20%26lt%3BmxCell%20id%3D%26quot%3BXV5yg_f98szh5ZPkbT75-4%26quot%3B%20value%3D%26quot%3BDevelopment%26quot%3B%20style%3D%26quot%3Btext%3Bhtml%3D1%3Balign%3Dcenter%3BverticalAlign%3Dmiddle%3Bresizable%3D0%3Bpoints%3D%5B%5D%3Bautosize%3D1%3BstrokeColor%3Dnone%3BfillColor%3Dnone%3BfontSize%3D14%3BfontStyle%3D1%26quot%3B%20vertex%3D%26quot%3B1%26quot%3B%20parent%3D%26quot%3B1%26quot%3B%26gt%3B%26%2310%3B%20%20%20%20%20%20%20%20%20%20%26lt%3BmxGeometry%20x%3D%26quot%3B485%26quot%3B%20y%3D%26quot%3B650%26quot%3B%20width%3D%26quot%3B110%26quot%3B%20height%3D%26quot%3B30%26quot%3B%20as%3D%26quot%3Bgeometry%26quot%3B%20%2F%26gt%3B%26%2310%3B%20%20%20%20%20%20%20%20%26lt%3B%2FmxCell%26gt%3B%26%2310%3B%20%20%20%20%20%20%20%20%26lt%3BmxCell%20id%3D%26quot%3BXV5yg_f98szh5ZPkbT75-5%26quot%3B%20value%3D%26quot%3B%26quot%3B%20style%3D%26quot%3BendArrow%3Dnone%3Bdashed%3D1%3Bhtml%3D1%3Brounded%3D0%3B%26quot%3B%20edge%3D%26quot%3B1%26quot%3B%20parent%3D%26quot%3B1%26quot%3B%26gt%3B%26%2310%3B%20%20%20%20%20%20%20%20%20%20%26lt%3BmxGeometry%20width%3D%26quot%3B50%26quot%3B%20height%3D%26quot%3B50%26quot%3B%20relative%3D%26quot%3B1%26quot%3B%20as%3D%26quot%3Bgeometry%26quot%3B%26gt%3B%26%2310%3B%20%20%20%20%20%20%20%20%20%20%20%20%26lt%3BmxPoint%20x%3D%26quot%3B750%26quot%3B%20y%3D%26quot%3B860%26quot%3B%20as%3D%26quot%3BsourcePoint%26quot%3B%20%2F%26gt%3B%26%2310%3B%20%20%20%20%20%20%20%20%20%20%20%20%26lt%3BmxPoint%20x%3D%26quot%3B750%26quot%3B%20y%3D%26quot%3B650%26quot%3B%20as%3D%26quot%3BtargetPoint%26quot%3B%20%2F%26gt%3B%26%2310%3B%20%20%20%20%20%20%20%20%20%20%26lt%3B%2FmxGeometry%26gt%3B%26%2310%3B%20%20%20%20%20%20%20%20%26lt%3B%2FmxCell%26gt%3B%26%2310%3B%20%20%20%20%20%20%20%20%26lt%3BmxCell%20id%3D%26quot%3BXV5yg_f98szh5ZPkbT75-9%26quot%3B%20value%3D%26quot%3BECR%26quot%3B%20style%3D%26quot%3Bshape%3Dcylinder3%3BwhiteSpace%3Dwrap%3Bhtml%3D1%3BboundedLbl%3D1%3BbackgroundOutline%3D1%3Bsize%3D15%3BfontStyle%3D1%26quot%3B%20vertex%3D%26quot%3B1%26quot%3B%20parent%3D%26quot%3B1%26quot%3B%26gt%3B%26%2310%3B%20%20%20%20%20%20%20%20%20%20%26lt%3BmxGeometry%20x%3D%26quot%3B520%26quot%3B%20y%3D%26quot%3B800%26quot%3B%20width%3D%26quot%3B40%26quot%3B%20height%3D%26quot%3B60%26quot%3B%20as%3D%26quot%3Bgeometry%26quot%3B%20%2F%26gt%3B%26%2310%3B%20%20%20%20%20%20%20%20%26lt%3B%2FmxCell%26gt%3B%26%2310%3B%20%20%20%20%20%20%20%20%26lt%3BmxCell%20id%3D%26quot%3BXV5yg_f98szh5ZPkbT75-12%26quot%3B%20value%3D%26quot%3B%26quot%3B%20style%3D%26quot%3Bgroup%26quot%3B%20vertex%3D%26quot%3B1%26quot%3B%20connectable%3D%26quot%3B0%26quot%3B%20parent%3D%26quot%3B1%26quot%3B%26gt%3B%26%2310%3B%20%20%20%20%20%20%20%20%20%20%26lt%3BmxGeometry%20x%3D%26quot%3B495%26quot%3B%20y%3D%26quot%3B688%26quot%3B%20width%3D%26quot%3B90%26quot%3B%20height%3D%26quot%3B100%26quot%3B%20as%3D%26quot%3Bgeometry%26quot%3B%20%2F%26gt%3B%26%2310%3B%20%20%20%20%20%20%20%20%26lt%3B%2FmxCell%26gt%3B%26%2310%3B%20%20%20%20%20%20%20%20%26lt%3BmxCell%20id%3D%26quot%3BXV5yg_f98szh5ZPkbT75-8%26quot%3B%20value%3D%26quot%3B%26quot%3B%20style%3D%26quot%3Brounded%3D0%3BwhiteSpace%3Dwrap%3Bhtml%3D1%3Bdashed%3D1%3B%26quot%3B%20vertex%3D%26quot%3B1%26quot%3B%20parent%3D%26quot%3BXV5yg_f98szh5ZPkbT75-12%26quot%3B%26gt%3B%26%2310%3B%20%20%20%20%20%20%20%20%20%20%26lt%3BmxGeometry%20width%3D%26quot%3B90%26quot%3B%20height%3D%26quot%3B100%26quot%3B%20as%3D%26quot%3Bgeometry%26quot%3B%20%2F%26gt%3B%26%2310%3B%20%20%20%20%20%20%20%20%26lt%3B%2FmxCell%26gt%3B%26%2310%3B%20%20%20%20%20%20%20%20%26lt%3BmxCell%20id%3D%26quot%3BXV5yg_f98szh5ZPkbT75-10%26quot%3B%20value%3D%26quot%3BK8s%20Cluster%26quot%3B%20style%3D%26quot%3Btext%3Bhtml%3D1%3Balign%3Dcenter%3BverticalAlign%3Dmiddle%3BwhiteSpace%3Dwrap%3Brounded%3D0%3B%26quot%3B%20vertex%3D%26quot%3B1%26quot%3B%20parent%3D%26quot%3BXV5yg_f98szh5ZPkbT75-12%26quot%3B%26gt%3B%26%2310%3B%20%20%20%20%20%20%20%20%20%20%26lt%3BmxGeometry%20width%3D%26quot%3B75%26quot%3B%20height%3D%26quot%3B18%26quot%3B%20as%3D%26quot%3Bgeometry%26quot%3B%20%2F%26gt%3B%26%2310%3B%20%20%20%20%20%20%20%20%26lt%3B%2FmxCell%26gt%3B%26%2310%3B%20%20%20%20%20%20%20%20%26lt%3BmxCell%20id%3D%26quot%3BXV5yg_f98szh5ZPkbT75-20%26quot%3B%20value%3D%26quot%3BBuildKit%20(amd64)%26quot%3B%20style%3D%26quot%3Brounded%3D0%3BwhiteSpace%3Dwrap%3Bhtml%3D1%3BfontSize%3D7%3B%26quot%3B%20vertex%3D%26quot%3B1%26quot%3B%20parent%3D%26quot%3BXV5yg_f98szh5ZPkbT75-12%26quot%3B%26gt%3B%26%2310%3B%20%20%20%20%20%20%20%20%20%20%26lt%3BmxGeometry%20x%3D%26quot%3B12.5%26quot%3B%20y%3D%26quot%3B32%26quot%3B%20width%3D%26quot%3B57.5%26quot%3B%20height%3D%26quot%3B18%26quot%3B%20as%3D%26quot%3Bgeometry%26quot%3B%20%2F%26gt%3B%26%2310%3B%20%20%20%20%20%20%20%20%26lt%3B%2FmxCell%26gt%3B%26%2310%3B%20%20%20%20%20%20%20%20%26lt%3BmxCell%20id%3D%26quot%3BXV5yg_f98szh5ZPkbT75-21%26quot%3B%20value%3D%26quot%3BBuildKit%20(arm64)%26quot%3B%20style%3D%26quot%3Brounded%3D0%3BwhiteSpace%3Dwrap%3Bhtml%3D1%3BfontSize%3D7%3B%26quot%3B%20vertex%3D%26quot%3B1%26quot%3B%20parent%3D%26quot%3BXV5yg_f98szh5ZPkbT75-12%26quot%3B%26gt%3B%26%2310%3B%20%20%20%20%20%20%20%20%20%20%26lt%3BmxGeometry%20x%3D%26quot%3B12.5%26quot%3B%20y%3D%26quot%3B62%26quot%3B%20width%3D%26quot%3B57.5%26quot%3B%20height%3D%26quot%3B18%26quot%3B%20as%3D%26quot%3Bgeometry%26quot%3B%20%2F%26gt%3B%26%2310%3B%20%20%20%20%20%20%20%20%26lt%3B%2FmxCell%26gt%3B%26%2310%3B%20%20%20%20%20%20%20%20%26lt%3BmxCell%20id%3D%26quot%3BXV5yg_f98szh5ZPkbT75-25%26quot%3B%20value%3D%26quot%3B%26quot%3B%20style%3D%26quot%3BendArrow%3Dnone%3Bhtml%3D1%3Brounded%3D0%3BentryX%3D1%3BentryY%3D0.5%3BentryDx%3D0%3BentryDy%3D0%3B%26quot%3B%20edge%3D%26quot%3B1%26quot%3B%20parent%3D%26quot%3BXV5yg_f98szh5ZPkbT75-12%26quot%3B%20target%3D%26quot%3BXV5yg_f98szh5ZPkbT75-20%26quot%3B%26gt%3B%26%2310%3B%20%20%20%20%20%20%20%20%20%20%26lt%3BmxGeometry%20width%3D%26quot%3B50%26quot%3B%20height%3D%26quot%3B50%26quot%3B%20relative%3D%26quot%3B1%26quot%3B%20as%3D%26quot%3Bgeometry%26quot%3B%26gt%3B%26%2310%3B%20%20%20%20%20%20%20%20%20%20%20%20%26lt%3BmxPoint%20x%3D%26quot%3B81%26quot%3B%20y%3D%26quot%3B71%26quot%3B%20as%3D%26quot%3BsourcePoint%26quot%3B%20%2F%26gt%3B%26%2310%3B%20%20%20%20%20%20%20%20%20%20%20%20%26lt%3BmxPoint%20x%3D%26quot%3B105%26quot%3B%20y%3D%26quot%3B112%26quot%3B%20as%3D%26quot%3BtargetPoint%26quot%3B%20%2F%26gt%3B%26%2310%3B%20%20%20%20%20%20%20%20%20%20%20%20%26lt%3BArray%20as%3D%26quot%3Bpoints%26quot%3B%26gt%3B%26%2310%3B%20%20%20%20%20%20%20%20%20%20%20%20%20%20%26lt%3BmxPoint%20x%3D%26quot%3B81%26quot%3B%20y%3D%26quot%3B41%26quot%3B%20%2F%26gt%3B%26%2310%3B%20%20%20%20%20%20%20%20%20%20%20%20%26lt%3B%2FArray%26gt%3B%26%2310%3B%20%20%20%20%20%20%20%20%20%20%26lt%3B%2FmxGeometry%26gt%3B%26%2310%3B%20%20%20%20%20%20%20%20%26lt%3B%2FmxCell%26gt%3B%26%2310%3B%20%20%20%20%20%20%20%20%26lt%3BmxCell%20id%3D%26quot%3BXV5yg_f98szh5ZPkbT75-13%26quot%3B%20value%3D%26quot%3B%26quot%3B%20style%3D%26quot%3Bgroup%26quot%3B%20vertex%3D%26quot%3B1%26quot%3B%20connectable%3D%26quot%3B0%26quot%3B%20parent%3D%26quot%3B1%26quot%3B%26gt%3B%26%2310%3B%20%20%20%20%20%20%20%20%20%20%26lt%3BmxGeometry%20x%3D%26quot%3B635%26quot%3B%20y%3D%26quot%3B688%26quot%3B%20width%3D%26quot%3B90%26quot%3B%20height%3D%26quot%3B100%26quot%3B%20as%3D%26quot%3Bgeometry%26quot%3B%20%2F%26gt%3B%26%2310%3B%20%20%20%20%20%20%20%20%26lt%3B%2FmxCell%26gt%3B%26%2310%3B%20%20%20%20%20%20%20%20%26lt%3BmxCell%20id%3D%26quot%3BXV5yg_f98szh5ZPkbT75-14%26quot%3B%20value%3D%26quot%3B%26quot%3B%20style%3D%26quot%3Brounded%3D0%3BwhiteSpace%3Dwrap%3Bhtml%3D1%3Bdashed%3D1%3B%26quot%3B%20vertex%3D%26quot%3B1%26quot%3B%20parent%3D%26quot%3BXV5yg_f98szh5ZPkbT75-13%26quot%3B%26gt%3B%26%2310%3B%20%20%20%20%20%20%20%20%20%20%26lt%3BmxGeometry%20width%3D%26quot%3B90%26quot%3B%20height%3D%26quot%3B100%26quot%3B%20as%3D%26quot%3Bgeometry%26quot%3B%20%2F%26gt%3B%26%2310%3B%20%20%20%20%20%20%20%20%26lt%3B%2FmxCell%26gt%3B%26%2310%3B%20%20%20%20%20%20%20%20%26lt%3BmxCell%20id%3D%26quot%3BXV5yg_f98szh5ZPkbT75-15%26quot%3B%20value%3D%26quot%3BK8s%20Cluster%26quot%3B%20style%3D%26quot%3Btext%3Bhtml%3D1%3Balign%3Dcenter%3BverticalAlign%3Dmiddle%3BwhiteSpace%3Dwrap%3Brounded%3D0%3B%26quot%3B%20vertex%3D%26quot%3B1%26quot%3B%20parent%3D%26quot%3BXV5yg_f98szh5ZPkbT75-13%26quot%3B%26gt%3B%26%2310%3B%20%20%20%20%20%20%20%20%20%20%26lt%3BmxGeometry%20width%3D%26quot%3B75%26quot%3B%20height%3D%26quot%3B18%26quot%3B%20as%3D%26quot%3Bgeometry%26quot%3B%20%2F%26gt%3B%26%2310%3B%20%20%20%20%20%20%20%20%26lt%3B%2FmxCell%26gt%3B%26%2310%3B%20%20%20%20%20%20%20%20%26lt%3BmxCell%20id%3D%26quot%3BXV5yg_f98szh5ZPkbT75-16%26quot%3B%20value%3D%26quot%3B%26quot%3B%20style%3D%26quot%3Bgroup%26quot%3B%20vertex%3D%26quot%3B1%26quot%3B%20connectable%3D%26quot%3B0%26quot%3B%20parent%3D%26quot%3B1%26quot%3B%26gt%3B%26%2310%3B%20%20%20%20%20%20%20%20%20%20%26lt%3BmxGeometry%20x%3D%26quot%3B776%26quot%3B%20y%3D%26quot%3B688%26quot%3B%20width%3D%26quot%3B90%26quot%3B%20height%3D%26quot%3B100%26quot%3B%20as%3D%26quot%3Bgeometry%26quot%3B%20%2F%26gt%3B%26%2310%3B%20%20%20%20%20%20%20%20%26lt%3B%2FmxCell%26gt%3B%26%2310%3B%20%20%20%20%20%20%20%20%26lt%3BmxCell%20id%3D%26quot%3BXV5yg_f98szh5ZPkbT75-17%26quot%3B%20value%3D%26quot%3B%26quot%3B%20style%3D%26quot%3Brounded%3D0%3BwhiteSpace%3Dwrap%3Bhtml%3D1%3Bdashed%3D1%3B%26quot%3B%20vertex%3D%26quot%3B1%26quot%3B%20parent%3D%26quot%3BXV5yg_f98szh5ZPkbT75-16%26quot%3B%26gt%3B%26%2310%3B%20%20%20%20%20%20%20%20%20%20%26lt%3BmxGeometry%20width%3D%26quot%3B90%26quot%3B%20height%3D%26quot%3B100%26quot%3B%20as%3D%26quot%3Bgeometry%26quot%3B%20%2F%26gt%3B%26%2310%3B%20%20%20%20%20%20%20%20%26lt%3B%2FmxCell%26gt%3B%26%2310%3B%20%20%20%20%20%20%20%20%26lt%3BmxCell%20id%3D%26quot%3BXV5yg_f98szh5ZPkbT75-18%26quot%3B%20value%3D%26quot%3BK8s%20Cluster%26quot%3B%20style%3D%26quot%3Btext%3Bhtml%3D1%3Balign%3Dcenter%3BverticalAlign%3Dmiddle%3BwhiteSpace%3Dwrap%3Brounded%3D0%3B%26quot%3B%20vertex%3D%26quot%3B1%26quot%3B%20parent%3D%26quot%3BXV5yg_f98szh5ZPkbT75-16%26quot%3B%26gt%3B%26%2310%3B%20%20%20%20%20%20%20%20%20%20%26lt%3BmxGeometry%20width%3D%26quot%3B75%26quot%3B%20height%3D%26quot%3B18%26quot%3B%20as%3D%26quot%3Bgeometry%26quot%3B%20%2F%26gt%3B%26%2310%3B%20%20%20%20%20%20%20%20%26lt%3B%2FmxCell%26gt%3B%26%2310%3B%20%20%20%20%20%20%20%20%26lt%3BmxCell%20id%3D%26quot%3BXV5yg_f98szh5ZPkbT75-22%26quot%3B%20value%3D%26quot%3BStaging%26quot%3B%20style%3D%26quot%3Btext%3Bhtml%3D1%3Balign%3Dcenter%3BverticalAlign%3Dmiddle%3Bresizable%3D0%3Bpoints%3D%5B%5D%3Bautosize%3D1%3BstrokeColor%3Dnone%3BfillColor%3Dnone%3BfontSize%3D14%3BfontStyle%3D1%26quot%3B%20vertex%3D%26quot%3B1%26quot%3B%20parent%3D%26quot%3B1%26quot%3B%26gt%3B%26%2310%3B%20%20%20%20%20%20%20%20%20%20%26lt%3BmxGeometry%20x%3D%26quot%3B645%26quot%3B%20y%3D%26quot%3B650%26quot%3B%20width%3D%26quot%3B70%26quot%3B%20height%3D%26quot%3B30%26quot%3B%20as%3D%26quot%3Bgeometry%26quot%3B%20%2F%26gt%3B%26%2310%3B%20%20%20%20%20%20%20%20%26lt%3B%2FmxCell%26gt%3B%26%2310%3B%20%20%20%20%20%20%20%20%26lt%3BmxCell%20id%3D%26quot%3BXV5yg_f98szh5ZPkbT75-23%26quot%3B%20value%3D%26quot%3BProduction%26quot%3B%20style%3D%26quot%3Btext%3Bhtml%3D1%3Balign%3Dcenter%3BverticalAlign%3Dmiddle%3Bresizable%3D0%3Bpoints%3D%5B%5D%3Bautosize%3D1%3BstrokeColor%3Dnone%3BfillColor%3Dnone%3BfontSize%3D14%3BfontStyle%3D1%26quot%3B%20vertex%3D%26quot%3B1%26quot%3B%20parent%3D%26quot%3B1%26quot%3B%26gt%3B%26%2310%3B%20%20%20%20%20%20%20%20%20%20%26lt%3BmxGeometry%20x%3D%26quot%3B776%26quot%3B%20y%3D%26quot%3B650%26quot%3B%20width%3D%26quot%3B90%26quot%3B%20height%3D%26quot%3B30%26quot%3B%20as%3D%26quot%3Bgeometry%26quot%3B%20%2F%26gt%3B%26%2310%3B%20%20%20%20%20%20%20%20%26lt%3B%2FmxCell%26gt%3B%26%2310%3B%20%20%20%20%20%20%20%20%26lt%3BmxCell%20id%3D%26quot%3BXV5yg_f98szh5ZPkbT75-24%26quot%3B%20value%3D%26quot%3B%26quot%3B%20style%3D%26quot%3BendArrow%3Dclassic%3Bhtml%3D1%3Brounded%3D0%3BexitX%3D1%3BexitY%3D0.5%3BexitDx%3D0%3BexitDy%3D0%3BentryX%3D0.5%3BentryY%3D0%3BentryDx%3D0%3BentryDy%3D0%3BentryPerimeter%3D0%3B%26quot%3B%20edge%3D%26quot%3B1%26quot%3B%20parent%3D%26quot%3B1%26quot%3B%20source%3D%26quot%3BXV5yg_f98szh5ZPkbT75-21%26quot%3B%20target%3D%26quot%3BXV5yg_f98szh5ZPkbT75-9%26quot%3B%26gt%3B%26%2310%3B%20%20%20%20%20%20%20%20%20%20%26lt%3BmxGeometry%20width%3D%26quot%3B50%26quot%3B%20height%3D%26quot%3B50%26quot%3B%20relative%3D%26quot%3B1%26quot%3B%20as%3D%26quot%3Bgeometry%26quot%3B%26gt%3B%26%2310%3B%20%20%20%20%20%20%20%20%20%20%20%20%26lt%3BmxPoint%20x%3D%26quot%3B530%26quot%3B%20y%3D%26quot%3B810%26quot%3B%20as%3D%26quot%3BsourcePoint%26quot%3B%20%2F%26gt%3B%26%2310%3B%20%20%20%20%20%20%20%20%20%20%20%20%26lt%3BmxPoint%20x%3D%26quot%3B580%26quot%3B%20y%3D%26quot%3B760%26quot%3B%20as%3D%26quot%3BtargetPoint%26quot%3B%20%2F%26gt%3B%26%2310%3B%20%20%20%20%20%20%20%20%20%20%20%20%26lt%3BArray%20as%3D%26quot%3Bpoints%26quot%3B%26gt%3B%26%2310%3B%20%20%20%20%20%20%20%20%20%20%20%20%20%20%26lt%3BmxPoint%20x%3D%26quot%3B576%26quot%3B%20y%3D%26quot%3B759%26quot%3B%20%2F%26gt%3B%26%2310%3B%20%20%20%20%20%20%20%20%20%20%20%20%20%20%26lt%3BmxPoint%20x%3D%26quot%3B576%26quot%3B%20y%3D%26quot%3B781%26quot%3B%20%2F%26gt%3B%26%2310%3B%20%20%20%20%20%20%20%20%20%20%20%20%20%20%26lt%3BmxPoint%20x%3D%26quot%3B540%26quot%3B%20y%3D%26quot%3B781%26quot%3B%20%2F%26gt%3B%26%2310%3B%20%20%20%20%20%20%20%20%20%20%20%20%26lt%3B%2FArray%26gt%3B%26%2310%3B%20%20%20%20%20%20%20%20%20%20%26lt%3B%2FmxGeometry%26gt%3B%26%2310%3B%20%20%20%20%20%20%20%20%26lt%3B%2FmxCell%26gt%3B%26%2310%3B%20%20%20%20%20%20%20%20%26lt%3BmxCell%20id%3D%26quot%3BXV5yg_f98szh5ZPkbT75-26%26quot%3B%20value%3D%26quot%3B%26quot%3B%20style%3D%26quot%3BendArrow%3Dclassic%3Bhtml%3D1%3Brounded%3D0%3BexitX%3D1%3BexitY%3D0.5%3BexitDx%3D0%3BexitDy%3D0%3BexitPerimeter%3D0%3BentryX%3D0.5%3BentryY%3D1%3BentryDx%3D0%3BentryDy%3D0%3B%26quot%3B%20edge%3D%26quot%3B1%26quot%3B%20parent%3D%26quot%3B1%26quot%3B%20source%3D%26quot%3BXV5yg_f98szh5ZPkbT75-9%26quot%3B%20target%3D%26quot%3BXV5yg_f98szh5ZPkbT75-14%26quot%3B%26gt%3B%26%2310%3B%20%20%20%20%20%20%20%20%20%20%26lt%3BmxGeometry%20width%3D%26quot%3B50%26quot%3B%20height%3D%26quot%3B50%26quot%3B%20relative%3D%26quot%3B1%26quot%3B%20as%3D%26quot%3Bgeometry%26quot%3B%26gt%3B%26%2310%3B%20%20%20%20%20%20%20%20%20%20%20%20%26lt%3BmxPoint%20x%3D%26quot%3B640%26quot%3B%20y%3D%26quot%3B870%26quot%3B%20as%3D%26quot%3BsourcePoint%26quot%3B%20%2F%26gt%3B%26%2310%3B%20%20%20%20%20%20%20%20%20%20%20%20%26lt%3BmxPoint%20x%3D%26quot%3B690%26quot%3B%20y%3D%26quot%3B820%26quot%3B%20as%3D%26quot%3BtargetPoint%26quot%3B%20%2F%26gt%3B%26%2310%3B%20%20%20%20%20%20%20%20%20%20%20%20%26lt%3BArray%20as%3D%26quot%3Bpoints%26quot%3B%26gt%3B%26%2310%3B%20%20%20%20%20%20%20%20%20%20%20%20%20%20%26lt%3BmxPoint%20x%3D%26quot%3B680%26quot%3B%20y%3D%26quot%3B830%26quot%3B%20%2F%26gt%3B%26%2310%3B%20%20%20%20%20%20%20%20%20%20%20%20%26lt%3B%2FArray%26gt%3B%26%2310%3B%20%20%20%20%20%20%20%20%20%20%26lt%3B%2FmxGeometry%26gt%3B%26%2310%3B%20%20%20%20%20%20%20%20%26lt%3B%2FmxCell%26gt%3B%26%2310%3B%20%20%20%20%20%20%20%20%26lt%3BmxCell%20id%3D%26quot%3BXV5yg_f98szh5ZPkbT75-27%26quot%3B%20value%3D%26quot%3B%26quot%3B%20style%3D%26quot%3BendArrow%3Dclassic%3Bhtml%3D1%3Brounded%3D0%3BentryX%3D0.5%3BentryY%3D1%3BentryDx%3D0%3BentryDy%3D0%3B%26quot%3B%20edge%3D%26quot%3B1%26quot%3B%20parent%3D%26quot%3B1%26quot%3B%20target%3D%26quot%3BXV5yg_f98szh5ZPkbT75-17%26quot%3B%26gt%3B%26%2310%3B%20%20%20%20%20%20%20%20%20%20%26lt%3BmxGeometry%20width%3D%26quot%3B50%26quot%3B%20height%3D%26quot%3B50%26quot%3B%20relative%3D%26quot%3B1%26quot%3B%20as%3D%26quot%3Bgeometry%26quot%3B%26gt%3B%26%2310%3B%20%20%20%20%20%20%20%20%20%20%20%20%26lt%3BmxPoint%20x%3D%26quot%3B680%26quot%3B%20y%3D%26quot%3B830%26quot%3B%20as%3D%26quot%3BsourcePoint%26quot%3B%20%2F%26gt%3B%26%2310%3B%20%20%20%20%20%20%20%20%20%20%20%20%26lt%3BmxPoint%20x%3D%26quot%3B830%26quot%3B%20y%3D%26quot%3B790%26quot%3B%20as%3D%26quot%3BtargetPoint%26quot%3B%20%2F%26gt%3B%26%2310%3B%20%20%20%20%20%20%20%20%20%20%20%20%26lt%3BArray%20as%3D%26quot%3Bpoints%26quot%3B%26gt%3B%26%2310%3B%20%20%20%20%20%20%20%20%20%20%20%20%20%20%26lt%3BmxPoint%20x%3D%26quot%3B821%26quot%3B%20y%3D%26quot%3B830%26quot%3B%20%2F%26gt%3B%26%2310%3B%20%20%20%20%20%20%20%20%20%20%20%20%26lt%3B%2FArray%26gt%3B%26%2310%3B%20%20%20%20%20%20%20%20%20%20%26lt%3B%2FmxGeometry%26gt%3B%26%2310%3B%20%20%20%20%20%20%20%20%26lt%3B%2FmxCell%26gt%3B%26%2310%3B%20%20%20%20%20%20%20%20%26lt%3BmxCell%20id%3D%26quot%3BXV5yg_f98szh5ZPkbT75-28%26quot%3B%20value%3D%26quot%3B%26quot%3B%20style%3D%26quot%3BendArrow%3Dclassic%3Bhtml%3D1%3Brounded%3D0%3BentryX%3D0.921%3BentryY%3D0.998%3BentryDx%3D0%3BentryDy%3D0%3BentryPerimeter%3D0%3B%26quot%3B%20edge%3D%26quot%3B1%26quot%3B%20parent%3D%26quot%3B1%26quot%3B%20target%3D%26quot%3BXV5yg_f98szh5ZPkbT75-8%26quot%3B%26gt%3B%26%2310%3B%20%20%20%20%20%20%20%20%20%20%26lt%3BmxGeometry%20width%3D%26quot%3B50%26quot%3B%20height%3D%26quot%3B50%26quot%3B%20relative%3D%26quot%3B1%26quot%3B%20as%3D%26quot%3Bgeometry%26quot%3B%26gt%3B%26%2310%3B%20%20%20%20%20%20%20%20%20%20%20%20%26lt%3BmxPoint%20x%3D%26quot%3B578%26quot%3B%20y%3D%26quot%3B830%26quot%3B%20as%3D%26quot%3BsourcePoint%26quot%3B%20%2F%26gt%3B%26%2310%3B%20%20%20%20%20%20%20%20%20%20%20%20%26lt%3BmxPoint%20x%3D%26quot%3B600%26quot%3B%20y%3D%26quot%3B740%26quot%3B%20as%3D%26quot%3BtargetPoint%26quot%3B%20%2F%26gt%3B%26%2310%3B%20%20%20%20%20%20%20%20%20%20%26lt%3B%2FmxGeometry%26gt%3B%26%2310%3B%20%20%20%20%20%20%20%20%26lt%3B%2FmxCell%26gt%3B%26%2310%3B%20%20%20%20%20%20%20%20%26lt%3BmxCell%20id%3D%26quot%3BXV5yg_f98szh5ZPkbT75-30%26quot%3B%20value%3D%26quot%3B%26quot%3B%20style%3D%26quot%3BendArrow%3Dnone%3Bdashed%3D1%3Bhtml%3D1%3Brounded%3D0%3B%26quot%3B%20edge%3D%26quot%3B1%26quot%3B%20parent%3D%26quot%3B1%26quot%3B%26gt%3B%26%2310%3B%20%20%20%20%20%20%20%20%20%20%26lt%3BmxGeometry%20width%3D%26quot%3B50%26quot%3B%20height%3D%26quot%3B50%26quot%3B%20relative%3D%26quot%3B1%26quot%3B%20as%3D%26quot%3Bgeometry%26quot%3B%26gt%3B%26%2310%3B%20%20%20%20%20%20%20%20%20%20%20%20%26lt%3BmxPoint%20x%3D%26quot%3B470%26quot%3B%20y%3D%26quot%3B860%26quot%3B%20as%3D%26quot%3BsourcePoint%26quot%3B%20%2F%26gt%3B%26%2310%3B%20%20%20%20%20%20%20%20%20%20%20%20%26lt%3BmxPoint%20x%3D%26quot%3B470%26quot%3B%20y%3D%26quot%3B650%26quot%3B%20as%3D%26quot%3BtargetPoint%26quot%3B%20%2F%26gt%3B%26%2310%3B%20%20%20%20%20%20%20%20%20%20%26lt%3B%2FmxGeometry%26gt%3B%26%2310%3B%20%20%20%20%20%20%20%20%26lt%3B%2FmxCell%26gt%3B%26%2310%3B%20%20%20%20%20%20%20%20%26lt%3BmxCell%20id%3D%26quot%3BXV5yg_f98szh5ZPkbT75-32%26quot%3B%20value%3D%26quot%3BLocal%20%2F%20CICD%26quot%3B%20style%3D%26quot%3Btext%3Bhtml%3D1%3Balign%3Dcenter%3BverticalAlign%3Dmiddle%3Bresizable%3D0%3Bpoints%3D%5B%5D%3Bautosize%3D1%3BstrokeColor%3Dnone%3BfillColor%3Dnone%3BfontSize%3D14%3BfontStyle%3D1%26quot%3B%20vertex%3D%26quot%3B1%26quot%3B%20parent%3D%26quot%3B1%26quot%3B%26gt%3B%26%2310%3B%20%20%20%20%20%20%20%20%20%20%26lt%3BmxGeometry%20x%3D%26quot%3B355%26quot%3B%20y%3D%26quot%3B650%26quot%3B%20width%3D%26quot%3B100%26quot%3B%20height%3D%26quot%3B30%26quot%3B%20as%3D%26quot%3Bgeometry%26quot%3B%20%2F%26gt%3B%26%2310%3B%20%20%20%20%20%20%20%20%26lt%3B%2FmxCell%26gt%3B%26%2310%3B%20%20%20%20%20%20%20%20%26lt%3BmxCell%20id%3D%26quot%3BXV5yg_f98szh5ZPkbT75-40%26quot%3B%20value%3D%26quot%3B%26quot%3B%20style%3D%26quot%3Bgroup%26quot%3B%20vertex%3D%26quot%3B1%26quot%3B%20connectable%3D%26quot%3B0%26quot%3B%20parent%3D%26quot%3B1%26quot%3B%26gt%3B%26%2310%3B%20%20%20%20%20%20%20%20%20%20%26lt%3BmxGeometry%20x%3D%26quot%3B360%26quot%3B%20y%3D%26quot%3B690%26quot%3B%20width%3D%26quot%3B90%26quot%3B%20height%3D%26quot%3B100%26quot%3B%20as%3D%26quot%3Bgeometry%26quot%3B%20%2F%26gt%3B%26%2310%3B%20%20%20%20%20%20%20%20%26lt%3B%2FmxCell%26gt%3B%26%2310%3B%20%20%20%20%20%20%20%20%26lt%3BmxCell%20id%3D%26quot%3BXV5yg_f98szh5ZPkbT75-41%26quot%3B%20value%3D%26quot%3B%26quot%3B%20style%3D%26quot%3Brounded%3D0%3BwhiteSpace%3Dwrap%3Bhtml%3D1%3Bdashed%3D1%3B%26quot%3B%20vertex%3D%26quot%3B1%26quot%3B%20parent%3D%26quot%3BXV5yg_f98szh5ZPkbT75-40%26quot%3B%26gt%3B%26%2310%3B%20%20%20%20%20%20%20%20%20%20%26lt%3BmxGeometry%20width%3D%26quot%3B90%26quot%3B%20height%3D%26quot%3B100%26quot%3B%20as%3D%26quot%3Bgeometry%26quot%3B%20%2F%26gt%3B%26%2310%3B%20%20%20%20%20%20%20%20%26lt%3B%2FmxCell%26gt%3B%26%2310%3B%20%20%20%20%20%20%20%20%26lt%3BmxCell%20id%3D%26quot%3BXV5yg_f98szh5ZPkbT75-42%26quot%3B%20value%3D%26quot%3BBuild%20Context%26quot%3B%20style%3D%26quot%3Btext%3Bhtml%3D1%3Balign%3Dcenter%3BverticalAlign%3Dmiddle%3BwhiteSpace%3Dwrap%3Brounded%3D0%3B%26quot%3B%20vertex%3D%26quot%3B1%26quot%3B%20parent%3D%26quot%3BXV5yg_f98szh5ZPkbT75-40%26quot%3B%26gt%3B%26%2310%3B%20%20%20%20%20%20%20%20%20%20%26lt%3BmxGeometry%20x%3D%26quot%3B4.01%26quot%3B%20width%3D%26quot%3B75%26quot%3B%20height%3D%26quot%3B18%26quot%3B%20as%3D%26quot%3Bgeometry%26quot%3B%20%2F%26gt%3B%26%2310%3B%20%20%20%20%20%20%20%20%26lt%3B%2FmxCell%26gt%3B%26%2310%3B%20%20%20%20%20%20%20%20%26lt%3BmxCell%20id%3D%26quot%3BXV5yg_f98szh5ZPkbT75-33%26quot%3B%20value%3D%26quot%3B%26amp%3Blt%3Bfont%20style%3D%26amp%3Bquot%3Bfont-size%3A%208px%3B%26amp%3Bquot%3B%26amp%3Bgt%3BDockerfile%26amp%3Blt%3B%2Ffont%26amp%3Bgt%3B%26quot%3B%20style%3D%26quot%3Brounded%3D0%3BwhiteSpace%3Dwrap%3Bhtml%3D1%3BverticalAlign%3Dtop%3B%26quot%3B%20vertex%3D%26quot%3B1%26quot%3B%20parent%3D%26quot%3BXV5yg_f98szh5ZPkbT75-40%26quot%3B%26gt%3B%26%2310%3B%20%20%20%20%20%20%20%20%20%20%26lt%3BmxGeometry%20x%3D%26quot%3B19.640000000000004%26quot%3B%20y%3D%26quot%3B22.5%26quot%3B%20width%3D%26quot%3B43.75%26quot%3B%20height%3D%26quot%3B63%26quot%3B%20as%3D%26quot%3Bgeometry%26quot%3B%20%2F%26gt%3B%26%2310%3B%20%20%20%20%20%20%20%20%26lt%3B%2FmxCell%26gt%3B%26%2310%3B%20%20%20%20%20%20%20%20%26lt%3BmxCell%20id%3D%26quot%3BXV5yg_f98szh5ZPkbT75-43%26quot%3B%20value%3D%26quot%3B%26quot%3B%20style%3D%26quot%3BendArrow%3Dclassic%3Bhtml%3D1%3Brounded%3D0%3BentryX%3D0%3BentryY%3D0.5%3BentryDx%3D0%3BentryDy%3D0%3BexitX%3D1%3BexitY%3D0.5%3BexitDx%3D0%3BexitDy%3D0%3B%26quot%3B%20edge%3D%26quot%3B1%26quot%3B%20parent%3D%26quot%3B1%26quot%3B%20source%3D%26quot%3BXV5yg_f98szh5ZPkbT75-41%26quot%3B%20target%3D%26quot%3BXV5yg_f98szh5ZPkbT75-20%26quot%3B%26gt%3B%26%2310%3B%20%20%20%20%20%20%20%20%20%20%26lt%3BmxGeometry%20width%3D%26quot%3B50%26quot%3B%20height%3D%26quot%3B50%26quot%3B%20relative%3D%26quot%3B1%26quot%3B%20as%3D%26quot%3Bgeometry%26quot%3B%26gt%3B%26%2310%3B%20%20%20%20%20%20%20%20%20%20%20%20%26lt%3BmxPoint%20x%3D%26quot%3B588%26quot%3B%20y%3D%26quot%3B840%26quot%3B%20as%3D%26quot%3BsourcePoint%26quot%3B%20%2F%26gt%3B%26%2310%3B%20%20%20%20%20%20%20%20%20%20%20%20%26lt%3BmxPoint%20x%3D%26quot%3B588%26quot%3B%20y%3D%26quot%3B798%26quot%3B%20as%3D%26quot%3BtargetPoint%26quot%3B%20%2F%26gt%3B%26%2310%3B%20%20%20%20%20%20%20%20%20%20%26lt%3B%2FmxGeometry%26gt%3B%26%2310%3B%20%20%20%20%20%20%20%20%26lt%3B%2FmxCell%26gt%3B%26%2310%3B%20%20%20%20%20%20%20%20%26lt%3BmxCell%20id%3D%26quot%3BXV5yg_f98szh5ZPkbT75-44%26quot%3B%20value%3D%26quot%3B%26quot%3B%20style%3D%26quot%3BendArrow%3Dclassic%3Bhtml%3D1%3Brounded%3D0%3BentryX%3D0%3BentryY%3D0.5%3BentryDx%3D0%3BentryDy%3D0%3BexitX%3D1%3BexitY%3D0.5%3BexitDx%3D0%3BexitDy%3D0%3B%26quot%3B%20edge%3D%26quot%3B1%26quot%3B%20parent%3D%26quot%3B1%26quot%3B%20source%3D%26quot%3BXV5yg_f98szh5ZPkbT75-41%26quot%3B%20target%3D%26quot%3BXV5yg_f98szh5ZPkbT75-21%26quot%3B%26gt%3B%26%2310%3B%20%20%20%20%20%20%20%20%20%20%26lt%3BmxGeometry%20width%3D%26quot%3B50%26quot%3B%20height%3D%26quot%3B50%26quot%3B%20relative%3D%26quot%3B1%26quot%3B%20as%3D%26quot%3Bgeometry%26quot%3B%26gt%3B%26%2310%3B%20%20%20%20%20%20%20%20%20%20%20%20%26lt%3BmxPoint%20x%3D%26quot%3B460%26quot%3B%20y%3D%26quot%3B750%26quot%3B%20as%3D%26quot%3BsourcePoint%26quot%3B%20%2F%26gt%3B%26%2310%3B%20%20%20%20%20%20%20%20%20%20%20%20%26lt%3BmxPoint%20x%3D%26quot%3B518%26quot%3B%20y%3D%26quot%3B739%26quot%3B%20as%3D%26quot%3BtargetPoint%26quot%3B%20%2F%26gt%3B%26%2310%3B%20%20%20%20%20%20%20%20%20%20%26lt%3B%2FmxGeometry%26gt%3B%26%2310%3B%20%20%20%20%20%20%20%20%26lt%3B%2FmxCell%26gt%3B%26%2310%3B%20%20%20%20%20%20%26lt%3B%2Froot%26gt%3B%26%2310%3B%20%20%20%20%26lt%3B%2FmxGraphModel%26gt%3B%26%2310%3B%20%20%26lt%3B%2Fdiagram%26gt%3B%26%2310%3B%26lt%3B%2Fmxfile%26gt%3B%26%2310%3B%22%3E%3Cdefs%2F%3E%3Cg%3E%3Cg%3E%3Cpath%20d%3D%22M%20255%20210%20L%20255%200%22%20fill%3D%22none%22%20stroke%3D%22rgb(0%2C%200%2C%200)%22%20stroke-miterlimit%3D%2210%22%20stroke-dasharray%3D%223%203%22%20pointer-events%3D%22stroke%22%2F%3E%3C%2Fg%3E%3Cg%3E%3Crect%20x%3D%22130%22%20y%3D%220%22%20width%3D%22110%22%20height%3D%2230%22%20fill%3D%22none%22%20stroke%3D%22none%22%20pointer-events%3D%22all%22%2F%3E%3C%2Fg%3E%3Cg%3E%3Cg%20transform%3D%22translate(-0.5%20-0.5)%22%3E%3Cswitch%3E%3CforeignObject%20pointer-events%3D%22none%22%20width%3D%22100%25%22%20height%3D%22100%25%22%20requiredFeatures%3D%22http%3A%2F%2Fwww.w3.org%2FTR%2FSVG11%2Ffeature%23Extensibility%22%20style%3D%22overflow%3A%20visible%3B%20text-align%3A%20left%3B%22%3E%3Cdiv%20xmlns%3D%22http%3A%2F%2Fwww.w3.org%2F1999%2Fxhtml%22%20style%3D%22display%3A%20flex%3B%20align-items%3A%20unsafe%20center%3B%20justify-content%3A%20unsafe%20center%3B%20width%3A%201px%3B%20height%3A%201px%3B%20padding-top%3A%2015px%3B%20margin-left%3A%20185px%3B%22%3E%3Cdiv%20data-drawio-colors%3D%22color%3A%20rgb(0%2C%200%2C%200)%3B%20%22%20style%3D%22box-sizing%3A%20border-box%3B%20font-size%3A%200px%3B%20text-align%3A%20center%3B%22%3E%3Cdiv%20style%3D%22display%3A%20inline-block%3B%20font-size%3A%2014px%3B%20font-family%3A%20Helvetica%3B%20color%3A%20rgb(0%2C%200%2C%200)%3B%20line-height%3A%201.2%3B%20pointer-events%3A%20all%3B%20font-weight%3A%20bold%3B%20white-space%3A%20nowrap%3B%22%3EDevelopment%3C%2Fdiv%3E%3C%2Fdiv%3E%3C%2Fdiv%3E%3C%2FforeignObject%3E%3Ctext%20x%3D%22185%22%20y%3D%2219%22%20fill%3D%22rgb(0%2C%200%2C%200)%22%20font-family%3D%22Helvetica%22%20font-size%3D%2214px%22%20text-anchor%3D%22middle%22%20font-weight%3D%22bold%22%3EDevelopment%3C%2Ftext%3E%3C%2Fswitch%3E%3C%2Fg%3E%3C%2Fg%3E%3Cg%3E%3Cpath%20d%3D%22M%20395%20210%20L%20395%200%22%20fill%3D%22none%22%20stroke%3D%22rgb(0%2C%200%2C%200)%22%20stroke-miterlimit%3D%2210%22%20stroke-dasharray%3D%223%203%22%20pointer-events%3D%22stroke%22%2F%3E%3C%2Fg%3E%3Cg%3E%3Cpath%20d%3D%22M%20165%20165%20C%20165%20156.72%20173.95%20150%20185%20150%20C%20190.3%20150%20195.39%20151.58%20199.14%20154.39%20C%20202.89%20157.21%20205%20161.02%20205%20165%20L%20205%20195%20C%20205%20203.28%20196.05%20210%20185%20210%20C%20173.95%20210%20165%20203.28%20165%20195%20Z%22%20fill%3D%22rgb(255%2C%20255%2C%20255)%22%20stroke%3D%22rgb(0%2C%200%2C%200)%22%20stroke-miterlimit%3D%2210%22%20pointer-events%3D%22all%22%2F%3E%3Cpath%20d%3D%22M%20205%20165%20C%20205%20173.28%20196.05%20180%20185%20180%20C%20173.95%20180%20165%20173.28%20165%20165%22%20fill%3D%22none%22%20stroke%3D%22rgb(0%2C%200%2C%200)%22%20stroke-miterlimit%3D%2210%22%20pointer-events%3D%22all%22%2F%3E%3C%2Fg%3E%3Cg%3E%3Cg%20transform%3D%22translate(-0.5%20-0.5)%22%3E%3Cswitch%3E%3CforeignObject%20pointer-events%3D%22none%22%20width%3D%22100%25%22%20height%3D%22100%25%22%20requiredFeatures%3D%22http%3A%2F%2Fwww.w3.org%2FTR%2FSVG11%2Ffeature%23Extensibility%22%20style%3D%22overflow%3A%20visible%3B%20text-align%3A%20left%3B%22%3E%3Cdiv%20xmlns%3D%22http%3A%2F%2Fwww.w3.org%2F1999%2Fxhtml%22%20style%3D%22display%3A%20flex%3B%20align-items%3A%20unsafe%20center%3B%20justify-content%3A%20unsafe%20center%3B%20width%3A%2038px%3B%20height%3A%201px%3B%20padding-top%3A%20193px%3B%20margin-left%3A%20166px%3B%22%3E%3Cdiv%20data-drawio-colors%3D%22color%3A%20rgb(0%2C%200%2C%200)%3B%20%22%20style%3D%22box-sizing%3A%20border-box%3B%20font-size%3A%200px%3B%20text-align%3A%20center%3B%22%3E%3Cdiv%20style%3D%22display%3A%20inline-block%3B%20font-size%3A%2012px%3B%20font-family%3A%20Helvetica%3B%20color%3A%20rgb(0%2C%200%2C%200)%3B%20line-height%3A%201.2%3B%20pointer-events%3A%20all%3B%20font-weight%3A%20bold%3B%20white-space%3A%20normal%3B%20overflow-wrap%3A%20normal%3B%22%3EECR%3C%2Fdiv%3E%3C%2Fdiv%3E%3C%2Fdiv%3E%3C%2FforeignObject%3E%3Ctext%20x%3D%22185%22%20y%3D%22196%22%20fill%3D%22rgb(0%2C%200%2C%200)%22%20font-family%3D%22Helvetica%22%20font-size%3D%2212px%22%20text-anchor%3D%22middle%22%20font-weight%3D%22bold%22%3EECR%3C%2Ftext%3E%3C%2Fswitch%3E%3C%2Fg%3E%3C%2Fg%3E%3Cg%2F%3E%3Cg%3E%3Crect%20x%3D%22140%22%20y%3D%2238%22%20width%3D%2290%22%20height%3D%22100%22%20fill%3D%22rgb(255%2C%20255%2C%20255)%22%20stroke%3D%22rgb(0%2C%200%2C%200)%22%20stroke-dasharray%3D%223%203%22%20pointer-events%3D%22all%22%2F%3E%3C%2Fg%3E%3Cg%3E%3Crect%20x%3D%22140%22%20y%3D%2238%22%20width%3D%2275%22%20height%3D%2218%22%20fill%3D%22none%22%20stroke%3D%22none%22%20pointer-events%3D%22all%22%2F%3E%3C%2Fg%3E%3Cg%3E%3Cg%20transform%3D%22translate(-0.5%20-0.5)%22%3E%3Cswitch%3E%3CforeignObject%20pointer-events%3D%22none%22%20width%3D%22100%25%22%20height%3D%22100%25%22%20requiredFeatures%3D%22http%3A%2F%2Fwww.w3.org%2FTR%2FSVG11%2Ffeature%23Extensibility%22%20style%3D%22overflow%3A%20visible%3B%20text-align%3A%20left%3B%22%3E%3Cdiv%20xmlns%3D%22http%3A%2F%2Fwww.w3.org%2F1999%2Fxhtml%22%20style%3D%22display%3A%20flex%3B%20align-items%3A%20unsafe%20center%3B%20justify-content%3A%20unsafe%20center%3B%20width%3A%2073px%3B%20height%3A%201px%3B%20padding-top%3A%2047px%3B%20margin-left%3A%20141px%3B%22%3E%3Cdiv%20data-drawio-colors%3D%22color%3A%20rgb(0%2C%200%2C%200)%3B%20%22%20style%3D%22box-sizing%3A%20border-box%3B%20font-size%3A%200px%3B%20text-align%3A%20center%3B%22%3E%3Cdiv%20style%3D%22display%3A%20inline-block%3B%20font-size%3A%2012px%3B%20font-family%3A%20Helvetica%3B%20color%3A%20rgb(0%2C%200%2C%200)%3B%20line-height%3A%201.2%3B%20pointer-events%3A%20all%3B%20white-space%3A%20normal%3B%20overflow-wrap%3A%20normal%3B%22%3EK8s%20Cluster%3C%2Fdiv%3E%3C%2Fdiv%3E%3C%2Fdiv%3E%3C%2FforeignObject%3E%3Ctext%20x%3D%22178%22%20y%3D%2251%22%20fill%3D%22rgb(0%2C%200%2C%200)%22%20font-family%3D%22Helvetica%22%20font-size%3D%2212px%22%20text-anchor%3D%22middle%22%3EK8s%20Cluster%3C%2Ftext%3E%3C%2Fswitch%3E%3C%2Fg%3E%3C%2Fg%3E%3Cg%3E%3Crect%20x%3D%22152.5%22%20y%3D%2270%22%20width%3D%2257.5%22%20height%3D%2218%22%20fill%3D%22rgb(255%2C%20255%2C%20255)%22%20stroke%3D%22rgb(0%2C%200%2C%200)%22%20pointer-events%3D%22all%22%2F%3E%3C%2Fg%3E%3Cg%3E%3Cg%20transform%3D%22translate(-0.5%20-0.5)%22%3E%3Cswitch%3E%3CforeignObject%20pointer-events%3D%22none%22%20width%3D%22100%25%22%20height%3D%22100%25%22%20requiredFeatures%3D%22http%3A%2F%2Fwww.w3.org%2FTR%2FSVG11%2Ffeature%23Extensibility%22%20style%3D%22overflow%3A%20visible%3B%20text-align%3A%20left%3B%22%3E%3Cdiv%20xmlns%3D%22http%3A%2F%2Fwww.w3.org%2F1999%2Fxhtml%22%20style%3D%22display%3A%20flex%3B%20align-items%3A%20unsafe%20center%3B%20justify-content%3A%20unsafe%20center%3B%20width%3A%2056px%3B%20height%3A%201px%3B%20padding-top%3A%2079px%3B%20margin-left%3A%20154px%3B%22%3E%3Cdiv%20data-drawio-colors%3D%22color%3A%20rgb(0%2C%200%2C%200)%3B%20%22%20style%3D%22box-sizing%3A%20border-box%3B%20font-size%3A%200px%3B%20text-align%3A%20center%3B%22%3E%3Cdiv%20style%3D%22display%3A%20inline-block%3B%20font-size%3A%207px%3B%20font-family%3A%20Helvetica%3B%20color%3A%20rgb(0%2C%200%2C%200)%3B%20line-height%3A%201.2%3B%20pointer-events%3A%20all%3B%20white-space%3A%20normal%3B%20overflow-wrap%3A%20normal%3B%22%3EBuildKit%20(amd64)%3C%2Fdiv%3E%3C%2Fdiv%3E%3C%2Fdiv%3E%3C%2FforeignObject%3E%3Ctext%20x%3D%22181%22%20y%3D%2281%22%20fill%3D%22rgb(0%2C%200%2C%200)%22%20font-family%3D%22Helvetica%22%20font-size%3D%227px%22%20text-anchor%3D%22middle%22%3EBuildKit%20(amd64)%3C%2Ftext%3E%3C%2Fswitch%3E%3C%2Fg%3E%3C%2Fg%3E%3Cg%3E%3Crect%20x%3D%22152.5%22%20y%3D%22100%22%20width%3D%2257.5%22%20height%3D%2218%22%20fill%3D%22rgb(255%2C%20255%2C%20255)%22%20stroke%3D%22rgb(0%2C%200%2C%200)%22%20pointer-events%3D%22all%22%2F%3E%3C%2Fg%3E%3Cg%3E%3Cg%20transform%3D%22translate(-0.5%20-0.5)%22%3E%3Cswitch%3E%3CforeignObject%20pointer-events%3D%22none%22%20width%3D%22100%25%22%20height%3D%22100%25%22%20requiredFeatures%3D%22http%3A%2F%2Fwww.w3.org%2FTR%2FSVG11%2Ffeature%23Extensibility%22%20style%3D%22overflow%3A%20visible%3B%20text-align%3A%20left%3B%22%3E%3Cdiv%20xmlns%3D%22http%3A%2F%2Fwww.w3.org%2F1999%2Fxhtml%22%20style%3D%22display%3A%20flex%3B%20align-items%3A%20unsafe%20center%3B%20justify-content%3A%20unsafe%20center%3B%20width%3A%2056px%3B%20height%3A%201px%3B%20padding-top%3A%20109px%3B%20margin-left%3A%20154px%3B%22%3E%3Cdiv%20data-drawio-colors%3D%22color%3A%20rgb(0%2C%200%2C%200)%3B%20%22%20style%3D%22box-sizing%3A%20border-box%3B%20font-size%3A%200px%3B%20text-align%3A%20center%3B%22%3E%3Cdiv%20style%3D%22display%3A%20inline-block%3B%20font-size%3A%207px%3B%20font-family%3A%20Helvetica%3B%20color%3A%20rgb(0%2C%200%2C%200)%3B%20line-height%3A%201.2%3B%20pointer-events%3A%20all%3B%20white-space%3A%20normal%3B%20overflow-wrap%3A%20normal%3B%22%3EBuildKit%20(arm64)%3C%2Fdiv%3E%3C%2Fdiv%3E%3C%2Fdiv%3E%3C%2FforeignObject%3E%3Ctext%20x%3D%22181%22%20y%3D%22111%22%20fill%3D%22rgb(0%2C%200%2C%200)%22%20font-family%3D%22Helvetica%22%20font-size%3D%227px%22%20text-anchor%3D%22middle%22%3EBuildKit%20(arm64)%3C%2Ftext%3E%3C%2Fswitch%3E%3C%2Fg%3E%3C%2Fg%3E%3Cg%3E%3Cpath%20d%3D%22M%20221%20109%20L%20221%2079%20L%20210%2079%22%20fill%3D%22none%22%20stroke%3D%22rgb(0%2C%200%2C%200)%22%20stroke-miterlimit%3D%2210%22%20pointer-events%3D%22stroke%22%2F%3E%3C%2Fg%3E%3Cg%2F%3E%3Cg%3E%3Crect%20x%3D%22280%22%20y%3D%2238%22%20width%3D%2290%22%20height%3D%22100%22%20fill%3D%22rgb(255%2C%20255%2C%20255)%22%20stroke%3D%22rgb(0%2C%200%2C%200)%22%20stroke-dasharray%3D%223%203%22%20pointer-events%3D%22all%22%2F%3E%3C%2Fg%3E%3Cg%3E%3Crect%20x%3D%22280%22%20y%3D%2238%22%20width%3D%2275%22%20height%3D%2218%22%20fill%3D%22none%22%20stroke%3D%22none%22%20pointer-events%3D%22all%22%2F%3E%3C%2Fg%3E%3Cg%3E%3Cg%20transform%3D%22translate(-0.5%20-0.5)%22%3E%3Cswitch%3E%3CforeignObject%20pointer-events%3D%22none%22%20width%3D%22100%25%22%20height%3D%22100%25%22%20requiredFeatures%3D%22http%3A%2F%2Fwww.w3.org%2FTR%2FSVG11%2Ffeature%23Extensibility%22%20style%3D%22overflow%3A%20visible%3B%20text-align%3A%20left%3B%22%3E%3Cdiv%20xmlns%3D%22http%3A%2F%2Fwww.w3.org%2F1999%2Fxhtml%22%20style%3D%22display%3A%20flex%3B%20align-items%3A%20unsafe%20center%3B%20justify-content%3A%20unsafe%20center%3B%20width%3A%2073px%3B%20height%3A%201px%3B%20padding-top%3A%2047px%3B%20margin-left%3A%20281px%3B%22%3E%3Cdiv%20data-drawio-colors%3D%22color%3A%20rgb(0%2C%200%2C%200)%3B%20%22%20style%3D%22box-sizing%3A%20border-box%3B%20font-size%3A%200px%3B%20text-align%3A%20center%3B%22%3E%3Cdiv%20style%3D%22display%3A%20inline-block%3B%20font-size%3A%2012px%3B%20font-family%3A%20Helvetica%3B%20color%3A%20rgb(0%2C%200%2C%200)%3B%20line-height%3A%201.2%3B%20pointer-events%3A%20all%3B%20white-space%3A%20normal%3B%20overflow-wrap%3A%20normal%3B%22%3EK8s%20Cluster%3C%2Fdiv%3E%3C%2Fdiv%3E%3C%2Fdiv%3E%3C%2FforeignObject%3E%3Ctext%20x%3D%22318%22%20y%3D%2251%22%20fill%3D%22rgb(0%2C%200%2C%200)%22%20font-family%3D%22Helvetica%22%20font-size%3D%2212px%22%20text-anchor%3D%22middle%22%3EK8s%20Cluster%3C%2Ftext%3E%3C%2Fswitch%3E%3C%2Fg%3E%3C%2Fg%3E%3Cg%2F%3E%3Cg%3E%3Crect%20x%3D%22421%22%20y%3D%2238%22%20width%3D%2290%22%20height%3D%22100%22%20fill%3D%22rgb(255%2C%20255%2C%20255)%22%20stroke%3D%22rgb(0%2C%200%2C%200)%22%20stroke-dasharray%3D%223%203%22%20pointer-events%3D%22all%22%2F%3E%3C%2Fg%3E%3Cg%3E%3Crect%20x%3D%22421%22%20y%3D%2238%22%20width%3D%2275%22%20height%3D%2218%22%20fill%3D%22none%22%20stroke%3D%22none%22%20pointer-events%3D%22all%22%2F%3E%3C%2Fg%3E%3Cg%3E%3Cg%20transform%3D%22translate(-0.5%20-0.5)%22%3E%3Cswitch%3E%3CforeignObject%20pointer-events%3D%22none%22%20width%3D%22100%25%22%20height%3D%22100%25%22%20requiredFeatures%3D%22http%3A%2F%2Fwww.w3.org%2FTR%2FSVG11%2Ffeature%23Extensibility%22%20style%3D%22overflow%3A%20visible%3B%20text-align%3A%20left%3B%22%3E%3Cdiv%20xmlns%3D%22http%3A%2F%2Fwww.w3.org%2F1999%2Fxhtml%22%20style%3D%22display%3A%20flex%3B%20align-items%3A%20unsafe%20center%3B%20justify-content%3A%20unsafe%20center%3B%20width%3A%2073px%3B%20height%3A%201px%3B%20padding-top%3A%2047px%3B%20margin-left%3A%20422px%3B%22%3E%3Cdiv%20data-drawio-colors%3D%22color%3A%20rgb(0%2C%200%2C%200)%3B%20%22%20style%3D%22box-sizing%3A%20border-box%3B%20font-size%3A%200px%3B%20text-align%3A%20center%3B%22%3E%3Cdiv%20style%3D%22display%3A%20inline-block%3B%20font-size%3A%2012px%3B%20font-family%3A%20Helvetica%3B%20color%3A%20rgb(0%2C%200%2C%200)%3B%20line-height%3A%201.2%3B%20pointer-events%3A%20all%3B%20white-space%3A%20normal%3B%20overflow-wrap%3A%20normal%3B%22%3EK8s%20Cluster%3C%2Fdiv%3E%3C%2Fdiv%3E%3C%2Fdiv%3E%3C%2FforeignObject%3E%3Ctext%20x%3D%22459%22%20y%3D%2251%22%20fill%3D%22rgb(0%2C%200%2C%200)%22%20font-family%3D%22Helvetica%22%20font-size%3D%2212px%22%20text-anchor%3D%22middle%22%3EK8s%20Cluster%3C%2Ftext%3E%3C%2Fswitch%3E%3C%2Fg%3E%3C%2Fg%3E%3Cg%3E%3Crect%20x%3D%22290%22%20y%3D%220%22%20width%3D%2270%22%20height%3D%2230%22%20fill%3D%22none%22%20stroke%3D%22none%22%20pointer-events%3D%22all%22%2F%3E%3C%2Fg%3E%3Cg%3E%3Cg%20transform%3D%22translate(-0.5%20-0.5)%22%3E%3Cswitch%3E%3CforeignObject%20pointer-events%3D%22none%22%20width%3D%22100%25%22%20height%3D%22100%25%22%20requiredFeatures%3D%22http%3A%2F%2Fwww.w3.org%2FTR%2FSVG11%2Ffeature%23Extensibility%22%20style%3D%22overflow%3A%20visible%3B%20text-align%3A%20left%3B%22%3E%3Cdiv%20xmlns%3D%22http%3A%2F%2Fwww.w3.org%2F1999%2Fxhtml%22%20style%3D%22display%3A%20flex%3B%20align-items%3A%20unsafe%20center%3B%20justify-content%3A%20unsafe%20center%3B%20width%3A%201px%3B%20height%3A%201px%3B%20padding-top%3A%2015px%3B%20margin-left%3A%20325px%3B%22%3E%3Cdiv%20data-drawio-colors%3D%22color%3A%20rgb(0%2C%200%2C%200)%3B%20%22%20style%3D%22box-sizing%3A%20border-box%3B%20font-size%3A%200px%3B%20text-align%3A%20center%3B%22%3E%3Cdiv%20style%3D%22display%3A%20inline-block%3B%20font-size%3A%2014px%3B%20font-family%3A%20Helvetica%3B%20color%3A%20rgb(0%2C%200%2C%200)%3B%20line-height%3A%201.2%3B%20pointer-events%3A%20all%3B%20font-weight%3A%20bold%3B%20white-space%3A%20nowrap%3B%22%3EStaging%3C%2Fdiv%3E%3C%2Fdiv%3E%3C%2Fdiv%3E%3C%2FforeignObject%3E%3Ctext%20x%3D%22325%22%20y%3D%2219%22%20fill%3D%22rgb(0%2C%200%2C%200)%22%20font-family%3D%22Helvetica%22%20font-size%3D%2214px%22%20text-anchor%3D%22middle%22%20font-weight%3D%22bold%22%3EStaging%3C%2Ftext%3E%3C%2Fswitch%3E%3C%2Fg%3E%3C%2Fg%3E%3Cg%3E%3Crect%20x%3D%22421%22%20y%3D%220%22%20width%3D%2290%22%20height%3D%2230%22%20fill%3D%22none%22%20stroke%3D%22none%22%20pointer-events%3D%22all%22%2F%3E%3C%2Fg%3E%3Cg%3E%3Cg%20transform%3D%22translate(-0.5%20-0.5)%22%3E%3Cswitch%3E%3CforeignObject%20pointer-events%3D%22none%22%20width%3D%22100%25%22%20height%3D%22100%25%22%20requiredFeatures%3D%22http%3A%2F%2Fwww.w3.org%2FTR%2FSVG11%2Ffeature%23Extensibility%22%20style%3D%22overflow%3A%20visible%3B%20text-align%3A%20left%3B%22%3E%3Cdiv%20xmlns%3D%22http%3A%2F%2Fwww.w3.org%2F1999%2Fxhtml%22%20style%3D%22display%3A%20flex%3B%20align-items%3A%20unsafe%20center%3B%20justify-content%3A%20unsafe%20center%3B%20width%3A%201px%3B%20height%3A%201px%3B%20padding-top%3A%2015px%3B%20margin-left%3A%20466px%3B%22%3E%3Cdiv%20data-drawio-colors%3D%22color%3A%20rgb(0%2C%200%2C%200)%3B%20%22%20style%3D%22box-sizing%3A%20border-box%3B%20font-size%3A%200px%3B%20text-align%3A%20center%3B%22%3E%3Cdiv%20style%3D%22display%3A%20inline-block%3B%20font-size%3A%2014px%3B%20font-family%3A%20Helvetica%3B%20color%3A%20rgb(0%2C%200%2C%200)%3B%20line-height%3A%201.2%3B%20pointer-events%3A%20all%3B%20font-weight%3A%20bold%3B%20white-space%3A%20nowrap%3B%22%3EProduction%3C%2Fdiv%3E%3C%2Fdiv%3E%3C%2Fdiv%3E%3C%2FforeignObject%3E%3Ctext%20x%3D%22466%22%20y%3D%2219%22%20fill%3D%22rgb(0%2C%200%2C%200)%22%20font-family%3D%22Helvetica%22%20font-size%3D%2214px%22%20text-anchor%3D%22middle%22%20font-weight%3D%22bold%22%3EProduction%3C%2Ftext%3E%3C%2Fswitch%3E%3C%2Fg%3E%3C%2Fg%3E%3Cg%3E%3Cpath%20d%3D%22M%20210%20109%20L%20221%20109%20L%20221%20131%20L%20185%20131%20L%20185%20143.63%22%20fill%3D%22none%22%20stroke%3D%22rgb(0%2C%200%2C%200)%22%20stroke-miterlimit%3D%2210%22%20pointer-events%3D%22stroke%22%2F%3E%3Cpath%20d%3D%22M%20185%20148.88%20L%20181.5%20141.88%20L%20185%20143.63%20L%20188.5%20141.88%20Z%22%20fill%3D%22rgb(0%2C%200%2C%200)%22%20stroke%3D%22rgb(0%2C%200%2C%200)%22%20stroke-miterlimit%3D%2210%22%20pointer-events%3D%22all%22%2F%3E%3C%2Fg%3E%3Cg%3E%3Cpath%20d%3D%22M%20205%20180%20L%20325%20180%20L%20325%20144.37%22%20fill%3D%22none%22%20stroke%3D%22rgb(0%2C%200%2C%200)%22%20stroke-miterlimit%3D%2210%22%20pointer-events%3D%22stroke%22%2F%3E%3Cpath%20d%3D%22M%20325%20139.12%20L%20328.5%20146.12%20L%20325%20144.37%20L%20321.5%20146.12%20Z%22%20fill%3D%22rgb(0%2C%200%2C%200)%22%20stroke%3D%22rgb(0%2C%200%2C%200)%22%20stroke-miterlimit%3D%2210%22%20pointer-events%3D%22all%22%2F%3E%3C%2Fg%3E%3Cg%3E%3Cpath%20d%3D%22M%20325%20180%20L%20466%20180%20L%20466%20144.37%22%20fill%3D%22none%22%20stroke%3D%22rgb(0%2C%200%2C%200)%22%20stroke-miterlimit%3D%2210%22%20pointer-events%3D%22stroke%22%2F%3E%3Cpath%20d%3D%22M%20466%20139.12%20L%20469.5%20146.12%20L%20466%20144.37%20L%20462.5%20146.12%20Z%22%20fill%3D%22rgb(0%2C%200%2C%200)%22%20stroke%3D%22rgb(0%2C%200%2C%200)%22%20stroke-miterlimit%3D%2210%22%20pointer-events%3D%22all%22%2F%3E%3C%2Fg%3E%3Cg%3E%3Cpath%20d%3D%22M%20223%20180%20L%20222.91%20144.17%22%20fill%3D%22none%22%20stroke%3D%22rgb(0%2C%200%2C%200)%22%20stroke-miterlimit%3D%2210%22%20pointer-events%3D%22stroke%22%2F%3E%3Cpath%20d%3D%22M%20222.89%20138.92%20L%20226.41%20145.91%20L%20222.91%20144.17%20L%20219.41%20145.93%20Z%22%20fill%3D%22rgb(0%2C%200%2C%200)%22%20stroke%3D%22rgb(0%2C%200%2C%200)%22%20stroke-miterlimit%3D%2210%22%20pointer-events%3D%22all%22%2F%3E%3C%2Fg%3E%3Cg%3E%3Cpath%20d%3D%22M%20115%20210%20L%20115%200%22%20fill%3D%22none%22%20stroke%3D%22rgb(0%2C%200%2C%200)%22%20stroke-miterlimit%3D%2210%22%20stroke-dasharray%3D%223%203%22%20pointer-events%3D%22stroke%22%2F%3E%3C%2Fg%3E%3Cg%3E%3Crect%20x%3D%220%22%20y%3D%220%22%20width%3D%22100%22%20height%3D%2230%22%20fill%3D%22none%22%20stroke%3D%22none%22%20pointer-events%3D%22all%22%2F%3E%3C%2Fg%3E%3Cg%3E%3Cg%20transform%3D%22translate(-0.5%20-0.5)%22%3E%3Cswitch%3E%3CforeignObject%20pointer-events%3D%22none%22%20width%3D%22100%25%22%20height%3D%22100%25%22%20requiredFeatures%3D%22http%3A%2F%2Fwww.w3.org%2FTR%2FSVG11%2Ffeature%23Extensibility%22%20style%3D%22overflow%3A%20visible%3B%20text-align%3A%20left%3B%22%3E%3Cdiv%20xmlns%3D%22http%3A%2F%2Fwww.w3.org%2F1999%2Fxhtml%22%20style%3D%22display%3A%20flex%3B%20align-items%3A%20unsafe%20center%3B%20justify-content%3A%20unsafe%20center%3B%20width%3A%201px%3B%20height%3A%201px%3B%20padding-top%3A%2015px%3B%20margin-left%3A%2050px%3B%22%3E%3Cdiv%20data-drawio-colors%3D%22color%3A%20rgb(0%2C%200%2C%200)%3B%20%22%20style%3D%22box-sizing%3A%20border-box%3B%20font-size%3A%200px%3B%20text-align%3A%20center%3B%22%3E%3Cdiv%20style%3D%22display%3A%20inline-block%3B%20font-size%3A%2014px%3B%20font-family%3A%20Helvetica%3B%20color%3A%20rgb(0%2C%200%2C%200)%3B%20line-height%3A%201.2%3B%20pointer-events%3A%20all%3B%20font-weight%3A%20bold%3B%20white-space%3A%20nowrap%3B%22%3ELocal%20%2F%20CICD%3C%2Fdiv%3E%3C%2Fdiv%3E%3C%2Fdiv%3E%3C%2FforeignObject%3E%3Ctext%20x%3D%2250%22%20y%3D%2219%22%20fill%3D%22rgb(0%2C%200%2C%200)%22%20font-family%3D%22Helvetica%22%20font-size%3D%2214px%22%20text-anchor%3D%22middle%22%20font-weight%3D%22bold%22%3ELocal%20%2F%20CICD%3C%2Ftext%3E%3C%2Fswitch%3E%3C%2Fg%3E%3C%2Fg%3E%3Cg%2F%3E%3Cg%3E%3Crect%20x%3D%225%22%20y%3D%2240%22%20width%3D%2290%22%20height%3D%22100%22%20fill%3D%22rgb(255%2C%20255%2C%20255)%22%20stroke%3D%22rgb(0%2C%200%2C%200)%22%20stroke-dasharray%3D%223%203%22%20pointer-events%3D%22all%22%2F%3E%3C%2Fg%3E%3Cg%3E%3Crect%20x%3D%229.01%22%20y%3D%2240%22%20width%3D%2275%22%20height%3D%2218%22%20fill%3D%22none%22%20stroke%3D%22none%22%20pointer-events%3D%22all%22%2F%3E%3C%2Fg%3E%3Cg%3E%3Cg%20transform%3D%22translate(-0.5%20-0.5)%22%3E%3Cswitch%3E%3CforeignObject%20pointer-events%3D%22none%22%20width%3D%22100%25%22%20height%3D%22100%25%22%20requiredFeatures%3D%22http%3A%2F%2Fwww.w3.org%2FTR%2FSVG11%2Ffeature%23Extensibility%22%20style%3D%22overflow%3A%20visible%3B%20text-align%3A%20left%3B%22%3E%3Cdiv%20xmlns%3D%22http%3A%2F%2Fwww.w3.org%2F1999%2Fxhtml%22%20style%3D%22display%3A%20flex%3B%20align-items%3A%20unsafe%20center%3B%20justify-content%3A%20unsafe%20center%3B%20width%3A%2073px%3B%20height%3A%201px%3B%20padding-top%3A%2049px%3B%20margin-left%3A%2010px%3B%22%3E%3Cdiv%20data-drawio-colors%3D%22color%3A%20rgb(0%2C%200%2C%200)%3B%20%22%20style%3D%22box-sizing%3A%20border-box%3B%20font-size%3A%200px%3B%20text-align%3A%20center%3B%22%3E%3Cdiv%20style%3D%22display%3A%20inline-block%3B%20font-size%3A%2012px%3B%20font-family%3A%20Helvetica%3B%20color%3A%20rgb(0%2C%200%2C%200)%3B%20line-height%3A%201.2%3B%20pointer-events%3A%20all%3B%20white-space%3A%20normal%3B%20overflow-wrap%3A%20normal%3B%22%3EBuild%20Context%3C%2Fdiv%3E%3C%2Fdiv%3E%3C%2Fdiv%3E%3C%2FforeignObject%3E%3Ctext%20x%3D%2247%22%20y%3D%2253%22%20fill%3D%22rgb(0%2C%200%2C%200)%22%20font-family%3D%22Helvetica%22%20font-size%3D%2212px%22%20text-anchor%3D%22middle%22%3EBuild%20Context%3C%2Ftext%3E%3C%2Fswitch%3E%3C%2Fg%3E%3C%2Fg%3E%3Cg%3E%3Crect%20x%3D%2224.64%22%20y%3D%2262.5%22%20width%3D%2243.75%22%20height%3D%2263%22%20fill%3D%22rgb(255%2C%20255%2C%20255)%22%20stroke%3D%22rgb(0%2C%200%2C%200)%22%20pointer-events%3D%22all%22%2F%3E%3C%2Fg%3E%3Cg%3E%3Cg%20transform%3D%22translate(-0.5%20-0.5)%22%3E%3Cswitch%3E%3CforeignObject%20pointer-events%3D%22none%22%20width%3D%22100%25%22%20height%3D%22100%25%22%20requiredFeatures%3D%22http%3A%2F%2Fwww.w3.org%2FTR%2FSVG11%2Ffeature%23Extensibility%22%20style%3D%22overflow%3A%20visible%3B%20text-align%3A%20left%3B%22%3E%3Cdiv%20xmlns%3D%22http%3A%2F%2Fwww.w3.org%2F1999%2Fxhtml%22%20style%3D%22display%3A%20flex%3B%20align-items%3A%20unsafe%20flex-start%3B%20justify-content%3A%20unsafe%20center%3B%20width%3A%2042px%3B%20height%3A%201px%3B%20padding-top%3A%2070px%3B%20margin-left%3A%2026px%3B%22%3E%3Cdiv%20data-drawio-colors%3D%22color%3A%20rgb(0%2C%200%2C%200)%3B%20%22%20style%3D%22box-sizing%3A%20border-box%3B%20font-size%3A%200px%3B%20text-align%3A%20center%3B%22%3E%3Cdiv%20style%3D%22display%3A%20inline-block%3B%20font-size%3A%2012px%3B%20font-family%3A%20Helvetica%3B%20color%3A%20rgb(0%2C%200%2C%200)%3B%20line-height%3A%201.2%3B%20pointer-events%3A%20all%3B%20white-space%3A%20normal%3B%20overflow-wrap%3A%20normal%3B%22%3E%3Cfont%20style%3D%22font-size%3A%208px%3B%22%3EDockerfile%3C%2Ffont%3E%3C%2Fdiv%3E%3C%2Fdiv%3E%3C%2Fdiv%3E%3C%2FforeignObject%3E%3Ctext%20x%3D%2247%22%20y%3D%2282%22%20fill%3D%22rgb(0%2C%200%2C%200)%22%20font-family%3D%22Helvetica%22%20font-size%3D%2212px%22%20text-anchor%3D%22middle%22%3EDockerf...%3C%2Ftext%3E%3C%2Fswitch%3E%3C%2Fg%3E%3C%2Fg%3E%3Cg%3E%3Cpath%20d%3D%22M%2095%2090%20L%20146.25%2080.2%22%20fill%3D%22none%22%20stroke%3D%22rgb(0%2C%200%2C%200)%22%20stroke-miterlimit%3D%2210%22%20pointer-events%3D%22stroke%22%2F%3E%3Cpath%20d%3D%22M%20151.4%2079.21%20L%20145.18%2083.96%20L%20146.25%2080.2%20L%20143.87%2077.09%20Z%22%20fill%3D%22rgb(0%2C%200%2C%200)%22%20stroke%3D%22rgb(0%2C%200%2C%200)%22%20stroke-miterlimit%3D%2210%22%20pointer-events%3D%22all%22%2F%3E%3C%2Fg%3E%3Cg%3E%3Cpath%20d%3D%22M%2095%2090%20L%20146.45%20107%22%20fill%3D%22none%22%20stroke%3D%22rgb(0%2C%200%2C%200)%22%20stroke-miterlimit%3D%2210%22%20pointer-events%3D%22stroke%22%2F%3E%3Cpath%20d%3D%22M%20151.44%20108.65%20L%20143.69%20109.78%20L%20146.45%20107%20L%20145.89%20103.13%20Z%22%20fill%3D%22rgb(0%2C%200%2C%200)%22%20stroke%3D%22rgb(0%2C%200%2C%200)%22%20stroke-miterlimit%3D%2210%22%20pointer-events%3D%22all%22%2F%3E%3C%2Fg%3E%3C%2Fg%3E%3Cswitch%3E%3Cg%20requiredFeatures%3D%22http%3A%2F%2Fwww.w3.org%2FTR%2FSVG11%2Ffeature%23Extensibility%22%2F%3E%3Ca%20transform%3D%22translate(0%2C-5)%22%20xlink%3Ahref%3D%22https%3A%2F%2Fwww.drawio.com%2Fdoc%2Ffaq%2Fsvg-export-text-problems%22%20target%3D%22_blank%22%3E%3Ctext%20text-anchor%3D%22middle%22%20font-size%3D%2210px%22%20x%3D%2250%25%22%20y%3D%22100%25%22%3EText%20is%20not%20SVG%20-%20cannot%20display%3C%2Ftext%3E%3C%2Fa%3E%3C%2Fswitch%3E%3C%2Fsvg%3E)
BuildKit should run in the lowest environment for the following reasons:
All developers should have direct access to the build servers as they will use them in their daily development workflow.
Builds are bursty workloads that may cause disruption to workloads running on the same node. For example, they might saturate the network bandwidth by downloading many dependencies all at once.
BuildKit runs arbitrary code with elevated privileges as build processes are given more permissions than runtime processes. If code does escape the build sandbox, it should not be able to access your sensitive systems.
BuildKit runs inside a Kubernetes cluster. If you have multiple clusters in your environment, you only need to deploy BuildKit to one.
BuildKit should push generated images to an Elastic Container Registry (ECR) in the same environment where it itself is hosted so that it does not need to be granted cross-environment permissions.
All environments will have permission to pull images from this registry as every build should only be done once (not per-environment). This ensures that container behavior will not change as code is promoted across environments. Additionally, images should be configured as immutable so that they can not be tampered with after creation.
Once you have chosen the cluster you will deploy BuildKit to, you are ready for the installation.
Install the Module
We provide a module, kube_buildkit, for deploying the BuildKit servers.
Let’s deploy it now:
In the region with the cluster you wish to deploy BuildKit to, add a new directory called
kube_buildkit.Add a
terragrunt.hclthat looks like this:14 collapsed linesinclude "panfactum" {path = find_in_parent_folders("panfactum.hcl")expose = true}terraform {source = include.panfactum.locals.pf_stack_source}dependency "kyverno" {config_path = "../kube_kyverno"skip_outputs = true}inputs = {}Run
pf-tf-initto enable the required providers.Run
terragrunt apply.
Note that the BuildKit system deployed by this module is horizontally autoscaled to dynamically adjust to your capacity needs. Additionally, it will scale to zero when not in use.
By default, the builders are sized at 2 vCPU / 8 GB RAM, but you can adjust these settings via the module inputs.
Deploy ECR Repositories
We recommend pushing new container images to AWS Elastic Container Registry (ECR) as this is the easiest way to consume images from within your Kubernetes clusters.
We provide a module for configuring ECR with your image repositories: aws_ecr_repos.
Note that a registry is the domain name (e.g., 5555555555.dkr.ecr.us-east-2.amazonaws.com), a repository is a specific namespace for images in the registry (e.g., my_image), and a tag is an arbitrary identifier for single image in the repository. Together these form a unique image identifier (e.g., 5555555555.dkr.ecr.us-east-2.amazonaws.com/my_image:some_tag) which conveniently also specifies where to push and pull the image from.
Let’s set up a test image repository, so we can demonstrate how to build images with BuildKit:
Adjacent to your
kube_buildkitdirectory, add a new directory calledaws_ecr_repos.Add a
terragrunt.hclthat looks like this:9 collapsed linesinclude "panfactum" {path = find_in_parent_folders("panfactum.hcl")expose = true}terraform {source = include.panfactum.locals.pf_stack_source}inputs = {ecr_repositories = {test = {}}}For now, set
ecr_repositoriesto{ test = {} }. This creates a test repository that you can push images to. You can add additional repositories later.Run
pf-tf-initto enable the required providers.Run
terragrunt apply.
Configuration Files
To connect your local tooling to both the BuildKit servers and your ECR repositories, you must add some additional configuration to your repository. Specifically, you must create a <buildkit_dir>/config.yaml (reference docs).
Let’s do this now:
You should already have a
buildkit_dirdirectory in your repository (defaults to.buildkit). In it, you should see aconfig.example.yaml. Copy that file toconfig.yaml.Update
moduleto the path of thekube_buildkitmodule you deployed earlier.Update
bastionto the name of the bastion deployed in the Kubernetes cluster running BuildKit. See your<ssh_dir>/config.yaml.Run
pf-update-buildkit --buildto build the generated configuration files that will be used to connect to BuildKit and ECR.
Build an Image
Now anyone on your team can use the remote BuildKit servers to build and push multi-platform container images right from their local machine.
Let’s test this out.
Create a simple Dockerfile (
Dockerfile) in the root of your repository:FROM ubuntu/nginxCreate an adjacent .dockerignore (
.dockerignore). The.dockeringorefile follows.gitignoresyntax and ignored files will not be sent to BuildKit in the build context.Setting this up correctly is critically important. Removing unnecessary files from the build context prevents local secrets from accidentally being included in your builds and also improves overall build performance, especially since the build context must be transferred over the network to BuildKit.
For these reasons, we recommend an ignore-by-default approach:
# Ignore-by-default*# Example of including a specific file or directory!some/pathWe provide a utility
pf-buildkit-buildthat will automatically submit your builds to BuildKit. Run it now from the root of your repository:pf-buildkit-build --repo=test --tag=test --context=. --file=./Dockerfile.This command automatically takes care of turning on BuildKit (if necessary), selecting the instance with the most free capacity, establishing a secure remote network tunnel, submitting builds for both arm64 and amd64 platform architectures, setting up the cache, pushing to ECR, and generating the multi-platform image manifest.
If all goes well, you should see output that looks like this:
Terminal window statefulset.apps/buildkit-arm64 scaledstatefulset.apps/buildkit-amd64 scaledarm64: Waiting 599 seconds for at least one BuildKit replica to become available...amd64: Waiting 599 seconds for at least one BuildKit replica to become available...arm64: Waiting 589 seconds for at least one BuildKit replica to become available...amd64: #1 [internal] load build definition from ./Dockerfileamd64: #1 transferring dockerfile: 29B 0.1sarm64: #1 [internal] load build definition from ./Dockerfilearm64: #1 transferring dockerfile: 54B 0.2s doneamd64: #1 transferring dockerfile: 54B 0.2s donearm64: #1 DONE 0.2sarm64:arm64: #2 [internal] load metadata for docker.io/ubuntu/nginx:latestamd64: #1 DONE 0.2samd64:amd64: #2 [internal] load metadata for docker.io/ubuntu/nginx:latestarm64: #2 DONE 0.4samd64: #2 DONE 0.4s...amd64: #6 exporting to imageamd64: #6 pushing layers 1.1s doneamd64: #6 pushing manifest for 891377197483.dkr.ecr.us-east-2.amazonaws.com/test:test-amd64@sha256:b6e2ca2f347b515a158fdb18bd1cb2f4c7b69ac5f9be9fa037bff62df2b7ffd1arm64: #6 pushing manifest for 891377197483.dkr.ecr.us-east-2.amazonaws.com/test:test-arm64@sha256:b501fac8d78b9db276549bab5cc38784e0bfd7758062741f0716abbbbd690740 0.1s donearm64: #6 DONE 1.1sarm64:arm64: #8 exporting cache to Amazon S3arm64: #8 preparing build cache for export 0.1s donearm64: #8 DONE 0.1samd64: #6 pushing manifest for 891377197483.dkr.ecr.us-east-2.amazonaws.com/test:test-amd64@sha256:b6e2ca2f347b515a158fdb18bd1cb2f4c7b69ac5f9be9fa037bff62df2b7ffd1 0.1s doneamd64: #6 DONE 1.1samd64:amd64: #8 exporting cache to Amazon S3amd64: #8 preparing build cache for export 0.1s doneamd64: #8 DONE 0.1sDigest: sha256:3e2cb9822cabdb580c825d5bf3ec53e52df9d18871f1a0a1086f17d57b01f020 710Closing build processes...Log into the AWS web console and navigate to the ECR. Select the “test” repository under the Private Registry section. Notice that your image should now be available.
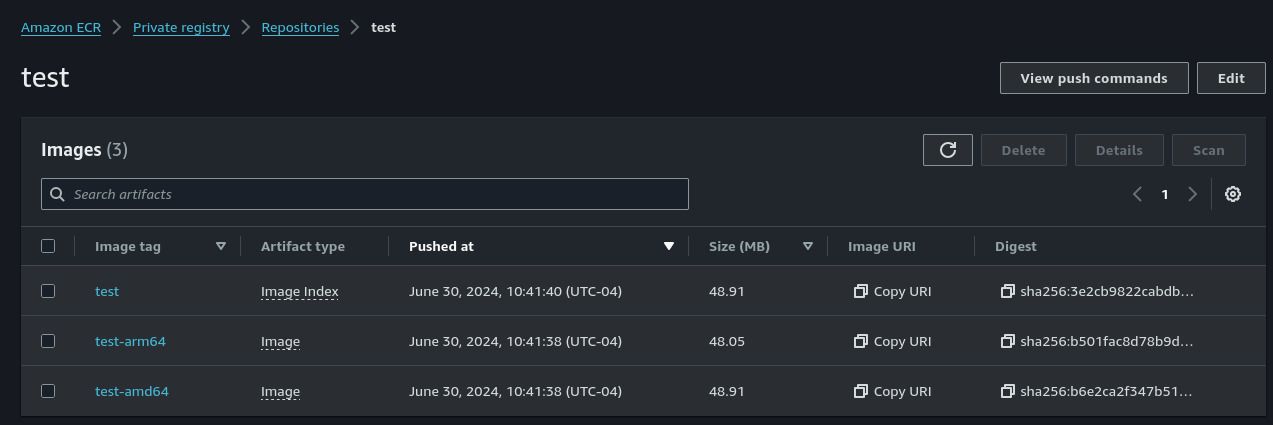
Notice there are three entries: one for each system architecture (
amd64andarm64) and the multi-platform manifest that is labeled as an Image Index.The multi-platform manifest allows you to use a single tag (in this case
test), and the right image (eithertest-amd64ortest-arm64) for your system architecture will automatically be pulled from the registry. This unlocks the ability to create a single deployment that can run either amd64 or arm64 nodes.You can now pull and run this image locally as well:
podman run --rm -it 891377197483.dkr.ecr.us-east-2.amazonaws.com/test:test. Replace891377197483.dkr.ecr.us-east-2.amazonaws.comwith your registry name (clickCopy URI).If you run this command from inside the repository, our devShell will automatically take care of registry authentication for you.
Next Steps
BuildKit is now ready for your organization to use. We recommend taking a look at the following guides for putting it to use:
Building images in CI pipelines (TODO)
Using BuildKit in local development (TODO)